SteveAndBelle
-
Posts
115 -
Joined
-
Last visited
-
Days Won
1
Content Type
Profiles
Forums
Events
Gallery
Tutorials
News & Articles
Videos
Everything posted by SteveAndBelle
-

DAB+ into a 2013 Corolla ZRE182R?
SteveAndBelle replied to SteveAndBelle's topic in Audio/Video/Electronics
Ha, it's what it was on at the time :) -
DAB+ into a 2013 Corolla ZRE182R?
SteveAndBelle replied to SteveAndBelle's topic in Audio/Video/Electronics
The harness arrived on Friday so I decided to begin the install today... even though the good antennas still a couple of weeks away. I soldered up the Red, White & Yellow AV cable supplied with the Digital Tuner directly to the pins on the harness and grounded the AV detection pin but no matter what I did I couldn't get it working as it was before. Over an hour later I decided to disconnect all plugs from the head unit then reconnect them 20 seconds later just to give it a decent reset. Bingo, the AV input worked again so it must've shut itself down while I was playing around with it. Connected the Digital Tuner and was watching crystal clear Digital TV and listening to DAB+ soon after. I then dealt with the handbrake sensor and speed sensor and took the car for a spin. Apart from the so-so reception from the tiny magnetic antenna supplied with the Tuner it worked perfectly so once the amplifier stick-on antenna arrives it should be as close to perfect as it can be. I've put it all back to stock (a 5 second job thanks to the harness) while I wait for the antenna to arrive but I've attached a couple of shots of the harness and a shot of the head unit displaying Channel 7 News just to show it working . Any questions please feel free to ask.
-
DAB+ into a 2013 Corolla ZRE182R?
SteveAndBelle replied to SteveAndBelle's topic in Audio/Video/Electronics
UPDATE: my Xtrons 'Car Digital TV Receiver' (http://go.redirectingat.com/?id=2061X573376&site=au.toyotaownersclub.com&xs=1&isjs=1&url=http%3A%2F%2Fwww.ebay.com.au%2Fitm%2FCar-Mobile-Free-View-DVB-T-Digital-TV-Receiver-Box-MPEG-2-Antenna-USB-SD-Slot-%2F121121942924%3Fpt%3DLH_DefaultDomain_15%26hash%3Ditem1c336e2d8c&xguid=3470d32adc6bc90dc2716c509181582e&xuuid=fd5d86ee53f809af1a4c1752787899fa&xsessid=dfb67205264bd98c753e6ab224e39d6a&xcreo=0&xed=0&sref=http%3A%2F%2Fau.toyotaownersclub.com%2Fforums%2Ftopic%2F51465-dab-into-a-2013-corolla-zre182r%2F&pref=http%3A%2F%2Fau.toyotaownersclub.com%2Fforums%2Findex.php%3Fapp%3Dcore%26module%3Dglobal%26section%3Dlogin&xtz=-600) arrived yesterday. 10 days from China, not too shabby! I ripped it out of its box, connected it to a TV and had a play. Seems to work quite well when on the test bench however I know the supplied magnetic antenna isn't going to hold up receiving DAB+ signals while moving so I've ordered a couple of these stick-on amplified antennas to experiment with: http://www.ebay.com.au/itm/351422658564?_trksid=p2057872.m2749.l2649&ssPageName=STRK%3AMEBIDX%3AIT Still waiting for the harness (pictured above) to arrive before I get back into pulling the dash apart but so far all seems to be looking good. -
Preparing to install Pioneer Android Auto Unit in ZRE152R
SteveAndBelle replied to cosmicr's topic in Audio/Video/Electronics
Hmm, mounting the camera is probably the easiest part of the install, running the cables is the frustrating part ;) You call but personally I'd stick with the Pioneer camera. Not as old as me... but not as 'young' as I thought :p I'd be fitting the head unit and possibly a small Sub then re-evaluate the need to go to town with replacement speakers and treat them as a separate upgrade later on if reuqired. I noticed a big improvement after replacing the head unit even just with the stock speakers but each to their own as no-one hears the same things the same way as anyone one else plus I don't exactly crank my system these days anyway ;) -
Preparing to install Pioneer Android Auto Unit in ZRE152R
SteveAndBelle replied to cosmicr's topic in Audio/Video/Electronics
1. Not sure as different cars & different adaptors may have different harnesses. I just grounded the Pioneers park brake wire as I was lazy plus I knew I'd never use the head unit to play videos but as you may/may not be aware it is in fact ILLEGAL to play videos on a head unit while the car is moving and I assume it's therefore against the law not to connect that wire to the hand brake so keep that in mind when installing yours. You may have to get two feeds from your reverse light circuit, one to power the camera and the other to send up the side of the car with the camera signal cable to connect to the violet/white wire so the head unit knows when you've put it in reverse. You could also just find the live reverse wire direct from the gearbox however you'll be running a signal wire from the camera to the head unit anyway so it's easy enough to run another small wire at the same time. 2. You'll be right to power the camera direct from the reverse light circuit as they don't consume much power at all. Interesting to know if the camera comes with its own fuse though because if it doesn't it might be a good idea to put one in. You shouldn't have to and it's probably just me being OTT but it wont hurt! The reverse lights are on the lighting fuse anyway so if something did go wrong with the camera it will simply blow the main lighting fuse. No biggie. 3. Sounds like a good place for the camera, especially if you only need to drill/screw into plastic. 4. Sorry but you can't be very 'old' if you're contemplating some of these upgrades ;) PS. No problem running the reverse camera output signal cable alongside other power wires as it should be a shielded cable plus it's not exactly a hardcore hi-def video signal afterall so a bit of interference wont affect it much ;) -
Preparing to install Pioneer Android Auto Unit in ZRE152R
SteveAndBelle replied to cosmicr's topic in Audio/Video/Electronics
2. Yes, the Reverse Camera should simply connect to the Reverse light circuit for power as there's no need to run it constantly... however some people like to have them powered up all the time and add a small switch so they can activate it at any time for whatever reason. Some people even add a front facing camera into the mix so they can switch between them but that's getting off topic. Once you've mounted it and have fed it power all you then need to do is run the signal cable up one side then connect it into the head unit. Easy but time consuming. 3. Tuck the camera somewhere discreet up near the boot release button/handle but try to find a place where you'll be drilling/screwing it into plastic and not metal. Not a big problem if you have to drill into metal but best to hit the holes & screws with some paint or rust prevention stuff from the inside once done... just to be on the safe side. Keep in mind that if you'll then need to pull the wiring through the rubber boot of the boot lid to wire it up to the reverse lights and feed it through the rest of the car. 4. Fuse everything and always put fuses as close to the power source as possible for best protection against catastrophic failures and silly mistakes. You may want to look at buying a nice power distribution fuse block from Jaycar or wherever as installing one now will save you a lot of hassle later on if you decide to install more Amps or whatever. Even something as simple as this: http://www.jaycar.com.au/Sight-%26-Sound-Car/Car-Audio-Hardware/Car-Hardware-Accessories/Two-Way-Gold-Fused-Power-Distribution-Block/p/SZ2070 allowing a nice thick but as-shot-as-possible 4GA feed direct from the positive terminal on the battery through two fuses then out to two thinner 8GA feeds to run to the Amp and/or active Sub. Remember, keep the fuses as close to the battery as possible!! Circuit breakers are also available however they usually only start at around 50A which may be a lot higher than the gear you're trying to protect therefore rendering them useless if something does go wrong. The thick 4GA feed should only need to be 20-50cm long as you should be able ot find a nice position to mount the fuse/distribution block somewhere nearby in the engine bay. Find an existing cable run through the firewall and simply pierce the rubber boot and run the cable through but be aware this can be a painful exercise as the cables usually have a rubbery coating and you may need to lube the cable up so it doesn't grip as you pull it through. Oh... and obviously only connect the Power Cable to the battery once everything else has already been connected or without the fuses installed. It doesn't take long for a short piece of thick cable to melt and start a serious fire if shorted out to earth! Amp, Speaker & Sub selection is totally up to you but don't discount a decent under-seat Sub as some of them can be pretty decent! Here's a review I did on a few about 5 years ago: It does all depend on how much you've got to spend versus your expectations. I'm an old duck now and although I used to build my own large Subs powered by crazy high current Amps etc. I'm way past all that these days and find the stock systems 'good enough'. I also don't drive anywhere near as much as I used to so it's pointless blowing loads of cash on something I'm not going to get a lot of use out of. That money now gets funnelled into mortgages & home Hifi instead ;) Hope this helps and please feel free to ask more questions. -
Preparing to install Pioneer Android Auto Unit in ZRE152R
SteveAndBelle replied to cosmicr's topic in Audio/Video/Electronics
Hi Cosmicr and welcome to the forum. BIG post... but first up, the head unit upgrade & harness. Why not just buy a full Toyota-to-Pioneer harness with Steering Wheel adaptor built in? Something like this: http://www.ebay.com.au/itm/CTSTY001-2-TOYOTA-COROLLA-2001-2011-STEERING-WHEEL-STALK-CONTROL-INTERACE-LEAD-/381298277086?pt=LH_DefaultDomain_3&var=&hash=item58c725fade I put a Pioneer DAB+ Double-DIN unit in my ZRE152R a couple of years ago and the adaptor worked perfectly and without any soldering! I'm a true geek and back-in-the-day I used to install ALL my head units by chopping off the connectors and soldering everything but this way the head unit swap itself took less than 5 minutes (seriously!) and sounded perfect. It then took another few minutes to install the mic and another 20-30 minutes to install the DAB+ antenna. Hopefully this adaptor harness answers your first question at least. Steve. -
DAB+ into a 2013 Corolla ZRE182R?
SteveAndBelle replied to SteveAndBelle's topic in Audio/Video/Electronics
Ha, went to Northfield Nundah today and asked if they had either a genuine Toyota 28-pin plug or just the pins to insert into one or just something else suitable I could use the pins from. No problem about paying for any of it, I just thought they of all people would have something suitable. I was presented with a blank faced member of staff who asked what I was trying to do. I explained and was told "nah, that isn't possible". I thought he may have misunderstood so I explained it again but even before I finished he said "nah, impossible" so I told him I had it working last night, thanked him and walked out. Wow, they really know what they're talking about (not). All good. I'll probably just try to get an original loom plug from a wrecked car and remove the pins from that or buy a male-female harness adaptor such as the one attached. The harness adaptor cable would be ideal as I could leave the original loom completely untouched and do all my silly mods (inc. handbrake & speed sensor bypass) to the adaptor instead. This would allow me to take everything back to original untouched perfection within a matter of seconds if required. They're about $50 though, blerg.
-
DAB+ into a 2013 Corolla ZRE182R?
SteveAndBelle replied to SteveAndBelle's topic in Audio/Video/Electronics
Success! Managed to get a video signal to appear when AV is selected using pins 13 & 14 of the 28-pin connector. It was only up there briefly as I'm literally just stuffing wires down into the connector but it did work nevertheless which was enough to prove the concept. I will go get a connector from a wrecker or off another harness so I can solder up some proper pins and retest this soon. Looks like the AV input is a go-er for stereo Audio and Video. Next thing to experiment with is the Handbrake & Speed sensor cut-outs and hope there isn't also a GPS based speed sensor cut-out too. If there is a GPS cut-out then that will kill all hope of getting this to work nicely. -
DAB+ into a 2013 Corolla ZRE182R?
SteveAndBelle replied to SteveAndBelle's topic in Audio/Video/Electronics
Hi again. Just dropped a tiny $64 on one of these: http://www.ebay.com.au/itm/Car-Mobile-Free-View-DVB-T-Digital-TV-Receiver-Box-MPEG-2-Antenna-USB-SD-Slot-/121121942924?pt=LH_DefaultDomain_15&hash=item1c336e2d8c eBay is currently having a 20% off sale so I couldn't resist :) From what I can tell this is exactly the same as this $715 unit: http://www.ebay.com.au/itm/CAR-MOBILE-Portable-DVB-T-Digital-TV-Receiver-SET-BOX-/130859937059?pt=LH_DefaultDomain_15&hash=item1e77dc2d23 I've already confirmed with the local seller that these will receive DAB+ not just DAB as per the description. DAB is the 'European' Standard and you really have to check to see if the item can do both before making a mistake. Of course this might be super-crap too but for $64 I thought it was worthwhile, even just as a DAB+ tuner. I will definitely be looking at a proper dual antenna rig to feed it a decent signal but only once I know it works. Will post more when I know more... -
DAB+ into a 2013 Corolla ZRE182R?
SteveAndBelle replied to SteveAndBelle's topic in Audio/Video/Electronics
UPDATE I've had the head unit out and have been experimenting with the various concepts as others here have discovered both here and on other Toyota forums and I've managed to get the on-screen 'AUX' button activated and have successfully fed it a headphone-level stereo signal from my phone... and it sounds great! My next mission is to prove 100% that I can also inject a composite video signal and if so I'll look at getting a DVB-T/DAB+ hideaway tuner which will display the DAB+ info on the screen plus of course allow TV viewing to boot (but of course only when stationary). I'll update this thread with my findings but from what I've seen elsewhere I think this may just work! Fingers crossed.... -
Yeah, we know that now ;) If I worked the way these guy work I doubt I'd be able to hold onto a job for more than a few days! What gives them to right to be slakkers :(
-
Hi all. About to take delivery of a very lightly used 2013 ZRE182R to replace my old ZRE152 that was written off a few days ago. Gotta say the '182 is leaps and bounds better than the old '152 so I think I'm going to really like it :) The '182 has the factory double-din NAV Head Unit and from the brief play I've had it looks to be pretty decent however I really want DAB+ in this car as I bought a decent Pioneer unit for the previous car and now can't go back to FM ;) Short of replacing the whole Head Unit with the non-NAV Pioneer I pulled out of the old car or blowing $1000+ on a new Pioneer with NAV and DAB+, is there any way of nicely feeding a DAB+ signal into the original? I've had a look at the pinout diagram of the rear connections and it doesn't look as though there's an easy way of injecting a simple Left/Right stereo feed but in saying that I'm now actually sure which model head unit I have so maybe it is possible?! Any help would be appreciated.
-
Oh yeah, I know! Basically all insurers lead back to AAMI or Suncorp. Budget Direct are underwritten by Auto & General Insurance Limited plus there are a few others who are independent of the AAMI/Suncorp beast so we've gone with them instead because now we know a 100% not-at-fault claim will end up like this with a 'Premium' insurer then we may as well save some cash and just go with a smaller insurer and expect the same service. Can't get a lot worse! Yep, the assessor needs to be sacked and never re-employed in a customer service role as he was beyond hopeless (feel free to PM me for his name!) however the fact that a magical fairy decided to add the note to our claim about us not wanting to go ahead with the repairs is really where it all began. That gobbled up over 3 weeks alone!
-
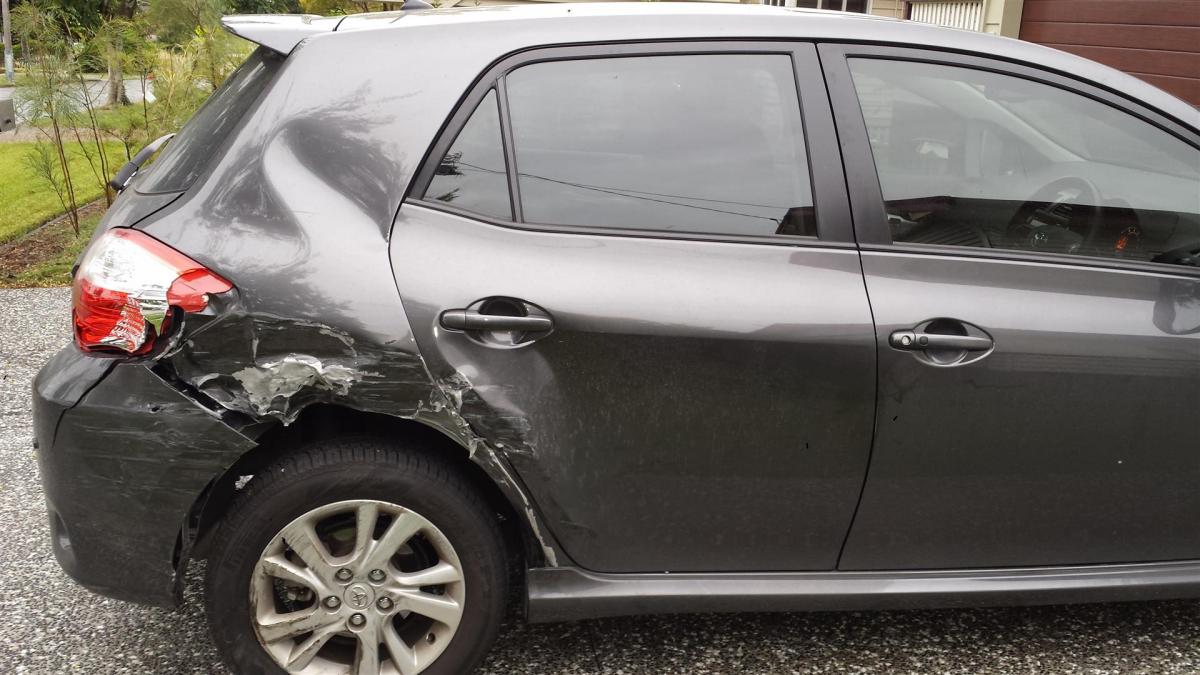
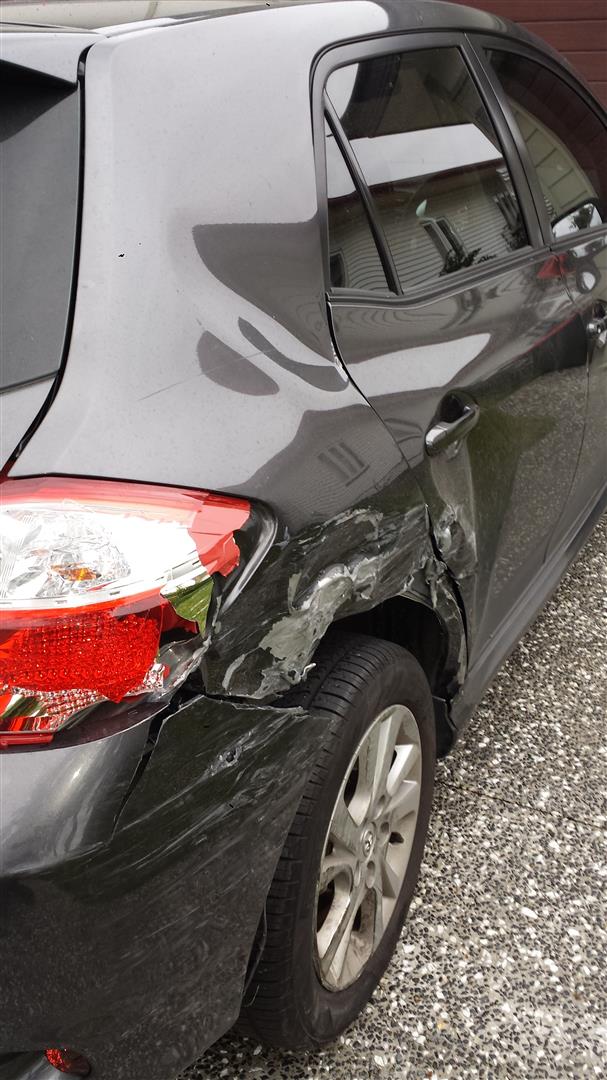
Just thought I'd share my recent terrible experience with AAMI in the hope this may sway people away from them and their underwriters 'Suncorp'... 8+ weeks ago - We were the 100% innocent victim of a hit & run, our 2010 Corolla Levin ZR parked on the side of a road and hit hard by a drunk driver along with other cars further up the street. BIG damage to the rear drivers side wheel and all surrounding panels but even though there were obvious signs of wheel toe-in the car still drove pretty nicely (it's IS a Toyota afterall ;)) See attached pics... - Police called out, report created, all went very well, smooth & professionally. Police said the car is "safe to drive as long as nothing falls off" and instructed me to hand his card with report number over to other Police if I was pulled over while driving. - Luckily the offenders Rego was reported to Police by a witness from one of the houses on the street. Without that we'd be screwed! - Claim lodged with AAMI within about an hour of the incident but I refused to pay the excess as I was absolutely not at fault. They said they needed the rego number to allow that to go through but I didn't have it so I told them I'd call the police and call them back the next day. - Called the Police but they couldn't give me the rego because of 'privacy issues'. Wow, what a world! Bounced to & fro the Police & AAMI a further 3-4 times each and no-one wanted to budge. The Police told me AAMI were simply "being lazy" as all they had to do was call them, quote the case number and they would be given the rego details but AAMI told me that would take a very, very long time. I still had a drivable car so I called their bluff and said no problem, I can wait. 5 weeks ago - Over three weeks go by and we hear nothing at all. This was our first ever claim so I just assumed this was normal ie. pay for top premiums for 25+ years and get treated like crap. - Called AAMI to find out what was going on and was told that a note had been added to our claim that we "no longer wanted to have the car repaired" WTF!? - Gave them absolute hell and demanded they tell us who added that note as that was absolutely not the case but of course 'privacy issues' came into play again. Pfft - Managed to yell & scream enough to get them to arrange a day to get two quotes within the following week. - Went to the two AAMI recommended Panel Beaters and got them to supply quotes but queried how a Panel Beater could know enough about the mechanical side of things to quote the full repair accurately and was told that was up to the insurer to sort out. - Both quotes made it to AAMI (approx. $9-10k worth of repairs required) and the car was taken in to the AAMI/Suncorp RepairLink assessment centre a few days later. I was hoping it would be written off as I knew it wouldn't be the same car after the repairs but it was deemed repairable so I couldn't argue with that. - The RepairLink assessor made a big song & dance about how dangerous it was for us to be driving the damaged car for so long. I informed him that it was AAMI's doing because they had screwed up the claim adding the absolutely fictitious note about us not wanting to go ahead with the repair. He obviously didn't care and called me a taxi as he deemed it unsafe. He told me they would transport the car to the repairers from that point on. Fair enough... but this is the info I feel we should've had within a few days of lodging the claim, not four weeks later! - I was instructed the repair would take 3-4 weeks but to keep an eye on the completion date on the AAMI website. It was set to the 19th June so I borrowed a car (friggin' uncomfortable Ute that cost a fortune in fuel) and waited patiently for a call from either AAMI or the repairer. - 3 weeks passed and no call however the completion date was changed from the 19th June to 3rd of July so we struggled through driving the uncomfortable, fuel guzzling loan Ute and put our faith in the fact that the repairers needed more time. No point getting angry about something completely out of our control. 2 days ago - 1st of July swings around and as we hadn't heard anything we thought we'd better just call AAMI to confirm the car will be ready to go. - AAMI informed us the assessor was still waiting on something... but noted that was lodged on the 19th June (or earlier) so they decided to try to call him to confirm. - Couldn't reach him so they called the repairers. The panel beaters told AAMI that some initial suspension work had been done however they had heard that further damage had been discovered and they had been waiting for the assessor to update them. The panel beaters had ordered & taken delivery of $8000 worth of parts but were just waiting to be given the green light. No other repairs had been started... five-and-a-half-weeks after the car had been taken in for repair! What... the... F*ck?! - Absolutley furious, I began my now famous tirade and Tsunami of very nasty profanities as per any unacceptable situation like giving way more than enough opportunity for the right thing to be done. I then demanded I speak with the assessor. I didn't care if they needed to drag them away from a conjugal visit, this was completely and utterly unacceptable. - Recording the AAMI phone call while they frantically tried to contact him I demanded they provide me with his mobile number so I could also call but of course 'Privacy Issues' reared their ugly head yet again. They told me he must've been on the road... what, a car insurance assessor doesn't have a hands-free kit? C'mon! - I continued to demand his number while screaming expletives down the phone and surprise, surprise they succumb and gave it to me! Privacy? What privacy?! - We then both continued to call for another 15 minutes when he suddenly answered. I introduced myself, stated the car type, colour & rego then asked if I could get a status update. He answered like a true smart-***** saying "mate, I look at dozens of cars every day, I have no idea what you're talking about" which of course instantly triggered another session of high volume expletives. - He went on defending his entire existence and continually blamed Toyota for not getting back to him with the repair requirements for the newly discovered damage. - The call ended with me taking control (that's right, me... the customer!) and demanding he calls me back by COB with a rock solid completion date. I'm not sure why I was still willing to give him a chance but that's just the kinda guy I am ;) I got everyones agreement of that and ended the call. - I can only assume AAMI and the Panel Beaters had ripped him a new one because less than 2 hours later I had a call from a very sheepish assessor admitting fault that he hadn't communicated any of this properly. By that stage I had calmed right down to my usual uber-passive self and found no need to attack him when he was obviously trying his best to deal with the consequences. He then informed me that he had decided to write the car off. Halle-friggin-lujah! So, after over EIGHT WEEKS of screwing around containing probably only around a few hours of actual work on the car it's now been written off. Fark me! This could've been assessed and decided within days of the incident. The silver lining to the 8 week 'acid rain' producing dark cloud is that they will be paying out the agreed value which is more than enough to buy a very decent replacement... not new but close enough to it. Less than 18 hours after receiving confirmation of the write off I've already bought a replacement car (see my Avatar), a sassy red 2013 ZRE182R with only 12k on the clock and all the trimmings including Leather Seats etc. and I've gotta say it's a MUCH nicer car than our original ZRE152 but we shouldn't have had to go through hell & back to get to this point. Fairly obviously we have already cancelled our other insurance policys with anyone connected to AAMI and Suncorp because of this. There aren't many others around who aren't underwritten by these guys and we know all insurers are probably the same BUT why bother spending top dollar on so-called 'Premium' insurance policies when we can spend a lot less and be treated the same way anyway?! To those of you with a AAMI policy I recommend you at least consider looking at your alternatives. It seems I'm not the only one who has issues with them too, check out this nice little site I found: http://www.servicerage.com/car-and-home-insurance Good going AAMI! So many satisfied customers ;)
-
Under Seat SubWoofers - A Review
SteveAndBelle replied to SteveAndBelle's topic in Audio/Video/Electronics
Not difficult to install at all however running cables etc. can be tedious, frustrating and very time consuming so be sure to put at least a few hours aside otherwise you'll get frustrated and make mistakes. 1. Put the Sub by iteself in the optimal location and make sure it's out of the way of everything including kicking feet from the back seat passengers, seat sliding mechanisms & seat wiring harnesses etc. Test as many scenarios as you can to be 100% positive it's totally out of the way and you have room to run/connect your cables then anchor it to something solid. If under a seat then gravity will be your friend and you can just use cotter pins or small screws with BIG flat washers just through the carpet & underlay as that works well too. 2. Run a dedicated high-current '+' power cable direct from your battery (ideally) or other convenient location capable of handling the same current the fuse in the unit is rated for (as a minimum). You may get a cable kit with the Sub and they're usually pretty good. If there already isn't one be sure to add a fuse to the '+' power cable as close to the power source as possible for extra protection BUT LEAVE THE FUSE OUT DURING THE INSTALL to prevent any accidental short-outs. Also run a '-' cable direct from the battery or a nearby reliable ground anchoring point like an existing solid bolt or screw into the body or chassis. 3. You'll then need to run the RCA signal cable/s plus the 'remote' power on cable from the rear of your head unit. Carpet is your friend when running cables as you can tuck so much under it and it just magically disappears when pushed into corners. Side chassis rails are also good as they're basically open channels of steel with plenty of room for thick cables and run the length of the car which is why you usually find the original loom in there... you've just got to be sure you have a convenient opening near where your Sub will be. 4. Wind the level control on the Sub down to zero, install the fuse into your '+' power wire, switch the head unit on and see if the Sub lights up. If not then quickly turn it all off, pull the fuse and inspect it & your wiring but if you see lights then you're pretty much good to go. Slowly turn the level control up (assuming you've already told the head unit that you have a Sub connected if need be) and you should start hearing low freqs. 5. Armed with a few of your favourite tracks go for a drive somewhere away from nearby houses & people and give it a good solid cranking. Play different types of music and just fiddle with the crossover and level controls until you like the way it sounds. Everyone's different, some like it boomy, others like it smooth so it's all up to you but general rule of thumb for ANY Subwoofer is that if you can detect where the low frequencies are emitting from then you need to make adjustments. A Subwoofer is there to emphasise the low freqs, not to take over the rest of the sound stage. You will probably need to make more adjustments over the following days/weeks but after a while you'll get it sounding as good as it can across all music types but don't expect it to sound perfect for everything... that's only ever possible in absolute perfect controllable listening environments of which a car definitely isn't one :) So yeah, some installs have taken me two whole days but others have been super simple and have just dropped in without any extra effort. It all depends on what car you have and what your expectations are but by all means it isn't rocket science and as long as you respect electricity... even low voltage stuff like this... you wont have any problems. Keep your connections clean & solid, don't overtighten anything, make sure your power leads are properly fused and you'll be right. -
The first non-Beta version of the Google Music Android app is out (V4.0.9) but doesn't look any different from V4.0.1 above. You can download it from here: http://www.uploadking.com/WDP4JITQSG You will probably need to uninstall any previous versions you may have installed (I had to) but as soon as the new version was installed my old Playlists were available within a few seconds so no probs there. Logged onto Google Music via ProXPN (instructions above) and accessed the Google Music Shop. Had a look around and noticed that you can buy stuff and then listen to it instantly via the Google Music cloud and also download the MP3 if need be. Here's hoping for extreme sample rates and absolutely no DRM for the downloads! I then decided to give it a go by purchasing the latest album from Coldplay (for the wife of course). Tracks are US$0.99 but the entire album was only US$4.99 so I assume that's some kind of intro price... or maybe it's a rebate from the artist for making you listen to yet another dozen tracks that sound the same :P Clicked the 'Buy' button but after a few seconds a window appeared asking me to enter the details of my 'US Credit Card'. Dead end :( Ah well, Coldplay will have to wait however all is looking good for the Shop so far. No timeframe for the release to the rest of the world but here's hoping it'll come sooner rather than later.
-
Hi Playwme. All good questions and reasons Google Music isn't for everyone but fits the bill perfectly for some. I have a 3Gb plan with TPG and don't use Google Music all day every day so I never get close to that anyway. Helps that when I'm at home or work or friends/relatives houses I connect via Wifi too. The upload process is simple, you point the small Google Music installable at your music collection and away it (slowly) goes. Don't know of any Gb limits but it's limited to 20,000 tracks at this stage however there are no sample rate limitations from what I can tell. No redundancy capabilities to my knowledge either however I already have my collection stored in two formats and on two separate NAS boxes because I'm super-paranoid. There's no way I'm going to re-rip thousands of CDs again. I've already done it three times over the last 10 years as formats & sample rates got better & storage became cheaper. Never again, worst job ever ;) I personally like it because I can access my music collection and most importantly my Playlists via multiple devices in different places (inc. the car) but being able to edit those Playlists in realtime is probably the best part of all for me. I couldn't wait to get the 'ball & chain' 160Gb iPod Classic out of the car and I thankfully no longer have any Apple devices and therefore no super-slow & limiting iTunes middle-man in my life. Each to their own though of course, I know many people who actually like iTunes & so be it. I'm really enjoying Google Music as is but it's got plenty of room for improvement too. I'd love it to send ID3 Tag data via Bluetooth but don't even know if that's technically possible. SONOS integration would be amazing for listening throughout the house but I think I may have to wait a while for that ;) Then there's the whole Google Music Shop side soon to come including rumours of being able to lend/borrow tracks with friends with the option to purchase after a set time or number of plays. Don't forget that Google Music is still a Beta release so this is only the tip of the iceberg. Who knows what may be available in the near future, the potential possibilities are exciting when you start thinking about it all but of course who knows if it will even be around in 6 months too! That's life and we'll just have to wait & see how it turns out.
-
New version of Google Music Beta is out (V4.0.1) and is already leaps & bounds better than the original. Much nicer UI and quite few more features... and it's still a Beta! You can download it from here: http://www.multiupload.com/HDU1GPTDXM Note: If you already have the previous version it's advised to uninstall it before installing this newer version. Also, there is a risk that you will lose your Playlists & Instant Mixes but I can't confirm that sorry. Upgrade at your own risk!!
-
Cheapie SubWoofers - A Review
SteveAndBelle replied to SteveAndBelle's topic in Audio/Video/Electronics
Hi Bobby. I've been tempted to buy one of these and check it out. The build quality isn't the best (you can even see flaws from the catalogue pics) but I'd say they'd sound pretty decent in a small/medium hatchback. I assume you want to put one into your Camry boot? You don't need to go to extremes to penetrate bass through a backseat & into the cabin however you may need a bit more oomph than this little cheapie is capable of in a sedan situation. Hmmm, really not sure. It's payday this Friday and you've now got me thinking of buying one to evaluate. I have been keen to see what they can do but didn't really want to go to all the hassle of doing a temporary install just for one Sub trial... but if there are others out there who'd appreciate it then I might be tempted ;) BTW, I can pick one of these up for $89 with my Trade Card and if we got enough people together to buy four of them then I'd be able to get them for only $78.95 each. Hmmm, tempting. Anyone else keen to see what they're like? Steve. -
Righto, I just realised my original activation instructions no longer work :( It seems they've updated HotSpot and the new version no longer seems to work the way it used to however I just managed to successfully activate two more invites via a different method. Here's how: Please note, proceed at your own risk!! These instructions are compiled & provided by myself in good faith and to spread the 'Google Love' around to as many as possible (ew). Although I have tested the following process and haven't had any problems, myself & TOC are not responsible for any issues that may arise with your accounts, software or hardware. Enjoy... but always be careful online. Righto, you've received a Google Music invite in your Gmail and you want to start uploading all your legally obtained music but when you try you're told that it's "currently only available in the United States". Sorry Google, that just isn't good enough... so here's an easy work-around (tested with Win7 & Internet Explorer only but should work with other OSs & browsers too): 1. Click on this link: http://proxpn.com/download.php to download proXPN V2.4.9 and follow the setup instructions provided. 2. When creating your new free proXPN account be sure to click the 'No thanks, I want a proXPN Basic account' link up the top right-hand corner of the page otherwise you'll need to pay to setup a 'Premium' account which is not required for our purposes here. 3. Once you've activated your proXPN account, log into it and let it connect. Note: Your browsing will slow down from this point but this is normal. 4. Open up a new Internet Explorer session, simply type http://mail.google.com into the address bar and log into your Gmail account. 5. Open up your Google Music invitation email and click the 'Get Started' button. 6. The next page you see appear is the beginning of your Google Music setup. Click 'Next' and follow your nose... BUT WAIT, THERE's MORE... 7. Once you've finished setting up Google Music you'll never have to make it think you're in America again so it's a very good idea to disconnect, exit & uninstall proXPN ASAP. This will also get your browsing speeds back to normal too. That's it! You're now a part of Google Music Beta. 'Beta' because this is just the tip of the iceberg so the future looks pretty bright indeed. Look for the dedicated Google Music Android app in the Market but if you can't find it simply download the APK file from here: http://www.multiupload.com/KIM5LQDL0K and run it on your phone, it'll know what to do from there. Before going too crazy uploading your 20,000 tracks just make sure your ISP doesn't include uploads in your monthly total. 20,000 x 192K MP3s equates to about 100-120Gb so if your ISP includes uploads in your total then you could be up for hundreds if not thousands of dollars of extra charges. Once you know all is OK then go for it but don't expect it to be quick. I'm on TPG ADSL2+ and it took 16 days to upload about 19,000 tracks from my NAS so be prepared for a long wait however also note that you can play tracks as soon as they've been uploaded so it's not as though you need to wait until it's all done before starting the fun. ... and of course, once you're up and running with it you can also hand out invites to others to do the same but please remember your roots and keep a couple for other TOC members here OK. An upsidedown Pyramid scheme, I like it :)
-
Yeah, I've had Pandora, Rhapsody & Sirius running through the SONOS. Great services indeed.
-
Ahhh, just under 19,000 tracks all done... 16 days later! Very happy chappy :)
-
Yeah, I'm in the IT Dept. and had similar thoughts about using my works external link (a pure unrestricted 100Mb pipe) but was a good boy & decided against it. Oh well, nearly there...
-
The upload is so painful! 14,000 tracks in 12 days so only a few more days to go before my entire collection is up... but I've already been loving it even before all tracks are available ;) Google away!