TRD468
-
Posts
201 -
Joined
-
Last visited
-
Days Won
1
Content Type
Profiles
Forums
Events
Gallery
Tutorials
News & Articles
Videos
Everything posted by TRD468
-
yep they are heavier than the sportivo wheels.
-
Colour sand with 3000 UNI-grit sand paper, then rotary buff with a good compound. Only do this if you are confident and have had previous experience with car detailing... if not, seek for a professional car detailer who can do this for you. But this is the only way to remove a serious paint defect PROPERLY.
-

A must for TRD Aurion owners! Front view cam
TRD468 replied to TRD468's topic in Aurion / TRD Aurion Club
Ok, yes i did use 2 of his pics off google images. Gotta admit they aided me with this project quite abit and just had to put them in this post to clarify a few things. Sorry about that andrew, i acknowledge your time/effort for taking and editing those pictures from your previous thread. Photo courtesy of [Andrew (Aurion ZR6) Pics 4th and 5th from the top. -
A must for TRD Aurion owners! Front view cam
TRD468 replied to TRD468's topic in Aurion / TRD Aurion Club
got no idea, who is the admin now days? -
A must for TRD Aurion owners! Front view cam
TRD468 replied to TRD468's topic in Aurion / TRD Aurion Club
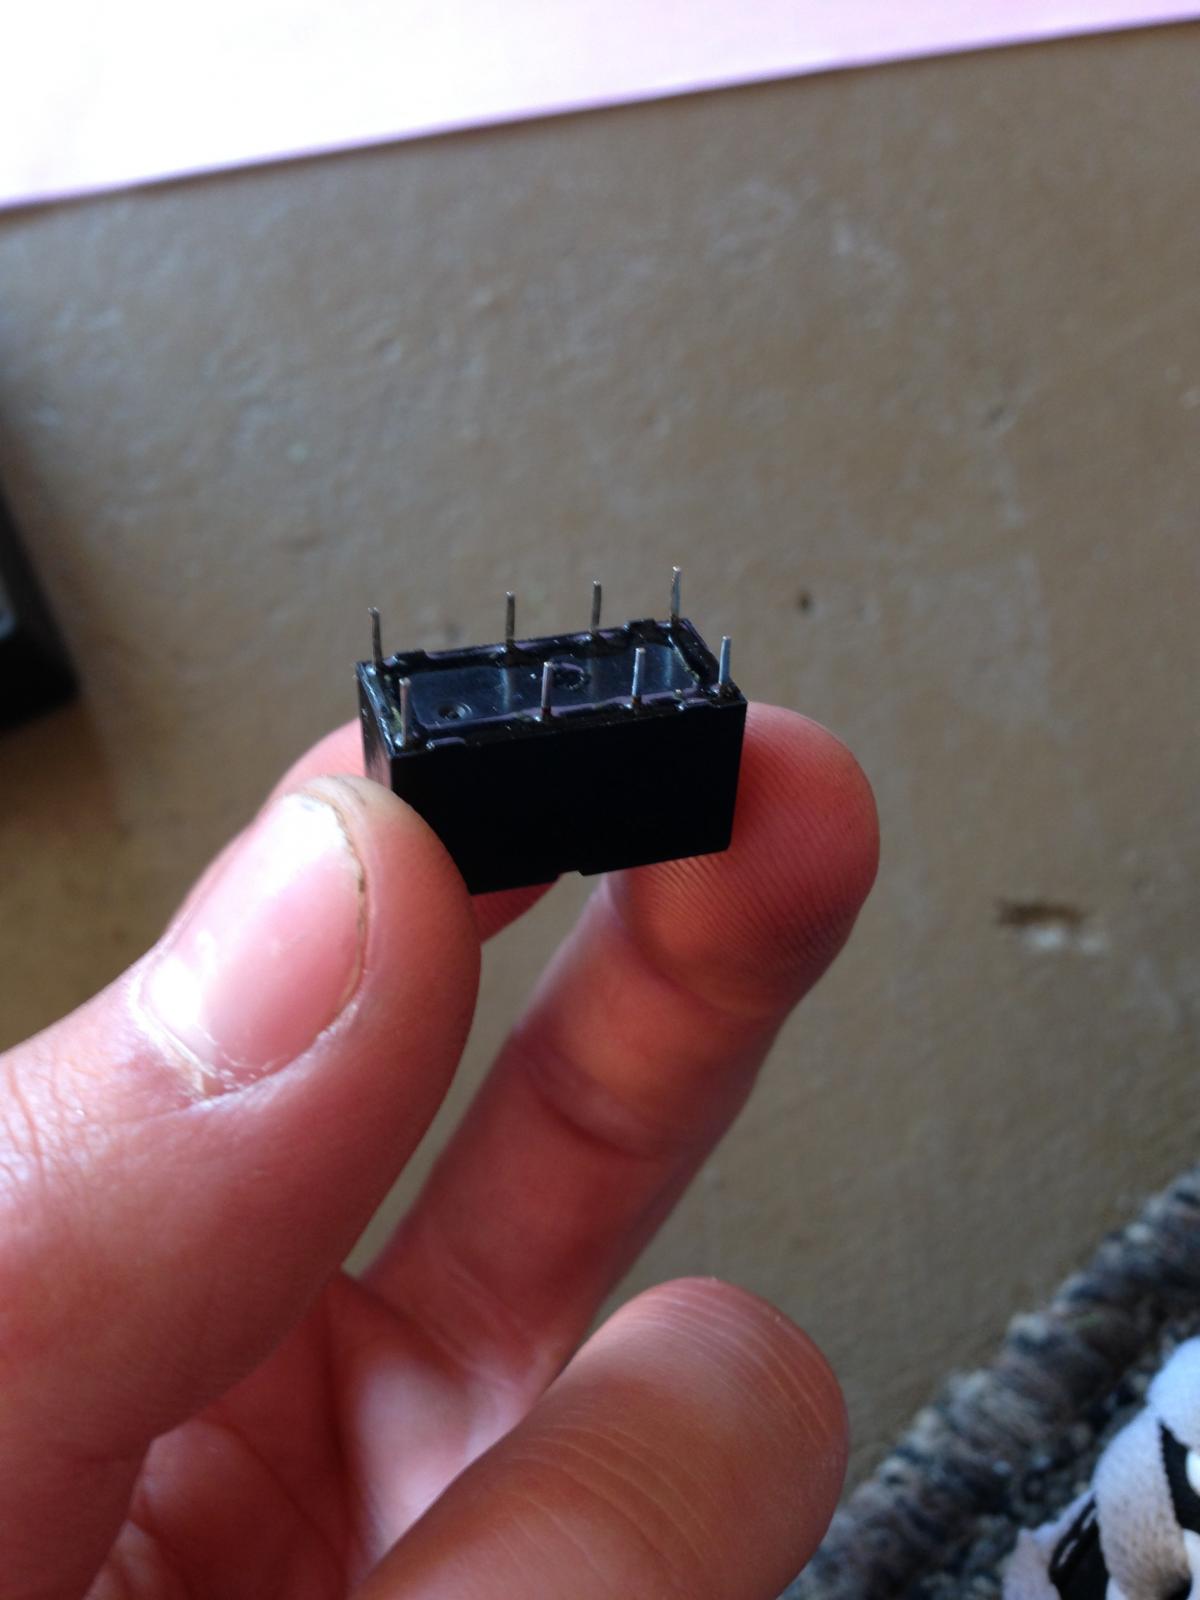
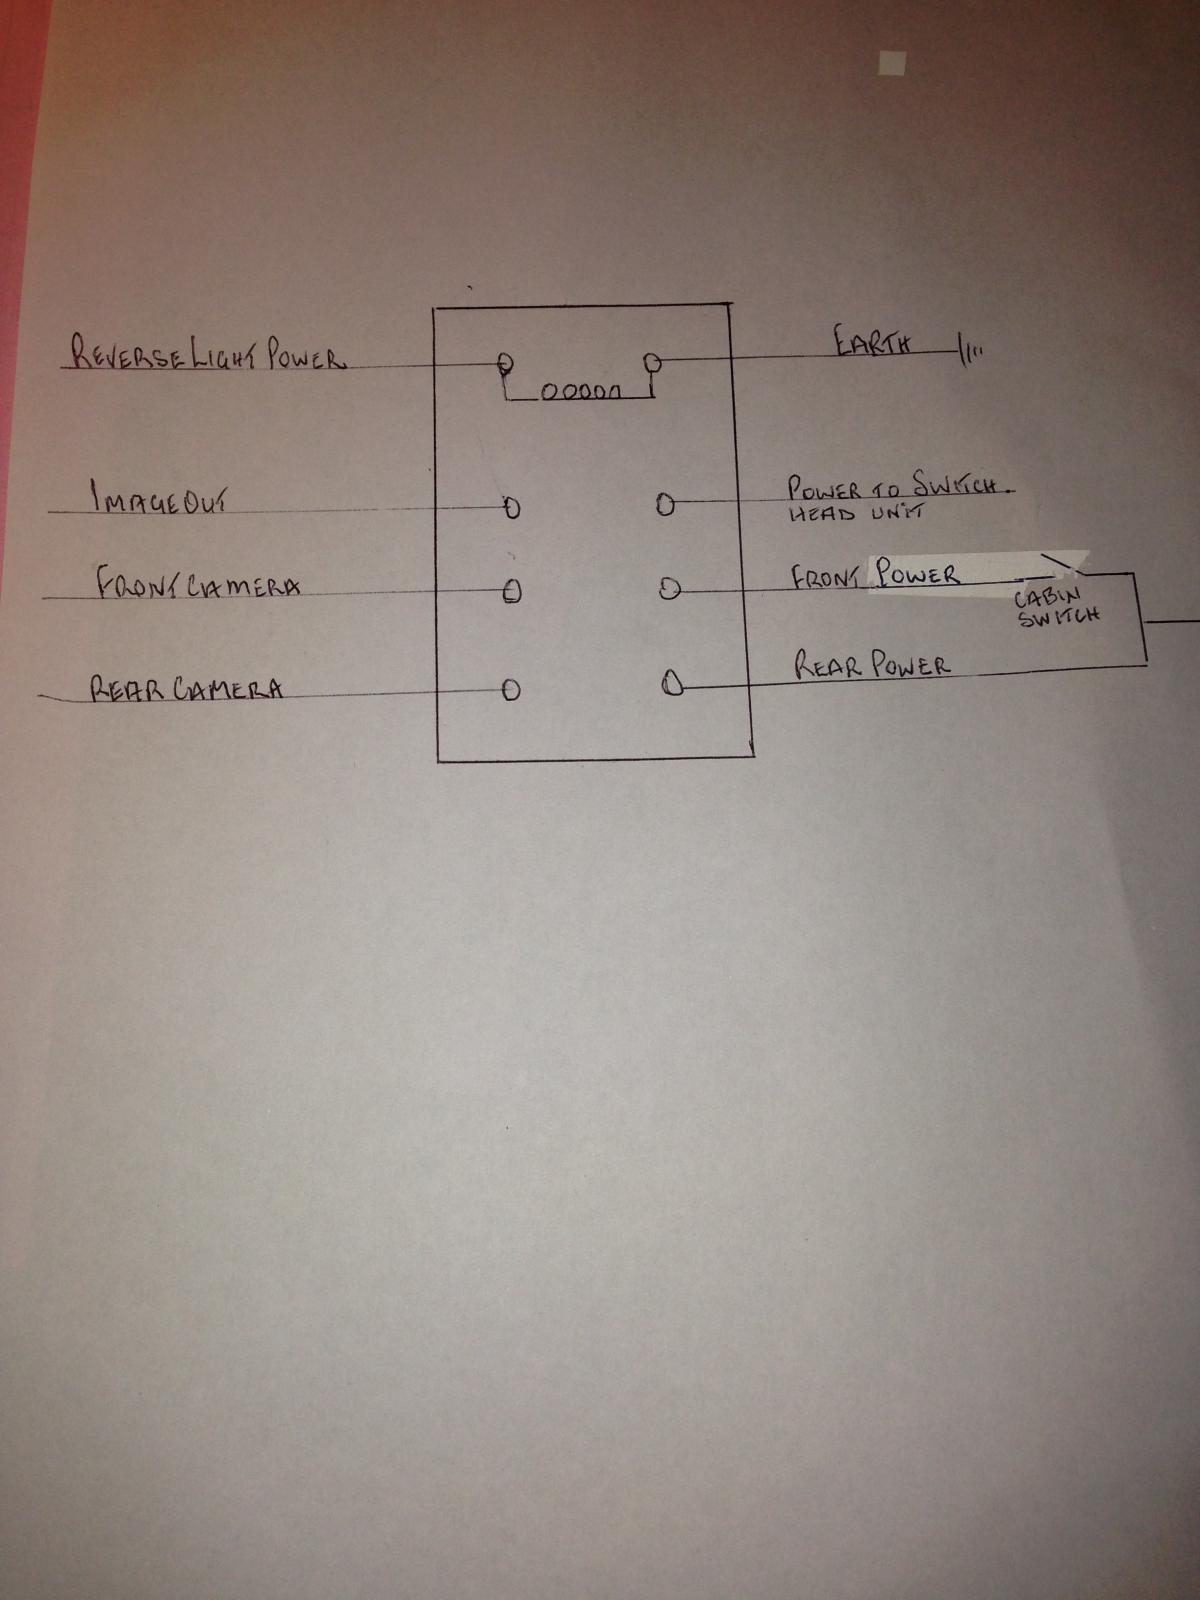
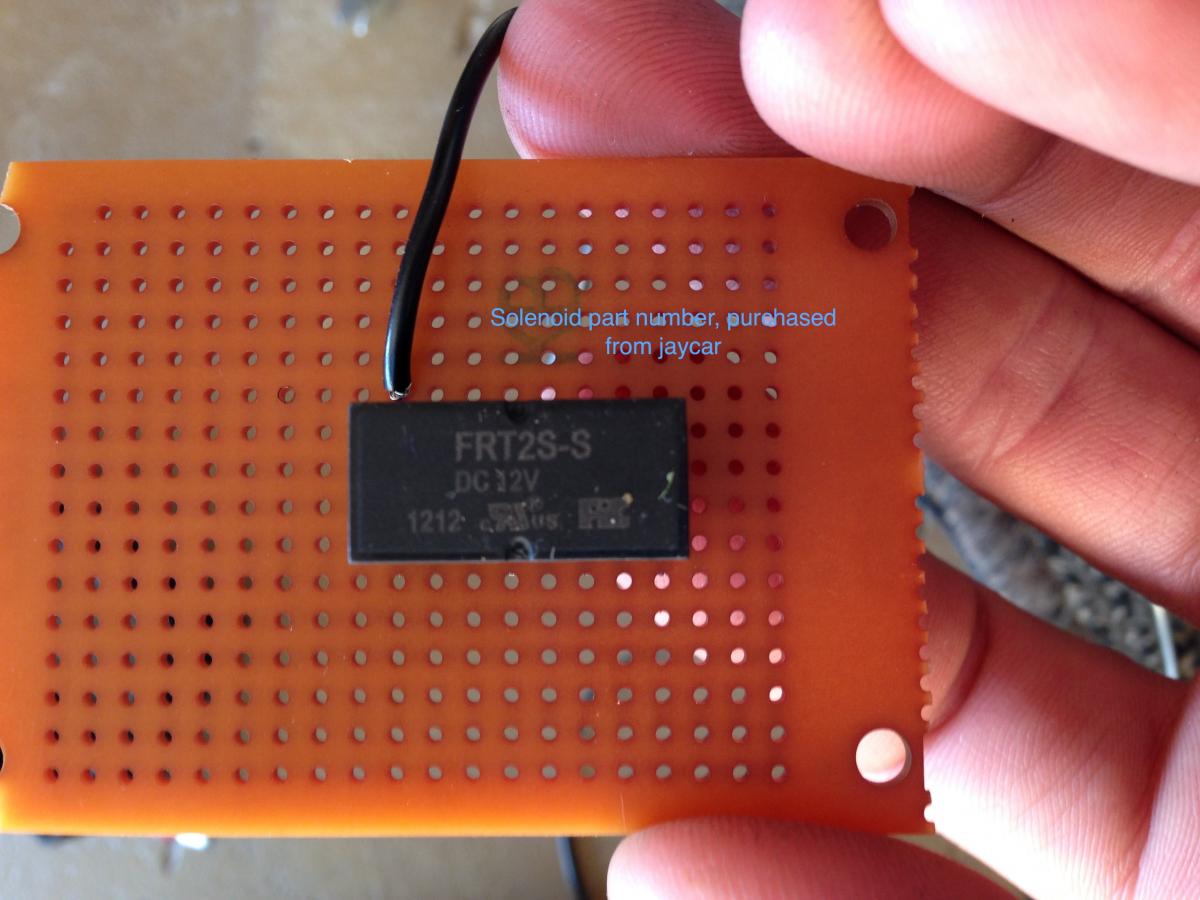
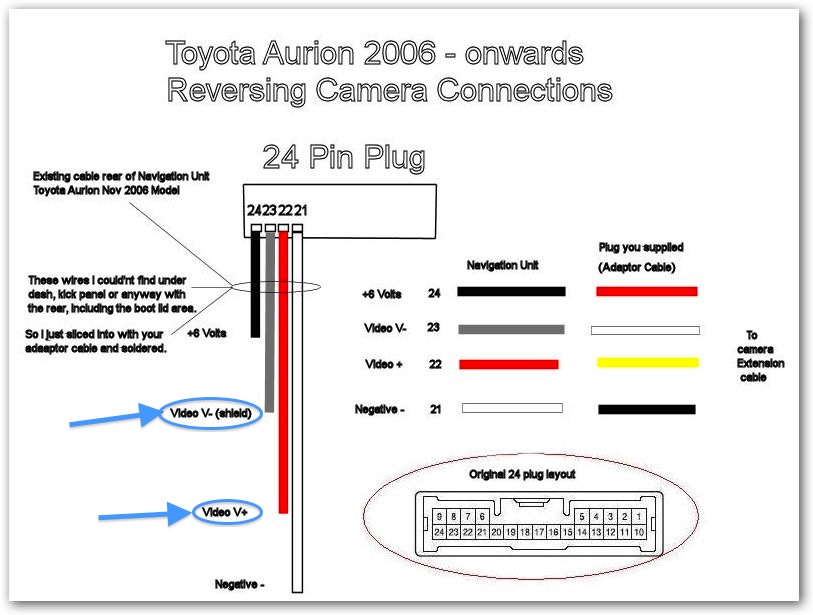
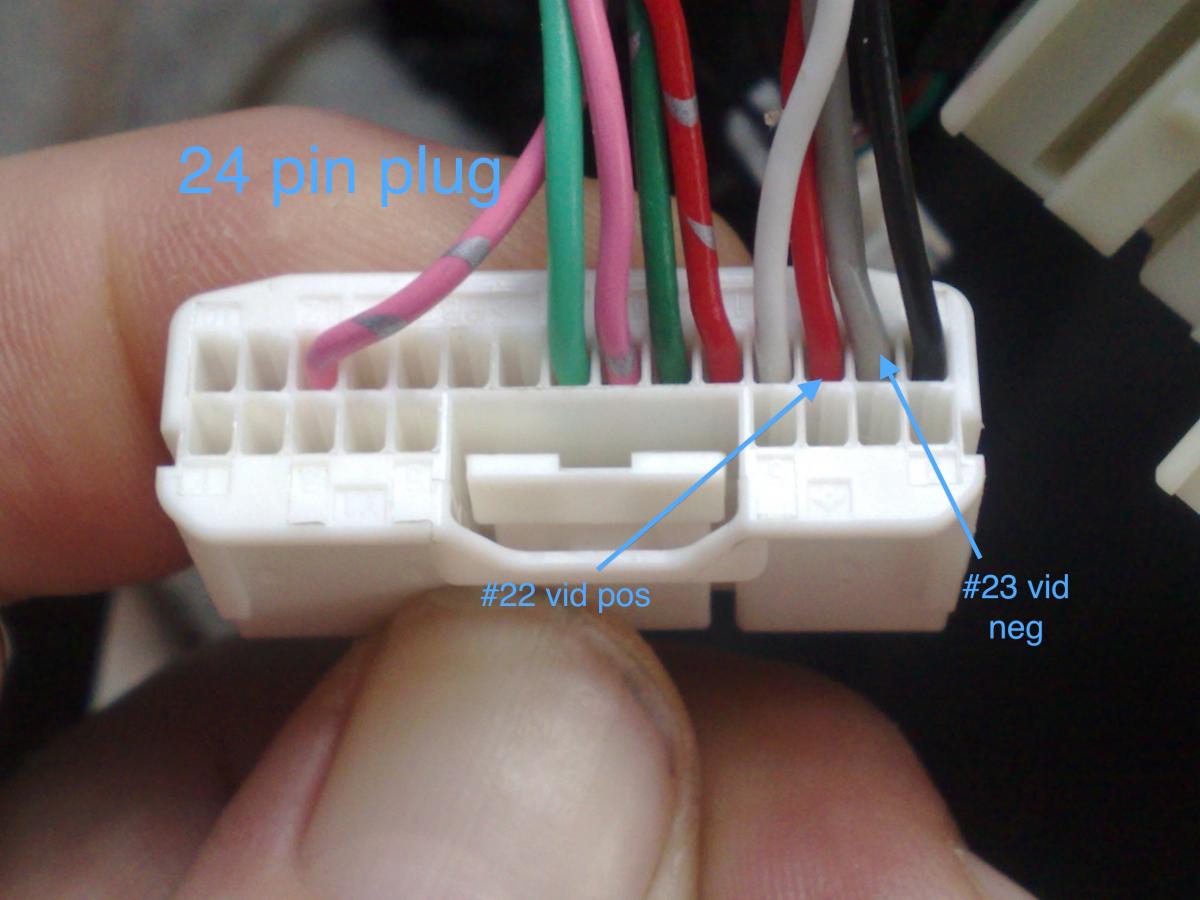
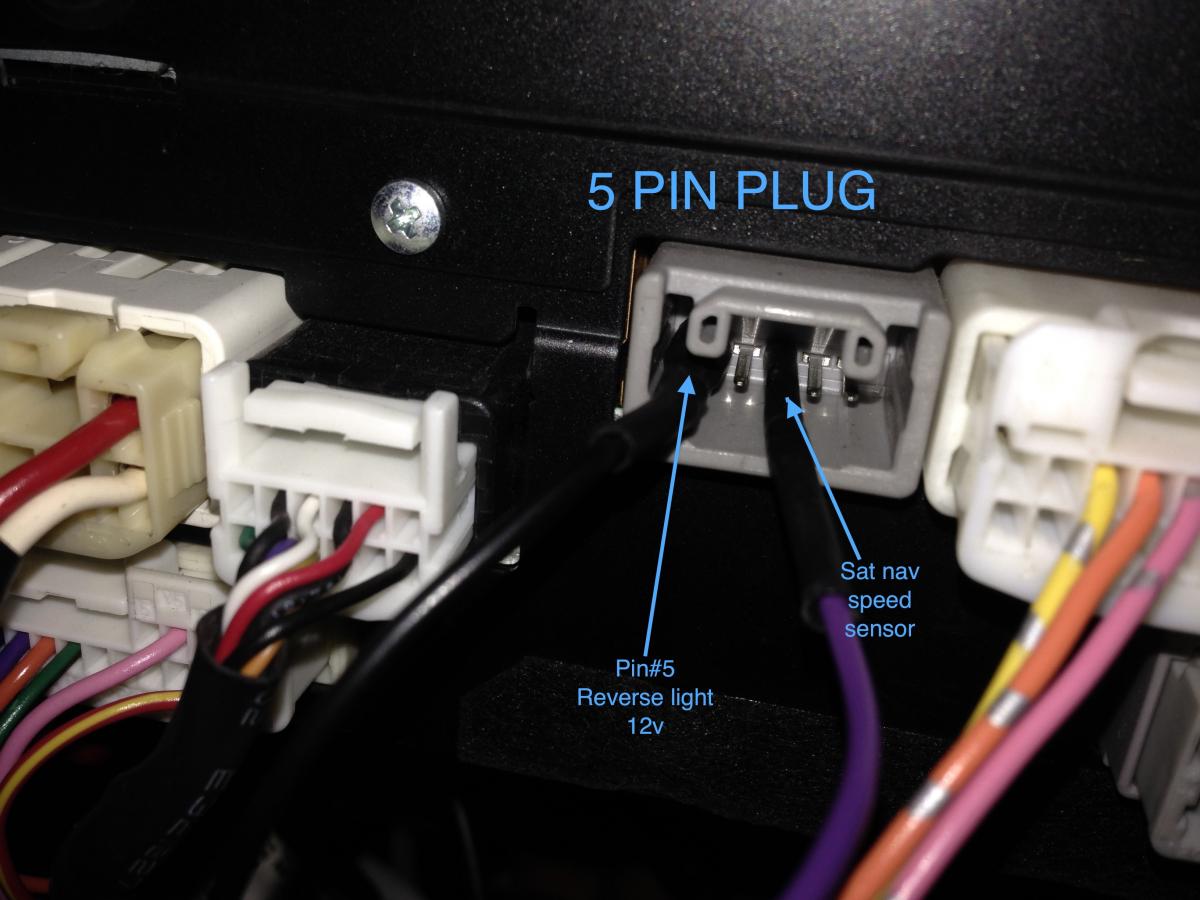
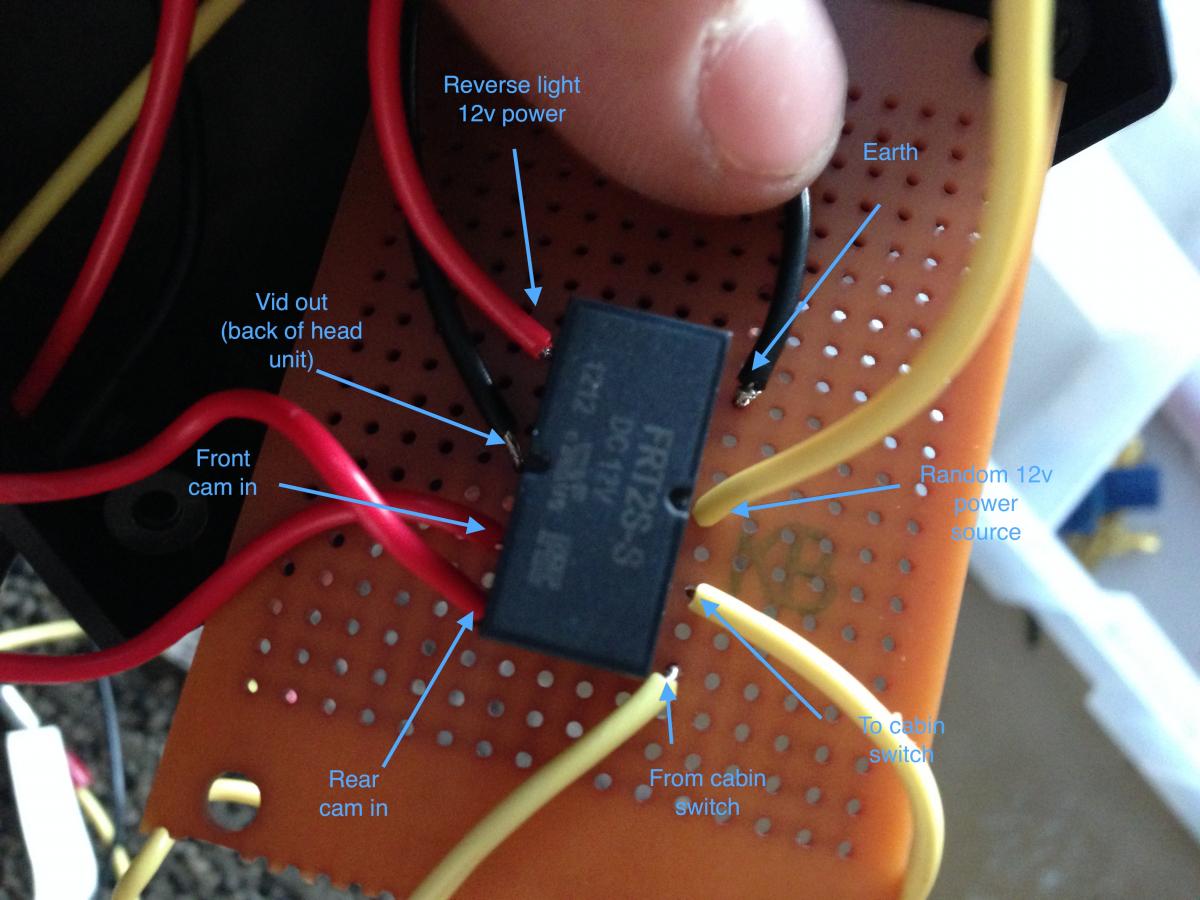
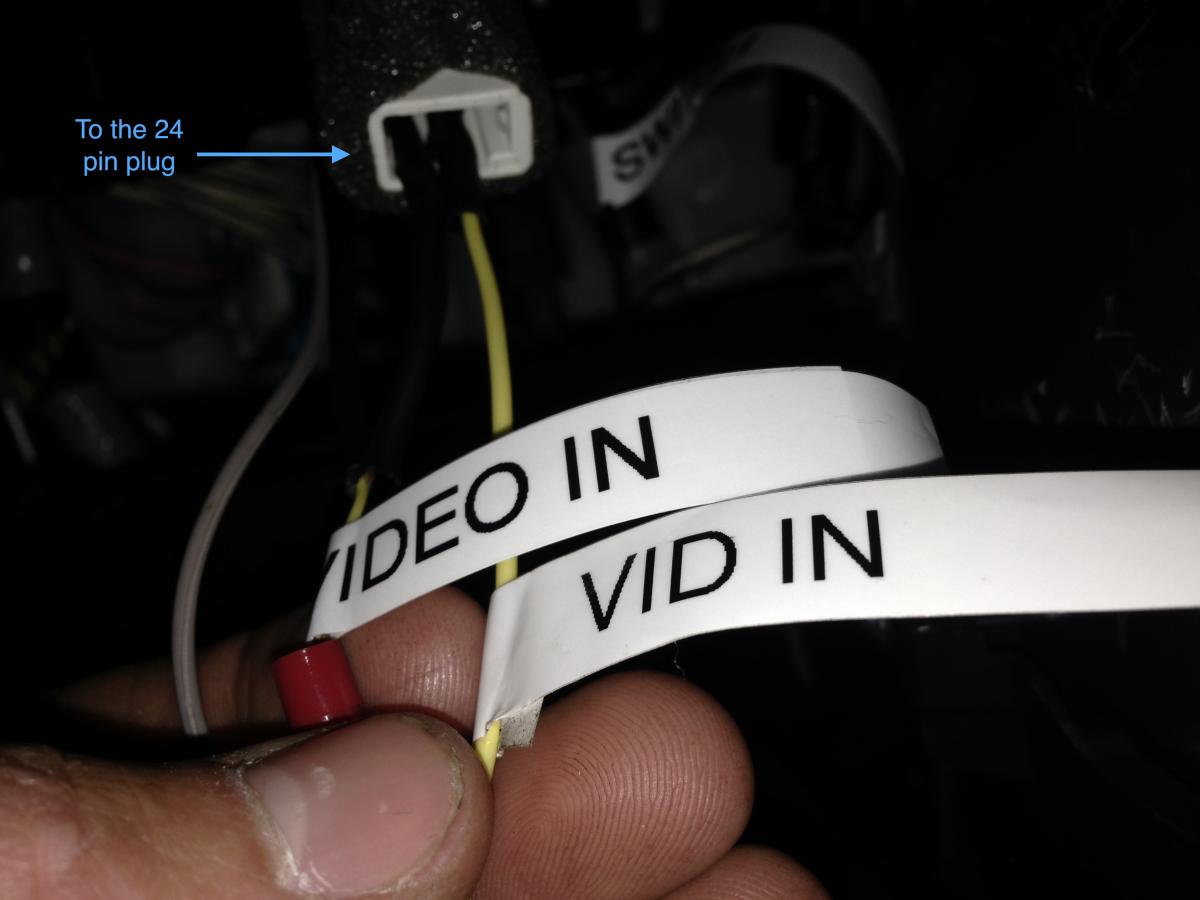
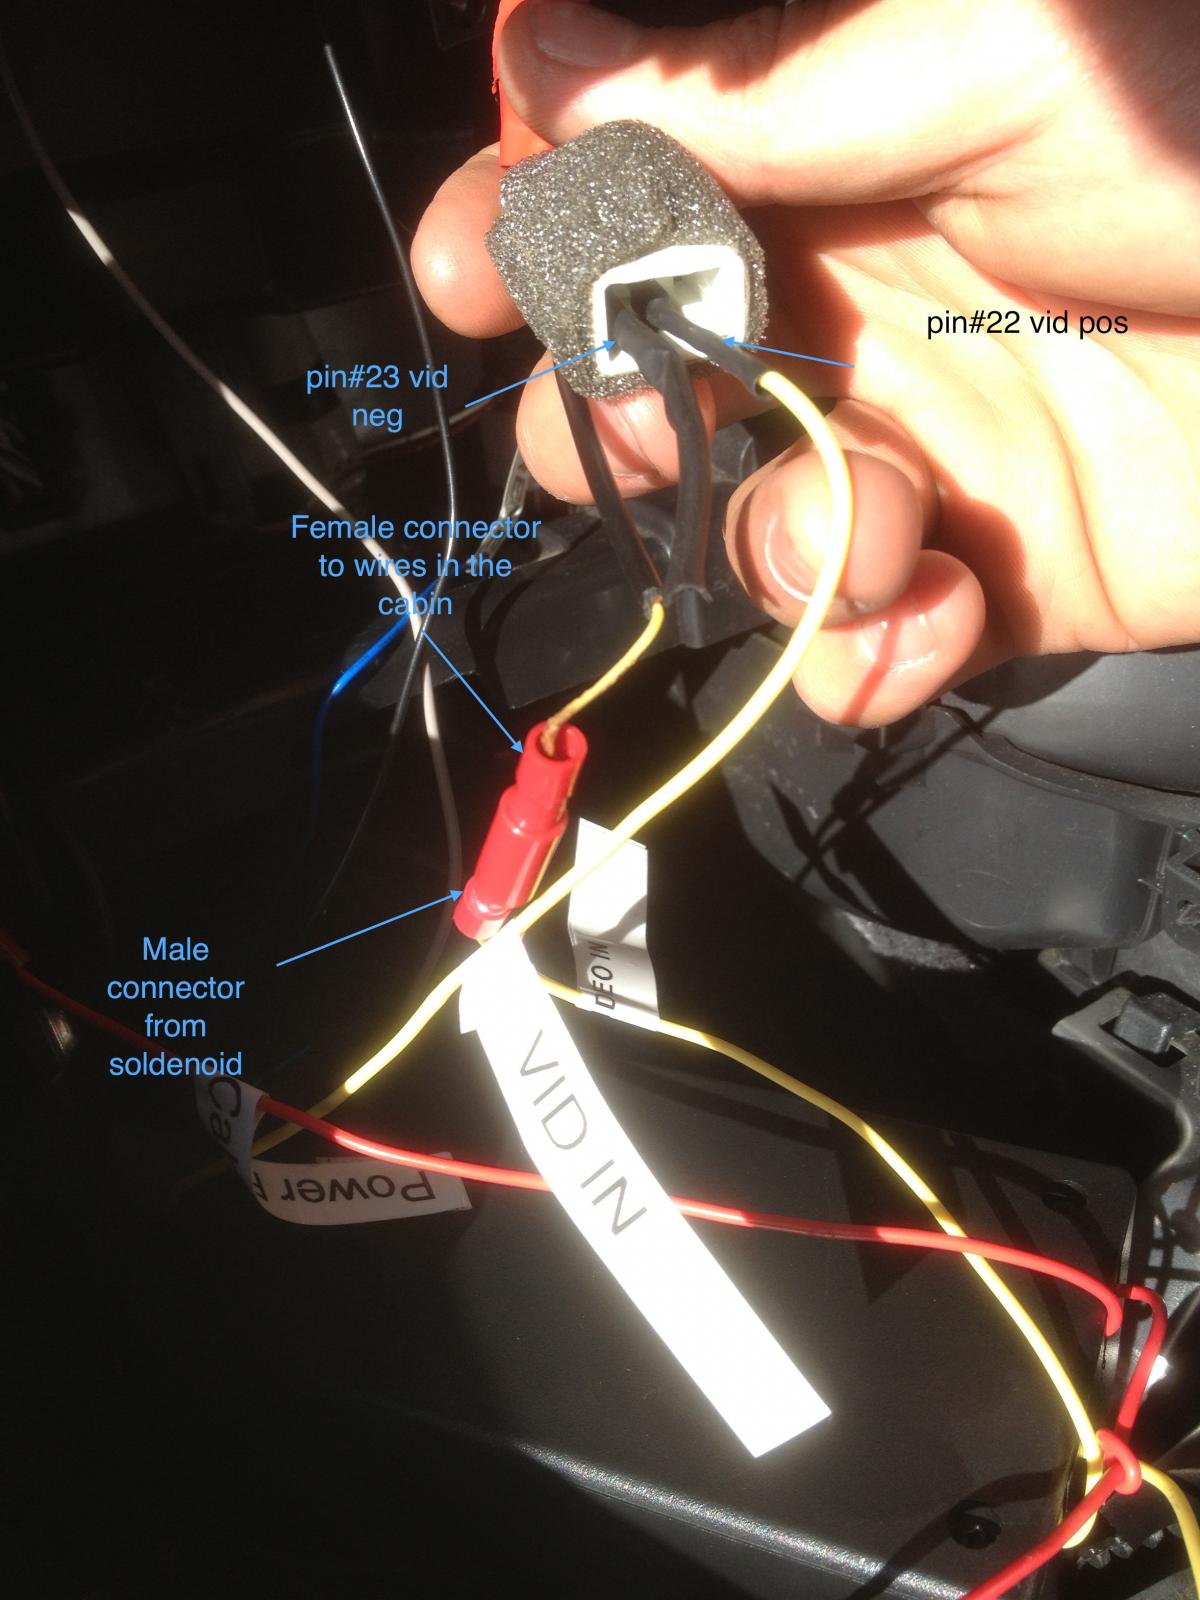
Ok, if anyone is interested here is a guide on how to install these front view cams. 1) you will need the solenoid i have which has 8 prongs, a switch with 2 prongs, some wire, solder+soldering iron, heat shrink, Front view cam (NTSC), female and male connectors. 2) The reason why we are using a solenoid: As we have a reverse camera hooked up already, the additional front camera will interfere the screens display if both cameras became active at the same time. To avoid this issue we need to install a solenoid which switches between the cameras, only allowing 1 camera to display at a time, except for when reverse gear is selected. When reverse is selected, the rear camera MUST turn on even of the front camera is already on. This is the reason why we need the solenoid. For example, say if i turned my front camera on (with the switch mounted on the dash) so i could view what is in front of my car and then decide to reverse, but wasn't bothered or forgot to turn off my front cam, both front and rear cameras will be active, and the display will not show a thing. So a solenoid integrated with the wiring, allows smooth transaction between cameras when selected into reverse gear. (hopefully this makes sense) 3) Ok so now you have a rough idea on why we need all this equipment, lets get started. Firstly you will want to remove your sat nav from the dash (fairly easy to do, there are many guides/videos on how to do this) You are going to want to locate your 24 pin plug (widest plug at the back of the unit) this houses the wires for your reverse cam and blutooth mic. You will also want to locate your reverse signal wire which is in the 5 pin plug (smallest plug at the back of the unit) Suggesting you have already got an aftermarket rear view camera, you would have 2 wires going into pin #23 and #22. 23 is vid neg. And 22 is vid pos. The reverse signal wire is pin #5 in the 5 pin plug. remove these 3 wires. now you need to start wiring up your little solenoid. you are going to need to find a place to earth a wire (find a bolt on a metal surface, make sure it touches bare metal) On the Diagram/picture you will need to solder the wires into there spots as presented. Start off with soldering the earth. Once it is hooked up, you will want to get your reverse signal wire, and solder it to the solenoid, to switch the solenoid on and off when reverse gear is selected (this determines what camera to display) this wire will be inline with the earth prong as seen. "Reverse light power 12v" At this stage you can get the wiring sorted out for your front camera. Cut the RCA connector off, and splice the wires (outer sheath *neg* and the inner wire*pos*) tie the outer sheath wire with the rear view cameras outer sheath wire. SO you will have both neg video wires joined together. These can be soldered (and extended if need be) and put back into #23 at the back of the head unit. Now you can solder the pos vid (front camera and rear camera) into there locations as shown in my diagram labelled as "front cam in" and "rear cam in". A wire will need to go from the solenoid and back into pin #22 at the head unit. Solder a wire to the prong labelled "vid out", and then plug connect it up to the back of the head unit #22. So far the the image in/out and solenoid detection has been taken care of. The head unit now needs to receive a signal for when it needs to display a camera. Solder a wire to the prong labelled as "To pin #5" and then plug it back into pin#5 at the back of the head unit. The 2 prongs left are for the switch which will control your front view camera (mounted in the dash for easy access) The 12v power you sourced earlier goes to the prong on the solenoid labelled "From cabin switch" . You will then need another wire tapped into this feed, and take it out to your switch on your dash. Then get another wire from the switch and back to the solenoid, soldering it to "to cabin switch" This will open and close the circuit for the front view cam. Make sure when you solder your wires, you use heat shrink to insulate them. Male and female connectors maybe be used to make installation easier, so you aren't soldering in the car. Note: that all the wires can be soldered onto the solenoid whilst outside of the car, ending with male connectors. Then attaching female connectors to the wires inside the car, so it becomes a plug and play unit. Hopefully this is easy to follow with the pictures supplied, and goodluck if you are going to attempt this! if you need any assistance i'm happy to help :)
-
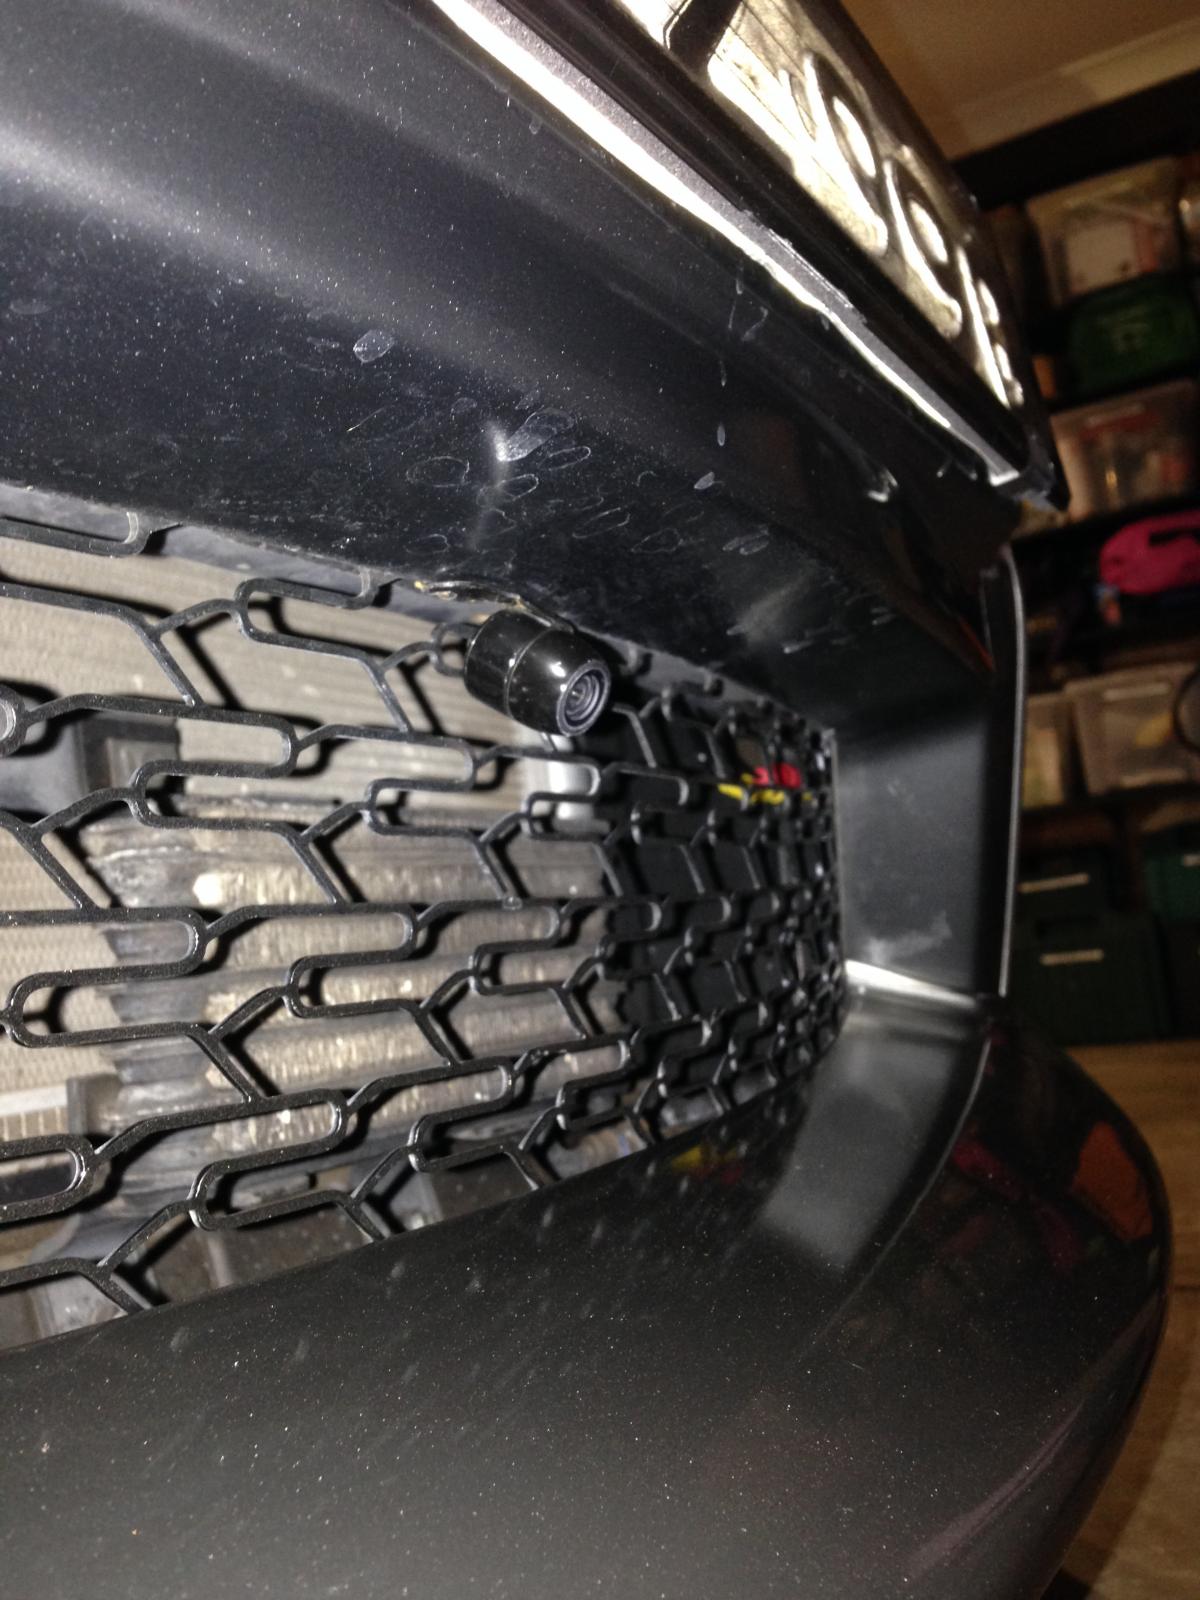
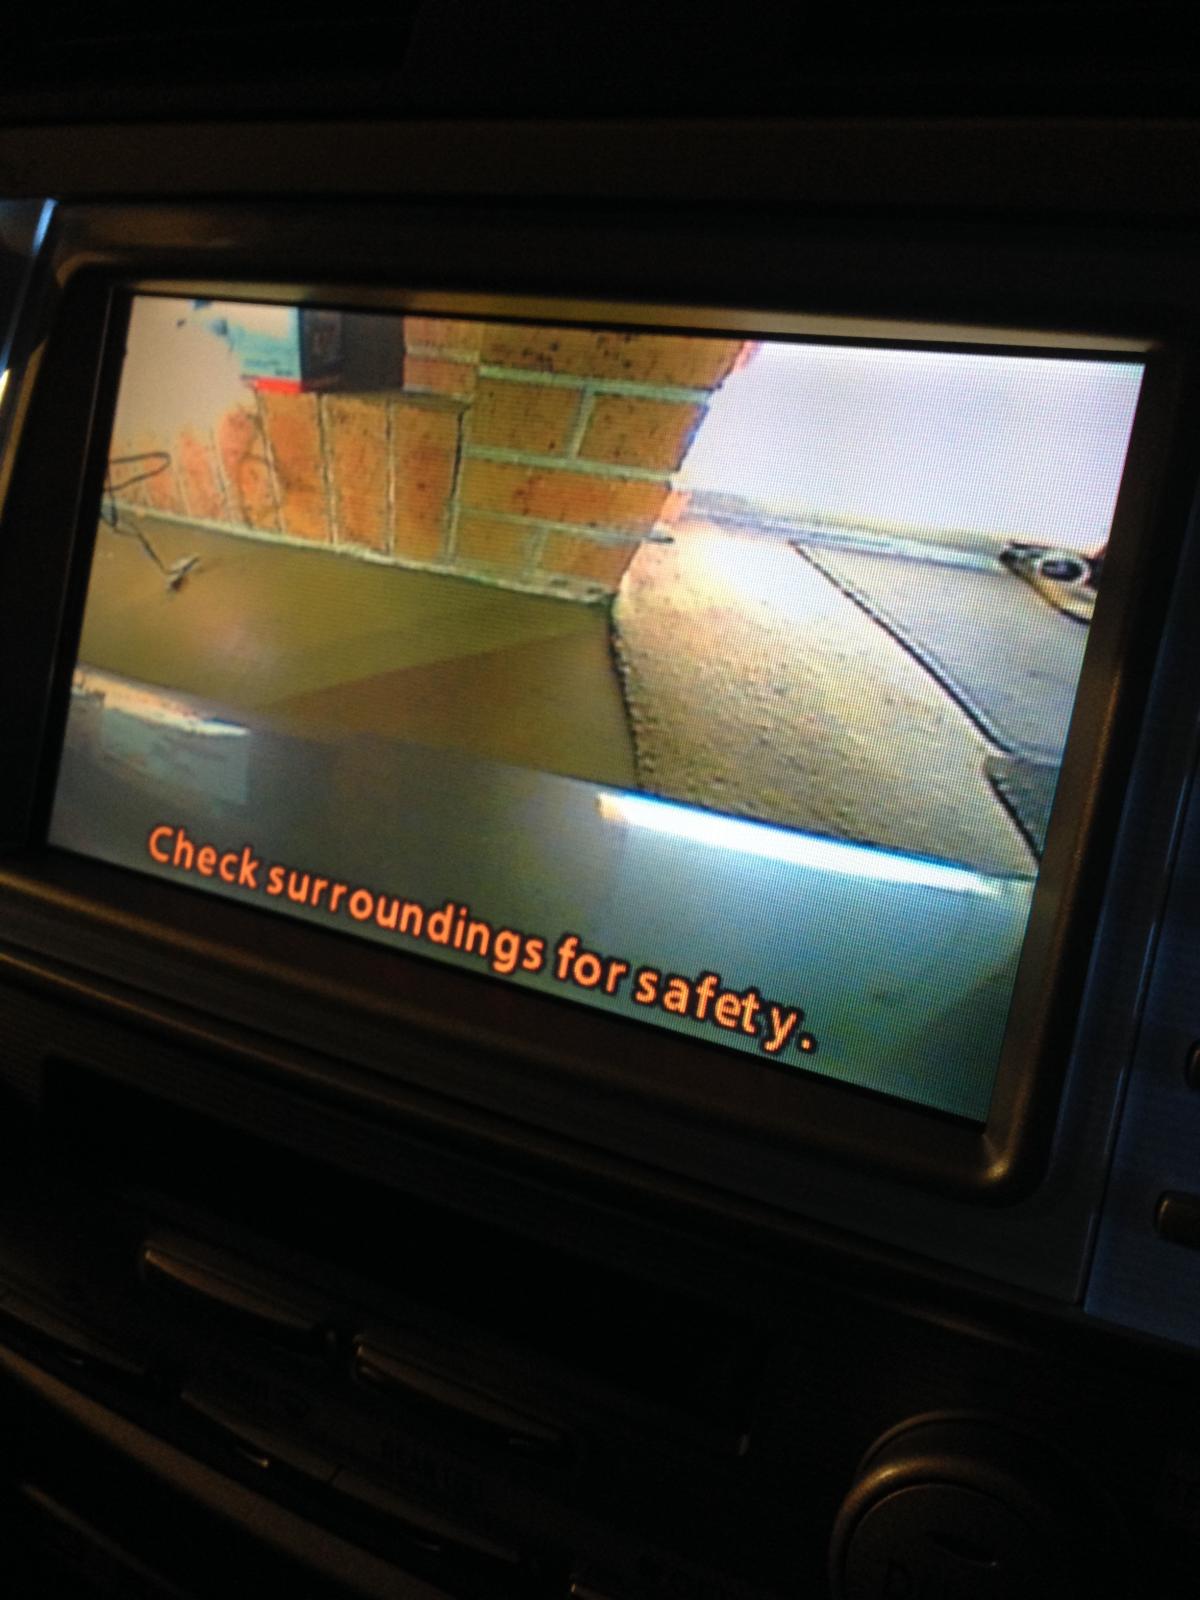
Hey guy's i recently purchased a TRD aurion 3500sl, and i have noticed that these splitters stick out quite a fair bit, and they are also quite low to the groud. The last thing i want, is to hear that unpleasant "scraping" sound when entering and exiting driveways, especially with the current condition my splitter is in now. My car came with a factory satnav, which had been installed by the previous owner. No reverse cam was installed, So I installed an aftermarket reverse camera, which wasn't too difficult too do. After this was installed, i wired up a front view camera, and this is how it looks! works really well too, i can park the car with confidence and decide whether driveways are too steep or not. This took a while to do but i managed to work it all out and get it to perform perfectly. I will post up diagrams on how to wire these systems up, as they need a solenoid integrated into the wiring so that only 1 camera can be displayed at a time. I think this is a must do for all TRD aurion owners. The cars should have come with this from the factory! I will explain everything in further detail when i find my diagrams, and explain why you need the solenoid etc.
-
Thats why you need to do what i did! left the house on foot, and returned in a TRD. lol Theres nothing she can do now
-
Yeh the 86 is an awesome car, but i needed a decent sized,comfortable 5 seater. TRD aurion is the ultimate family car ahaha. Love it.
-
I bought a TRD aurion 3500sl. Absolutely ADORE it too bits. Such a massive improvement on the standard ZR6. I am currently selling my ZR6 at the moment, and nobody is interested. Already been advertised for 2 months. 2008 model, 71000km for $19,000 not even a phone call :( shame coz it is such a lovely car, who ever gets it will love it. However i do recommend upgrading to a TRD, for the price you pay now days, its alot of car for the money, so worth it!
-
Acid Rain etching. Can i do this to fix it?
TRD468 replied to TRD468's topic in Detailing - Show & Shine
I tried sanding it today, i rubbed it back very lightly, but it seemed to have some depth to it. plus it looks like as if it has a clear coat as the residue was milky. I managed to remove some etching but it looks to have damaged the surface. Plus my rotary buffer has decided to not work anymore, so i used my dual action polisher to buff it up. I may have to invest in some new pillars! -
Hey guys, i recently purchased a TRD Aurion 3500sl, and it had been slightly neglected by its previous owner. The car is clean but to a detailers eye it needs alot of TLC. Anyway, i have some acid rain etching on the shinny Black plastics on the B pillar/doors. I have already tried rotary buffing with a compound but i haven't managed to remove the defects. I was thinking of colour sanding with 2500 uni-grit sand paper, but i'm not sure if it i will damage the pillars. Are they painted? do they have a clear coat? or are they just clear plastic over a painted surface? I have been using the uni grit on some parts of the car due to more severe defects, but i just wanted to double check if i am able to sand down this surface, and then buff it to a shine, as you would with the other painted surfaces. Also, my rear spoiler has suffered quite badly from this as well, and buffing has only removed small amounts of etching. Can i sand these "plastic" parts too? i know the ZR6 aurion you can't as the plastic for the spoiler is much clear, and it will make the paint more transparent when sanded down (for a silver or light coloured car), creating a blotchy effect in the sunlight. I know the material is different for the TRD but i don't want to risk it, until i know what sort of material was used for the spoiler. Hope you guys are able to help! :) Cheers, Anthony.
-
LoooL im watching those wheels... just saying
-
Removing spray paint dust from windows
TRD468 replied to DemonRolla's topic in Detailing - Show & Shine
steel wool. -
my sister used to have a yaris with a pioneer deck and the radio reception wasn't as good as the factory stereo. But she didnt care as she used the ipod hence why she bought it.
-
Are you running a genuine toyota headunit? Because i had an aftermarket head unit and had terrible radio reception. I then forked out some more cash for a genuine Aurion sat nav. what a difference! The quality of the radio reception improved by 100%
-
these chinese units are dodgey, in the end i forked out the extra cash and bought a 2nd hand genuine unit, installed it with all the accessories and i couldn't be happier. I spent twice the amount of cash for a unit that is 100 times better.
-
random grinding noise when starting the engine
TRD468 replied to xCalibur_'s topic in Aurion / TRD Aurion Club
This is what i have been told. Over night oil drains down into the sump leaving the top parts of the engine dry. On first start up these parts aren't fully lubricated and make a grinding noise (as it is metal against metal) until oil pressure is built up and all parts are lubricated. The noise usually lasts for about 1 or 2 seconds once the engine has cranked over and started. makes sense to me :D -
such a good looking car with rims. lowered suspension will also improve the look, as with any car
-
faaarrrrrrk man, that sucks. I friggen hate that, no need to key a car i remember the week i bought my aurion it got egged, and boy did i go off. not cool at all.
-
went to toyota today, they had aurions on the showroom floor, and i have to say, these cars look so much better in real life. The sportivo will look good if it had bigger rims lowered suspension. The presara looks very classy as well. The rear end of the car actually isn't as bad as we all thought it was ^_^
-
lol i got the Y cable as well, i have no idea why they even sell it, so pointless, does absolutely nothing haha.
-
Do not buy the "Y" cable it is completely useless, i bought it and took it out of the pack and literally said wtf. Just buy the unit and its all good. Works with factory satnav as well. No Y cable is needed.
-
Good habits for keeping our Aurion's healthy inside?
TRD468 replied to Brad - SX6's topic in Aurion / TRD Aurion Club
The most crucial thing is warming up your engine. I let my car warm up while i get things prepared for the day and load the car up. let it sit in neutral or park and let the engine warm up. Then drive off without letting the car go over 2000rpm, this will warm up your gearbox. 98 also helps alot, and regular servicing and oil changes etc will reflect on your cars health. -
i reckon that dark grey suits the new sportivo, seems to balance those big plastic surrounds, blue and red are like wtf, and same with black. silver, grey and white are the best colours. But the car i saw was a presara in black, and it looked like a camry, boring as.
-
those car wash drive throughs have had millions of other cars go through them, so you could imagine the amount of crap left on them. Best way to do it is with clean products, chuck your chamois, sponges, microfibres etc, into the wash, dry em off, have a clean bucket and wash your car from the top down, and dry your car from the top down. Best way to eliminate swirls and dullness in your black paint work, consider waxing your car often.