

I know there are a few guides on brake pad changes on here, but none cover the rear pads.
Disclaimer:
Read this guide through completely before commencing to ensure that you are competent in doing the work yourself. By following this guide you are accepting full responsibility and I will not be held responsible, directly or indirectly, for any damage or anything else caused by following this guide.
Do not install new pads and rotors at the same time. It is always best to bed the new pads in on the old rotors before installing the new rotors. Doing this at the same time risks permanent damage to the new brake rotors! And yes I am aware that new cars come with new pads and rotors, but they also tell you to drive slow and easy for the first 1000km 
Front brake pads
1. Undo the front wheels nuts, but don’t take them off just yet.
2. Jack the front of the car up and support it on jack stands.
3. Now remove the wheels
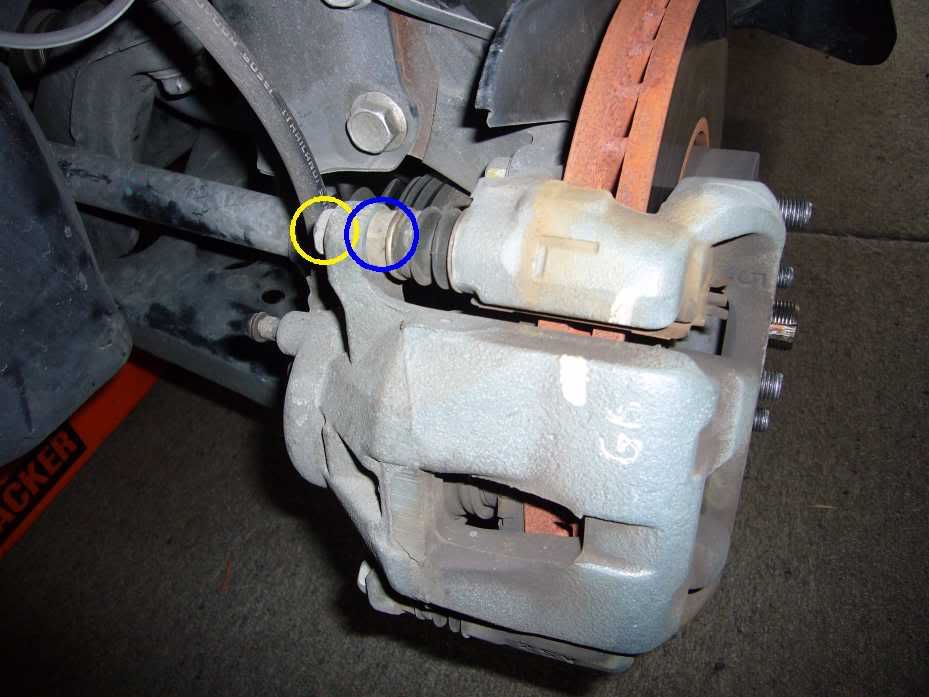
4. Undo the top bolt on the caliper (circled yellow), this is a 14mm bolt.
5. Gently swing the caliper forward being careful not to pinch the bake hose. Pull the brake pads out and remove the anti squeel shims and wear indicator. Take note of the noise shim order. The image below shows the order in case you mix it up. To pull the wear indicators off use some pliers to gently tilt the loop backwards so that the little finger (shown below in the green circle) clears the notch and slide the wear indicator off.


6. Place the wear indicator onto the new pads, shouldn’t matter which end of the pad it goes onto, it just has to face the right direction. I’m open to be corrected on this. And add the noise shims.
7. To push the caliper pistons back in I just use one of those purpose made tools you get from Repco/Coventrys. But if you can’t be bothered buying one of these some g-clamps will do the job. Using the g-clamps and blocks of wood, the wood is key, place this around the caliper being careful not to clamp onto anything weak or uneven. Then wind the piston in until the piston is almost flush with the housing, as seen in the image below. During this process keep a very keen eye on the brake fluid reservoir as there is a high chance it will over flow. If it does overflow wrap a rag around it to avoid getting the fluid onto anything else and try to remove some fluid by any means without getting any debris into the reservoir. The best way would be to bleed some of the fluid out, this requires a helper. Get a ring spanner (8mm front, 10mm rear), if you use anything else I am not respsonsible, and loosen the bleed valve on one of the calipers that is easiest to get to. Attach a small tube over the bleed nipple and push down on the brake peddle, undo the bleed valve so that fluid coms out. Retighten the valve then take the pressure off of the brake peddle. Repeat until the reservoir level is below the max level. Once that is done tighten up the bleed valve and put the rubber dust boot back on.

8. When putting the new pads in ensure that the inside pad goes into its guide correctly (circled blue below). Once both pads are in squeeze them together with your hands and while still holding them swing the caliper back into place. Hopefully you have pushed the piston back in far enough not to repeat step 7. The nut where the bolt was removed in step 4 (circled green) may need to be pushed back in, this is ok as it is meant to slide.
9. Put the bolt back in and torque up to 35Nm. If the nut spins while doing this use a XXmm (I need to double check the size) spanner to stop the slide from spinning.

10.Put the wheels back on, lower the car, torque the nuts up to 100Nm and move onto the rear pads, or go for a drive to bed the new pads in.
Rear brake pads
1. Undo the rear wheel nuts, but don’t take them off just yet.
2. Chock the front wheels and then jack the rear of the car up and support it on jack stands and take the hand brake off.
3. Now remove the wheels.
4. Undo both bolts on the caliper mount. I circled the top bolt blue, shown below. I forgot to get a photo of the lower bolt. Should be easy to find, if not then I’ll have to take another picture. Get something to support the caliper on while changing the pads as you don’t want to stress the brake hose.

5. To remove the pads, the retaining clips need to be undone. Start by removing the clips circled in green. Lift these up and push towards the brake rotor, these should just pop out. Make sure to not lose or bend them. To remove the clip circled in red you will need some needle nosed pliers. Just grab one of the ends and try to pull it out with the same angle that it is in the hole with. The pins should then just side straight out, they might be a little caked up with brake dust.

6. Pull the old pads out and push the piston back into the caliper. I ended up having to push it the whole way back in to fit the new pads in. Keep an eye on the brake fluid reservoir while doing this as you don’t want it to overflow.
7. Put the new pads in with the shims. It is a tight fit, but gently using a hammer they should go into place. Put the pins and clips back into the caliper keeping in mind which way they went. The big clip uses the mounting holes. The smaller clips just loop around the pins.
8. Make sure that the caliper slides, circled pink below, are not stuck by sliding them back and forth gently. If the rubber boot comes off of the slide, just move it back and forth until it pops back into place.

9. Redo the caliper mounting bolts up nice and tight, 47Nm to be exact. And the finished product will look something like this. Before adjusting the brake reservoir level to be under the max, gently pump the brake peddle a few times with the engine running until it becomes nice and firm. This is to get brake fluid back into the calipers.

10.Put the wheels back on and re-apply the handbrake, lower the car, torque the nuts up to 100Nm and go for a drive to bed the new pads in.
Bedding in procedure
This is taken from Autospeed and is the easiest to understand and best method to bed pads for the street.
Brake pads and rotors should always be initially bedded to condition the pads and rotor surfaces for racing use. This "bedding in" procedure will result in greater performance, longer wear, and less likelihood of rotors cracking due to thermal shock. To bed in brake pads, start by pumping your brakes at a very low speed to assure proper brake system operation. In a safe location, make a series of progressively harder stops from moderate speeds until some brake fade is experienced. Allow brakes to cool while driving at moderate speeds, avoiding use of the brakes. The brake pads should now be properly bedded in.
Link to original article: <a href="http://www.autospeed.com/cms/A_0351/article.html" target="_blank">http://www.autospeed.com/cms/A_0351/article.html</a>
Just be very careful on the pads until they have been bedded in as stopping distances will increase dramatically due to green fade.
