


iSCH
-
Posts
3 -
Joined
-
Last visited
Content Type
Profiles
Forums
Events
Gallery
Tutorials
News & Articles
Videos
Posts posted by iSCH
-
-
I have no idea. Daryl is the man for that question. I was content in knowing I can use it if I need it. So I really have no idea.
I can't directly comment with respect to the new 'updated Auspack' head unit. All I can say is that mine has a reverse trigger on it so when you put the car into reverse, the head unit will automatically switch to the revers camera mode. I would assume the new head unit is the same, but from previous posts, I have heard conflicting answers.
As for where to tap into the +12v source, the passenger side kick panel is the best spot. There is a wire there, I have indicated it before but others have had mixed results, that provides power to the reverse lights so therefore it will be +12v when the car is in reverse. This is what I used to trigger the head unit to go into reverse mode.
But as I said, I can't confirm the operation of the new head unit.
Ok, thanks to both Adam and Daryl for the replies....
Just seems a bit odd that the reverse camera mode does not come out automatically when reverse gear is selected .. unless somewhere in the menu / settings of the new 'auspack', there is a provision to enable / disable (default) this automated function. There isn't another 'trigger' cable that we need to connect from car's +12V to head unit, right?
Back on the camera power wiring issue, does this means that it really makes no difference if owners choose to power the reverse camera power either by tapping into the red & black wire at the reverse light itself or to the red & black wire at the hardness in the passenger side kick panel?
If this is the case, any reason why one would choose to run the camera power cables all the way to the front passenger kick panel as oppose to the rear reverse light which is a lot closer?
Hope everyone has a great week ahead... :)
-
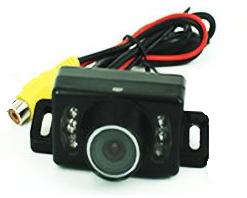
I’ve been putting off installing my reverse camera that came with my new head unit for a few days due to the lack of a complete guide all in the one place. But yesterday I decided to bite the bullet and go for it. I’m going to assume the reader is a complete beginner and explain everything in detail and hope it makes it a bit easier for someone in the future. My Head Unit is listed on eBay as HD LCD CAR DVD GPS 2007/08/09 TOYOTA AURION CAMRY DVB-T from seller autome305. I have written a review of the unit itself here. The installation may differ depending on the camera that you have, but the camera I have looks like this.

The camera is designed to be screwed on above the number plate and attached with the included screws. The entire installation process working as a complete beginner took around 2 hours working slowing and carefully. In retrospect, it was quite an easy although time consuming job and I’m definitely pleased with the result. The camera itself comes with 2 cables: a standard yellow RCA cable and a 12 volt cable, both of which plug into the camera. The power is accessed through the reverse light and the RCA cable runs from the boot to the head unit. The set up I am going to write up now does not automatically bring up the camera on screen when reverse is selected, but I’m happy with this as I don’t believe the camera is always necessary. All you need to do to access the camera is press menu and press the CAM button on the screen. Now let’s get into the set up.
What You’ll Need:
- Camera.
- Cables.
- Drill.
- Silicone.
- Coat Hanger.
- Screwdriver.
- Wire Taps.
STEP ONE: REMOVAL OF TRIM:
An important note when it comes to trim removal: Make sure that all clips are removed before you try to put them back in. It took me awhile to figure this out and was very frustrating.
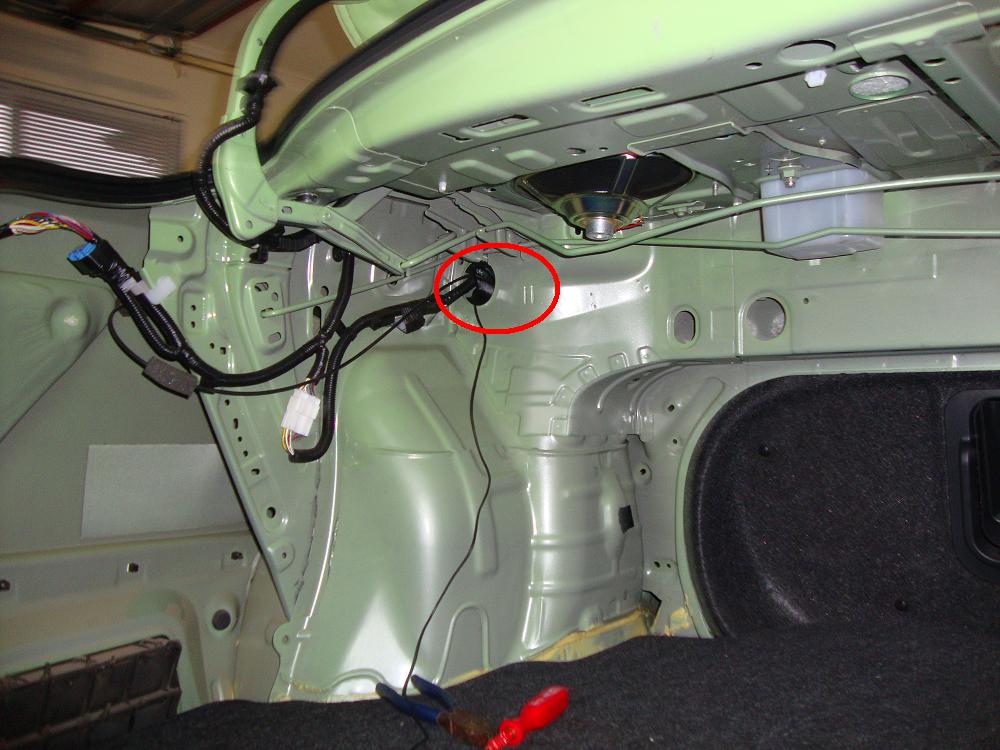
As the title suggests, the first thing you’re going to do is remove all the necessary trim to drill and run the cables through. The trims come off by simply pulling quickly away from the panel. Any that don’t come out can be removed by using 2 flat head screw drivers to lever them out. Care should be taken in this step as the white clips that hold the trims in place are a pain to get out at times and are definitely the most frustrating part of this installation. I broke quite a few trying to get them out. If anyone knows of an easy way to get them out, please let me know. Starting at the boot the trims you are going to want to take out are the boot lid trim. This is quite easy as the black clips are easy to get out. Just put the clips somewhere for later. The next thing to do is to take out the floor of the boot and remove the entire piece of carpet as well as the wood underneath it. This allows you to remove the trim on the left side of the boot and have access to the cable hole. All the side trims simply pull off as well. All the removed trims can be seen in this photo. Note the cabling hole circled in red. This is where you run the cable through.
The Next thing you are going to want to remove are the door trims along the side of the car starting with the door pillar and forward kick panel before moving on to the door trims.
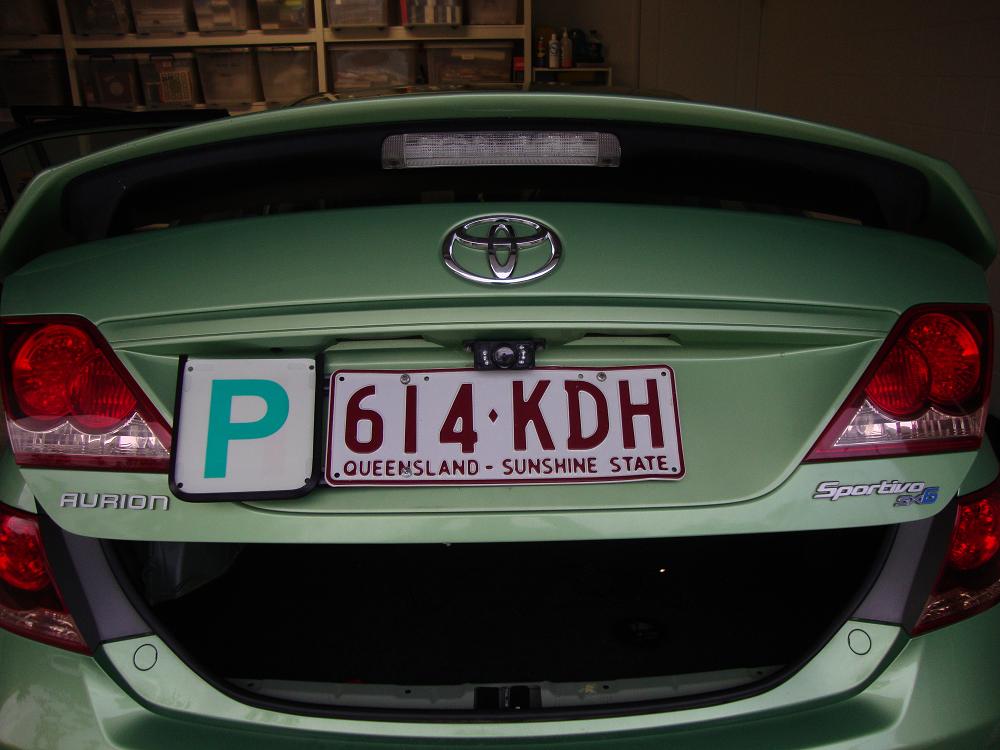
STEP TWO: FITTING OF CAMERA.
To fit the camera was easy. I simply found the middle, marked out where the screws were going and the cables had to be run through and drilled the holes. Make sure you only drill the holes just big enough to fit the screws through or you will have to find something bigger. The cables were inserted through a 12 mm hole I drilled. My advice with drilling is to start with a small bit and work your way up. It’s easier to correct any mistakes and is neater. The camera was simply screwed in and the holes were covered in silicone to waterproof them. The final job looks like this.
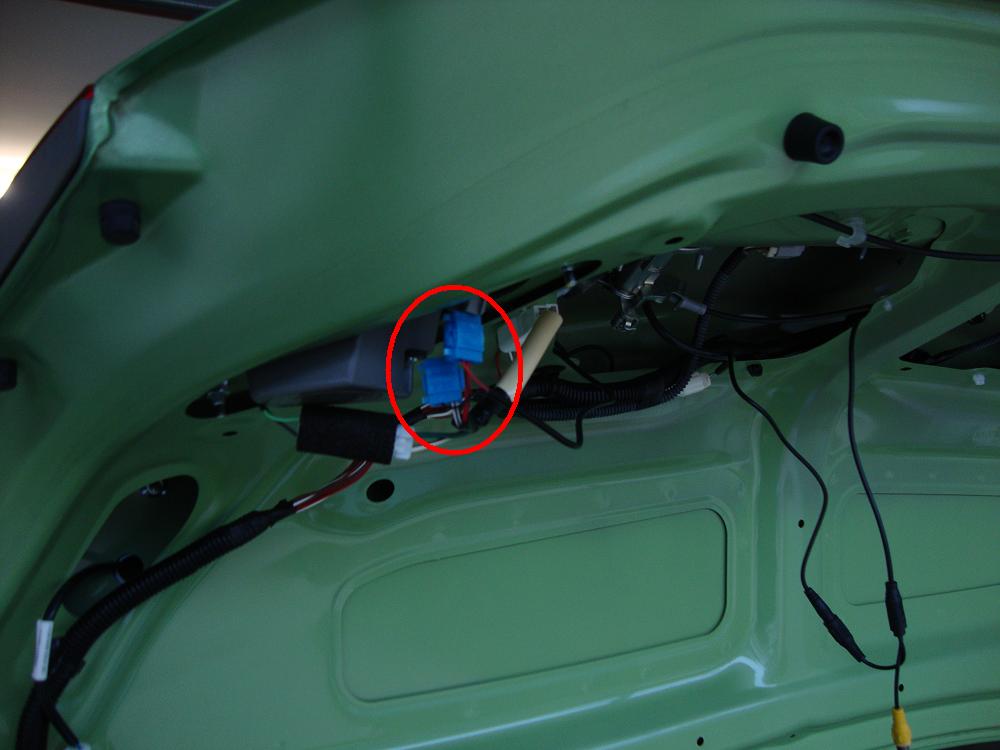
STEP THREE: ATTACHING THE CABLES:
To get power for the camera, I just looked at the back of the car and saw which wires connected to the reverse lights and tapped into them with some wire taps. You can use a soldering Iron instead, but this is not as permanent and much easier in my opinion. The completed work can be seen in this photo, the wire taps are blue.
That is the power taken care of. Whenever reverse is selected, the camera has power. Running the RCA lead was simple. All I did was tape it along the existing wires and run it through the cable hole. If are working in a bright environment this process is easy. What I did was straightened a coat hanger and make a small loop at the end to lock the cable in. I then simply grabbed the top corner of the back seat and looked for day light. I pushed the coat hanger through, attached the RCA cable from the boot and pulled it through. Once this was done I ran it along side the other wiring all the way to the front foot well. Once this has been done, reinstall the trim starting with the pillar the forward most kick panel. After that, push the 2 door trim back on. The only thing left to do now is to attach the RCA cable to the head unit. Head unit removal is easy thanks to DJKOR’s guide here. If you open the glove box and look to the left side you will see a small hole with some cabling inside. Run the coat hanger through this hole and down to the foot well. Pull the cable through, behind the console and through the hole on the right hand side and attach to the head unit. The coat hanger is a big help here as well as the use of a torch to see which holes line up where. It is a simple matter to run the cable through and attach the head unit so I won’t go into detail there. All you need to do is install the RCA cable to the plug that says “Camera” and reinstall the head unit. Before you put everything back together, turn the car on and put it in reverse and check that you have a picture as well as your reverse lights working. This shouldn’t be a problem if you have followed the instructions and been careful. All that is left to do now is put everything back in starting with the Head Unit and moving to the boot trims. If you got them off easily, just reverse the process and you’ll be fine.
That’s about everything you’ll need to know. It’s a fairly long write up for a simple process but it has the beginner in mind. Thanks for reading and best of luck. Enjoy.
Adam.
Cool...Great write up.... I am thinking of getting this installed soon.
Anyway, I have a question regarding the camera installation, specifically on this unit >>> HD LCD CAR DVD GPS 2007/08/09 TOYOTA AURION CAMRY DVB-T from ebay seller " autome305 ".
I have read through quite a number of post and different Aurion owners seems to wire the video feed up differently; which I assume depending on the Aurion models / camera wiring / head unit build itself. (i.e some wired up to the socket found near passenger kick plate, some wired directly to rear of the head unit, some simply plugged in). As for the power supply to camera, I can only assume most owners would power the camera by tapping into the reverse light on the boot lid itself.
I am wondering whether the camera on this unit (conveniently plugged in directly to the rear of the headunit) be set such that it comes on automatically when the car is put in reverse, rather than having to manually turning it on as required? Can this unit be wired such that it will come on automatically?
Thanks in advance for further clarification.

A Complete Beginners Guide to Installing a Reverse Camera.
in Aurion / TRD Aurion Club
Posted
OK.... now I understand.... thanks for your help
(a) camera power cables (red & black) tapped into the reverse light
(B) head unit trigger to +12V red cable in passenger kick plate (indicated in the second photo of your previous post)