


Lak005
-
Posts
16 -
Joined
-
Last visited
Content Type
Profiles
Forums
Events
Gallery
Tutorials
News & Articles
Videos
Posts posted by Lak005
-
-
The turn signal flasher relay is mounted behind the speedo funnily enough. So you will have to take that out to get there.
You can buy them from eBay by searching for LED flasher relay. As a matter of fact, I think Narva makes them and you can find them at places like Repco.
Is it hard to get to the flasher behind the Speedo? Have you posted any thread on it previously? Do you know any links to get the info? What a place to put the flasher unit! I found this on eBay. http://cgi.ebay.com.au/Lexus-Toyota-Electr...=item2c529214ea
Thank again DJ.
-
Yes, both the front and rear indicators are a T20 bulb.
You will need to get an electronic flasher unit because changing just either the front or rear light will be enough to reduce the flashing delay from the traditional flasher unit.
Thanks DJ.
Where do you find this flasher unit on the car? I had a look in the engine bay and found the fuse box, but couldn’t figure out which one is flasher. Can you help please help?
Would you know where to get this flasher for LED indicator lights?
-
Hi Guys I would like to change my indicator lights to LED. Are they T20 LED globes? Please find the link attached from eBay.
http://cgi.ebay.com.au/2pcs-7440-7443-T20-...=item2c529d702f
Do I need to change any flasher unit for led indictors?
Thanks
-
I received my reversing camera today. And I wired it up as suggested previously. My head units all other functions work fine. My camera works but I have to go in to main menu to select the camera mode to see it. I want it to make it turn on automatically when I shift in to reversing gear.
I connected the Reverse (pink) wire as you suggested, to red with white dots. It makes the camera mode stay on.
My parking wire does not have a loose end to connect to earth. I do have loose wire called ILL – PWM and I trying connecting to earth. Doing this makes the camera stay on and I cannot get into any other mode. I left the P.Center and Mute loose. Any suggestion.
If connecting to the wire specified in my guide does not activate your reverse camera only when reverse is selected, then here are my next two suggestions.
1) Use a multimeter and test for any wires around the passenger side kick panel that are +12v when reverse is selected. Then you can tap into that one.
2) Extend the wires and connect directly to the reverse light itself. That will be guaranteed to work.
Thanks DJ for quick reply and I will try this.
Finely I found the wire to connect my reverse Pink wire. DJ as you suggested previously finding a wire using multimeter. That was a read wire in the left kick panel and 2nd block from the bottom, red wire is on the top raw of the plug. Now when I am playing radio AF sign is flashing in the bottom left corner of the screen (only in radio mode). Does anyone know what this means. Thanks again guys.
-
I received my reversing camera today. And I wired it up as suggested previously. My head units all other functions work fine. My camera works but I have to go in to main menu to select the camera mode to see it. I want it to make it turn on automatically when I shift in to reversing gear.
I connected the Reverse (pink) wire as you suggested, to red with white dots. It makes the camera mode stay on.
My parking wire does not have a loose end to connect to earth. I do have loose wire called ILL – PWM and I trying connecting to earth. Doing this makes the camera stay on and I cannot get into any other mode. I left the P.Center and Mute loose. Any suggestion.
If connecting to the wire specified in my guide does not activate your reverse camera only when reverse is selected, then here are my next two suggestions.
1) Use a multimeter and test for any wires around the passenger side kick panel that are +12v when reverse is selected. Then you can tap into that one.
2) Extend the wires and connect directly to the reverse light itself. That will be guaranteed to work.
Thanks DJ for quick reply and I will try this.
-
I am trying to buy the reverse camera for my Aurion ZR6 2008. The camera came with the unit I could fit into the original hole and blown up. Would you have pitchers of reverse camera, fitted in the original plastic cover plate? If possible you could give me eBay seller details. Thanks
Watch out with the photo quoting there :P
Anyways, a camera that seems to be a good fit would be the one specified in the thread here:
I received my reversing camera today. And I wired it up as suggested previously. My head units all other functions work fine. My camera works but I have to go in to main menu to select the camera mode to see it. I want it to make it turn on automatically when I shift in to reversing gear.
I connected the Reverse (pink) wire as you suggested, to red with white dots. It makes the camera mode stay on.
My parking wire does not have a loose end to connect to earth. I do have loose wire called ILL – PWM and I trying connecting to earth. Doing this makes the camera stay on and I cannot get into any other mode. I left the P.Center and Mute loose. Any suggestion.
-
I had a look in my Aurion Registration Date 05-06-2008. It has a steel pipe no rubber pipe looking from the top. Is this OK.
Whoa.... go easy on the picture quoting.
Yes mate. That is the new pipe. Just look at the before and after photos in the second post.
Thanks DJ. One more thing wear to buy a cheap oil filter wrench?
-
Basic steps to get you going should you choose to DIY.
Difficulty: Frustrating
Swear Factor: Extremely high
Notes: I would advise to NOT do this yourself unless you have small hands and A LOT of patience. Working with the 2GR in the Aurion engine bay is not the most pleasant experience.
Okay, so if you're not aware, the 2GR-FE in the Aurion (and other cars for that matter) had previously had a design fault which can lead to oil loss. The Aurion's affected are generally those that were built prior to 2009. There is quite a lot of discussion over on the Toyota Nation thread "ATTN: All 2GR-FE V6 OWNERS!!! BEWARE!!!", as well as over here in "Alert to V-6 owners - possible oil leak!".
I'll let you do the reading further into those topics as this thread is here just for reference. It has been said that the leak mainly occurs anywhere between 45k to 65k miles (72k to 104k kms). Now this part replacement would be covered under warranty, but I believe that they will only change it once the leak occurs. This in my opinion is too risky as even with a small leak, you can lose quite a bit of your oil really fast. You can see just how fast the oil comes out of a pinhole leak from this video:
Please wait a few seconds for Video to Load!If you wanted to be safe like I am, you can purchase the replacement pipe plus gaskets for around $45 and either change this yourself, or get Toyota or another mechanic to change it for you at cost.
The part numbers are:
Pipe Oil No. 2 - 15772-31030
Gasket - 90430-16012
Gasket - 90430-16016
Gasket - 90430-16017

So with all that said, yesterday I purchased these parts, and today I fitted them.
The general instruction to replace the pipe itself can be seen in this PDF:
http://members.cox.net/n0v8or/engine_oil_drip.pdf
However, getting to it all in the first place is not the easiest thing to do while the engine is still in the car. The following is just a helper guide to give you the idea. It requires that you know how to fill in the gaps in terms of basic automotive work. If you can't figure this out, don't attempt this procedure. It's not for beginners.
So basically, you jack your car up and remove the drivers side wheel:
Then you need to remove/put aside the power steering pump. To do this you remove the trim at the front of the wheel arch:
Then you locate the automatic belt tensioner. Keeping a 5mm Allen key handy (or any other rod of solid metal that is 5mm), you place a 14mm spanner on the belt tensioner and apply pressure in the anti-clockwise direction. This is spring loaded and you will need a bit of pressure on the spanner. Once you have turned it, you will see that the hole at the bottom will line up with a gap in the engine block. You insert the Allen key here to lock it in place:
You then proceed to take the belt off the power steering pump and then unbolting it, putting it to the side to give you some room:
I had a look in my Aurion Registration Date 05-06-2008. It has a steel pipe no rubber pipe looking from the top. Is this OK.
-
Hi Guys,
As discussed in the other thread here are some pics of my install with the various screens.
Things to note:
ALL the steering wheel buttons work perfectly. The display button for the trip computer works normally. Volume, and Up/Down buttons work normally. The mode button cycles between the various stereo functions ie. Radio, CD DVD, TV, Bluetooth etc etc.
The TV function works OK once you tune it. When you move the car into a different area, you may have to fine tune it each time. Doesn't really keep a stable picture while driving. (to be expected for tv though. Wouldn't watch while driving anyway)
You don't need to spend any extra money at all. It comes with camera, tv antenna, sat nav antenna, all wiring. I did however buy a different camera from ebay.
The camera it comes with is an excellent quality night vision camera, it does fit in the factory mounting hole, but the angle points a little too low. ie. could see my rear bumper and tow bar and about 50cm back from the car. Because of its size you can't angle it up any higher. I purchased a smaller camera ($35 ebay) which allows a higher angle and more vision. See pics below. You guys may be able to work out a better way to mount the included camera. The ebay one is not a night vision camera but works on 2 lux light. The included camera is way way better in the night that the ebay one i purchased. The ebay one is the same quality during the day, but has much more flexability for angle adjustment.
Like its already been mentioned, the beeping can get annoying so if you want to get past that, you should install an AMP and run the units pre-outs into the amp. The sound is a lot better.
I have eclipse 6x9's all round with an amp. sounds superb.
Overall i'm really happy with the unit and the service from Auspack Electronics.
I am trying to buy the reverse camera for my Aurion ZR6 2008. The camera came with the unit I could fit into the original hole and blown up. Would you have pitchers of reverse camera, fitted in the original plastic cover plate? If possible you could give me eBay seller details. Thanks
-
Is this wire makes the camera to switch on automatically, when I move the gear shift to reverse? At this moment I can go into main menu and select camera it works. Thanks again for your help.
Yes this is the wire to make it switch automatically went you put it into reverse.
I connected the pink wire as you suggested. But with my unit the reverse camera stays on all the time, I cannot get in to any other application. Any ideas!I would most likely think you connected it to the wrong red wire. One of those red wires is constant +12v, the other is +12v only when in reverse (as it runs to the reverse lights). Are you sure you connected it to the correct red wire?
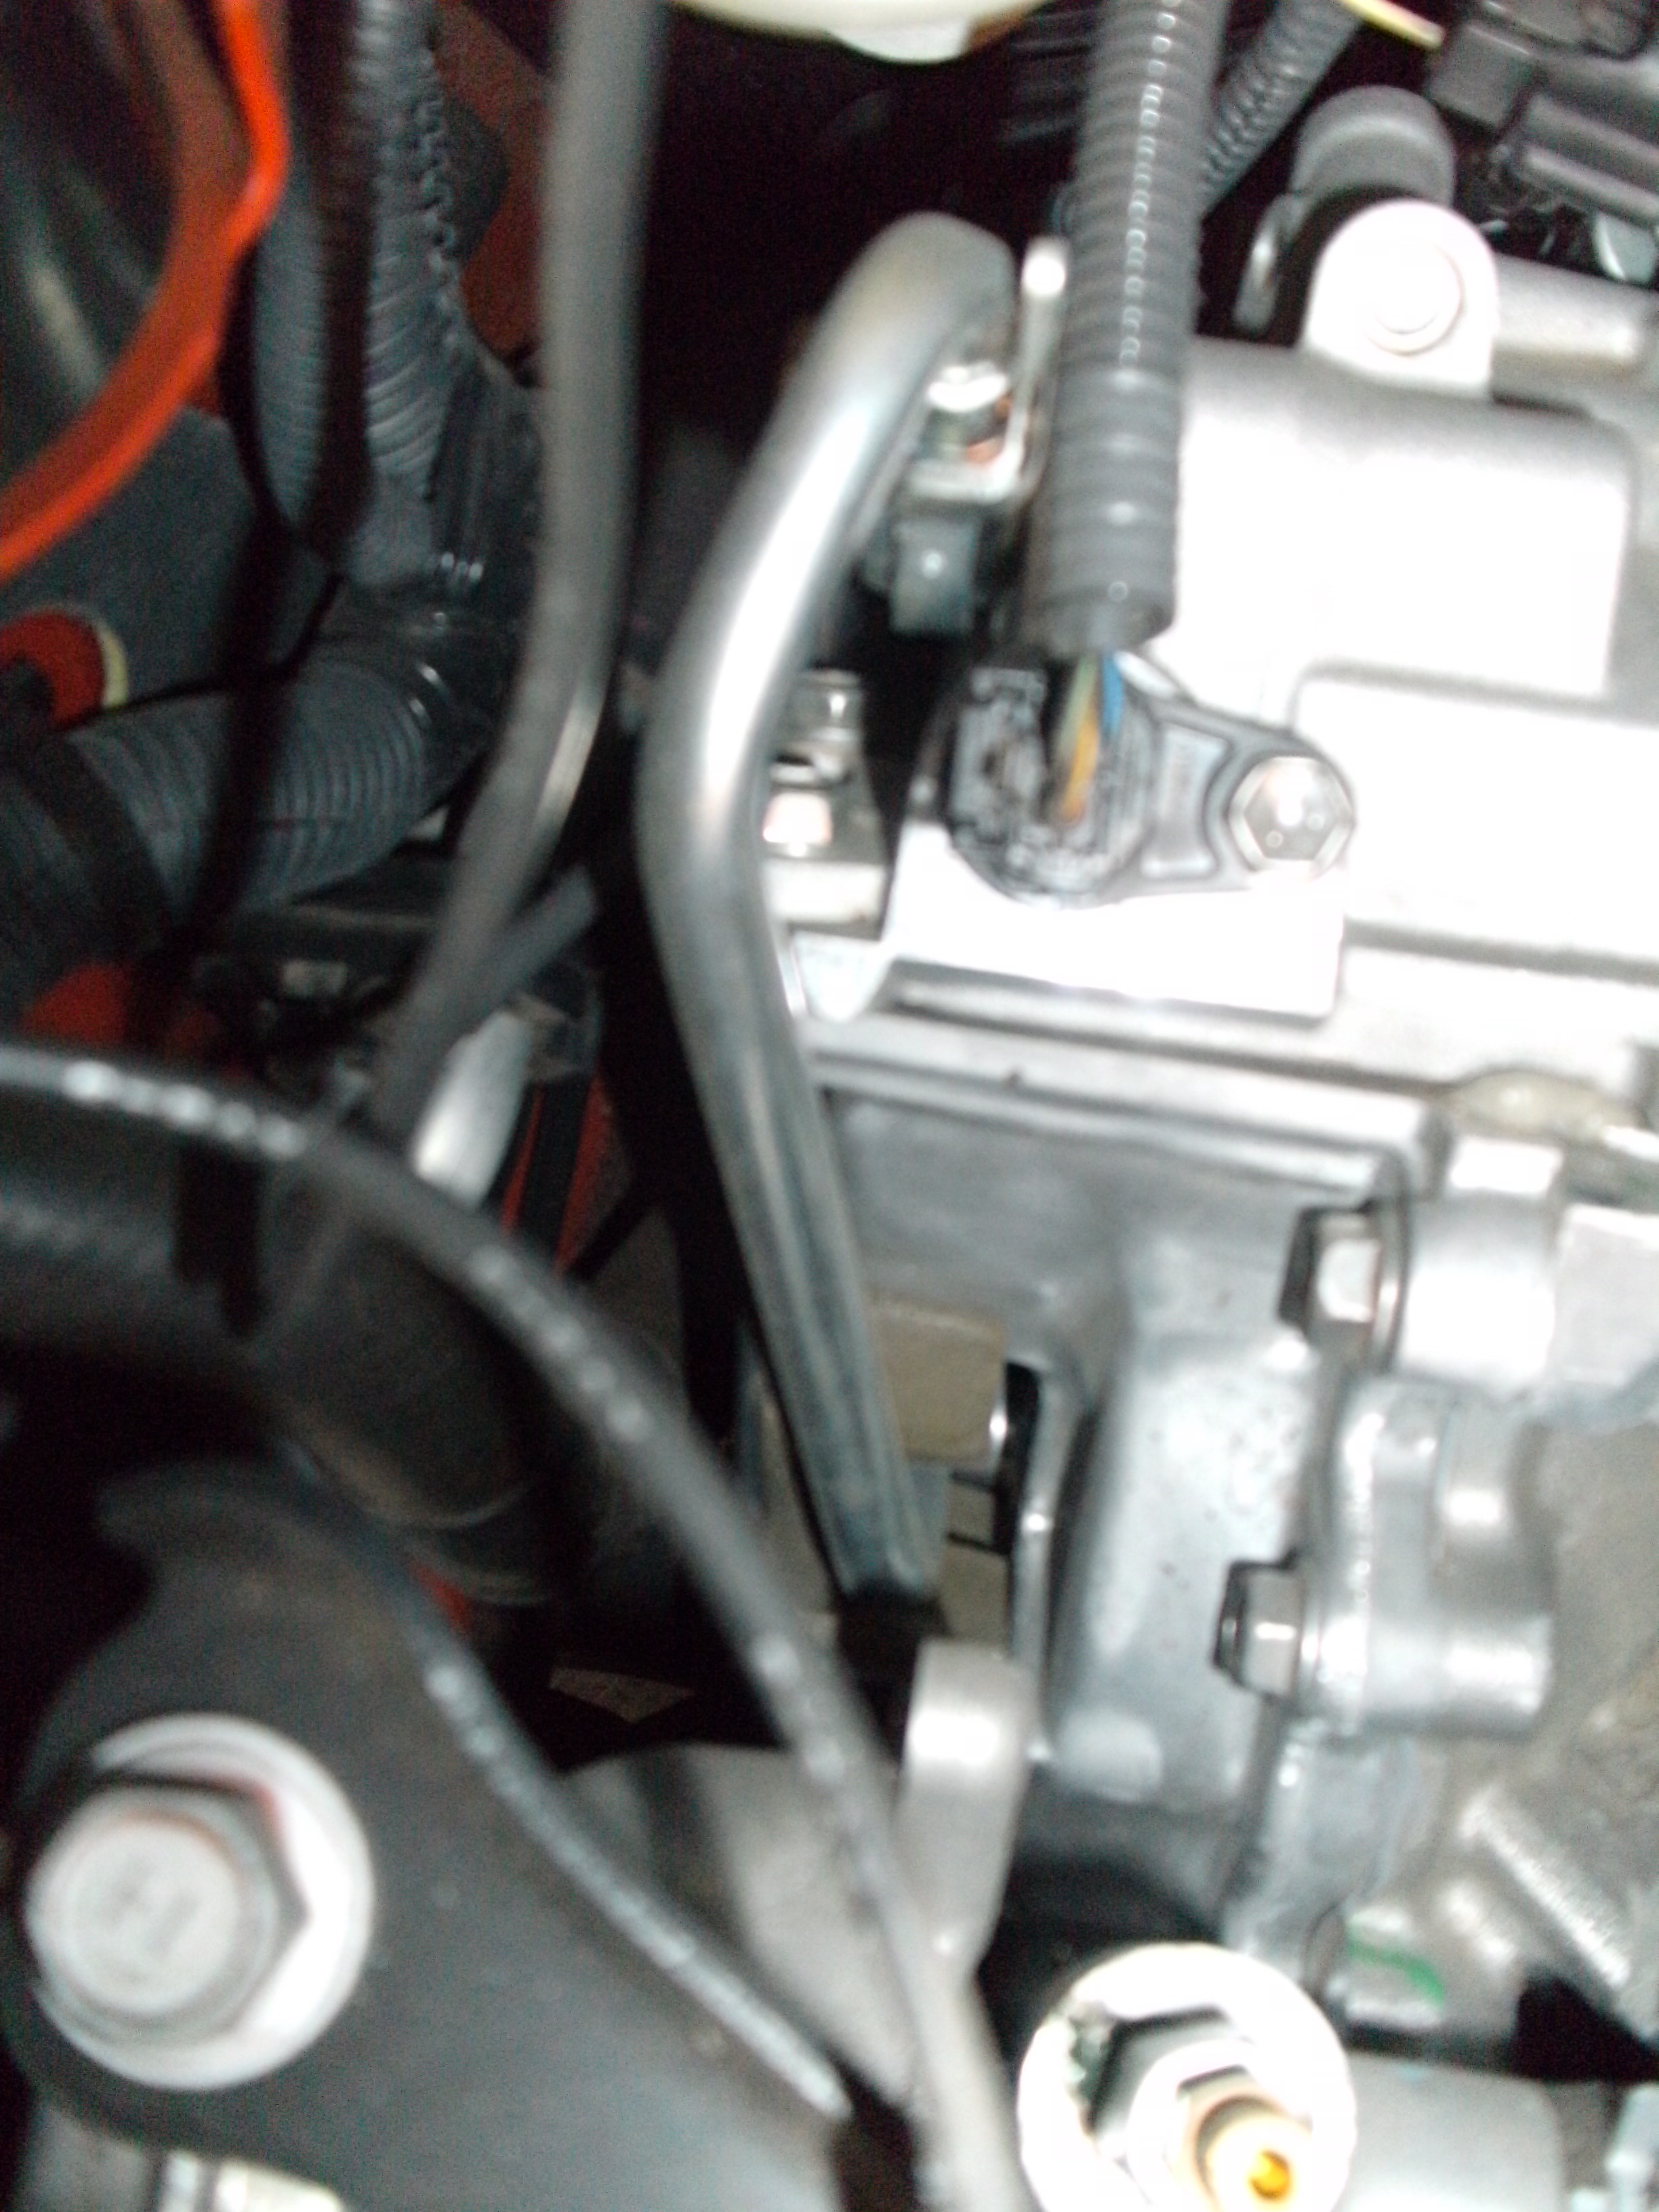
... and the reverse +12v sense (pink wire) which I connected to the harness in the passenger kick panel that leads to the reverse lights (shown below).
If you go that route, the plug that you will tap into has two red wires.The one you are after is that one with the silver dot on it.I did connect to red wire with dot on it, but I was testing this unit with video movie camera witch runs on 240 volt. I was using only RCA yellow cable plugged into the video move camera. Because my original reverse camera came with unit blown up. I use the power supply from the cigarette lighter.
Now I have tap the power supply from reverse light in the boot. Is this correct? I have to buy a new camera any suggestions.
Thanks again DJ
-
Reverse (pink)
I connected mine by extending the wire and connecting it in the passenger side kick panel. Photos can be seen here.
P.CNTR (blue white)Under standard head unit wiring, blue/white usually represents a remote turn on for an amplifier. If you have a multimeter you can test to see if this wire goes to +12v when the head unit is turned on. If so, you can use this to turn on any amps you have/plan to have in the future. Looking at the diagram in the manual you have provided, this seems to be the likely candidate since there is no other wire marked for the amp remote trigger.
Previously I thought the 'CNTR' stood for 'CENTRE', but I guess they meant 'CONTROL'.
Mute (brown)Leave disconnected. Chances are you don't have any hardware to utilise it.
... parkingJust connect it to the casing of the head unit. Secure it under a screw that holds it together.
I connected the pink wire as you suggested. But with my unit the reverse camera stays on all the time, I cannot get in to any other application. Any ideas!
-
QUOTE (DJKOR @ Dec 24 2009, 12:50 PM) *
QUOTE (Lak005 @ Dec 23 2009, 05:51 PM) *
Reverse (pink)
I connected mine by extending the wire and connecting it in the passenger side kick panel. Photos can be seen here.
Is this wire makes the camera to switch on automatically, when I move the gear shift to reverse? At this moment I can go into main menu and select camera it works. Thanks again for your help.
-
Hi Guys
Is this reversing camera good for Aurion ZR6? I have bought after market GPS/TV/DVD unit from Hong Kong. It does not fit into the Aurion mounting. Please have a look at the link below and please post reply.
http://cgi.ebay.com.au/NEW-CAR-IR-NIGHT-VI...=item5ad5a2fe18
-
Reverse (pink)
I connected mine by extending the wire and connecting it in the passenger side kick panel. Photos can be seen here.
P.CNTR (blue white)Under standard head unit wiring, blue/white usually represents a remote turn on for an amplifier. If you have a multimeter you can test to see if this wire goes to +12v when the head unit is turned on. If so, you can use this to turn on any amps you have/plan to have in the future. Looking at the diagram in the manual you have provided, this seems to be the likely candidate since there is no other wire marked for the amp remote trigger.
Previously I thought the 'CNTR' stood for 'CENTRE', but I guess they meant 'CONTROL'.
Mute (brown)Leave disconnected. Chances are you don't have any hardware to utilise it.
... parkingJust connect it to the casing of the head unit. Secure it under a screw that holds it together.
Thanks very much DJ. I will give it a go after X-mass.
-
Hi every one
Can someone help me with the wiring of this unit?
Reverse (pink), P.CNTR (blue white), Mute (brown) and parking.
Where do I connect these wires to?
DKzr6 you have installed this unit, could please help!
Please find the link below wiring diagram.
http://www.google.com.au/url?sa=t&sour...jZBLUb-bjYhbuaw
Thanks


Oil Filter
in Aurion / TRD Aurion Club
Posted
Has anybody tried this oil filter from eBay 3 for US$ 18.29?
http://cgi.ebay.com/ws/eBayISAPI.dll?ViewItem&item=320616347210