Sploddy
-
Posts
35 -
Joined
-
Last visited
-
Days Won
1
Content Type
Profiles
Forums
Events
Gallery
Tutorials
News & Articles
Videos
Everything posted by Sploddy
-
In reply to Jim and Laurie, I have to agree that modern technology is far from perfect, automotive control systems have become very complex and in many cases have been an embarrassment to the manufacturers. Over the last few months I have met and heard of people experiencing complete writeoffs of brand new vehicles, due to electronic failures. Not as expensive as the recent Soyuz cargo space craft (Progress 59) now out of control !! http://tinyurl.com/o8p7kz8 When I have completed the strut changeout, I will write up a new post on "How to replace your struts for under $500" - Yes Jim, the prices given above are for pairs and my total cost including special tools will be $450. (including special tools) Finding an outlet that carries the struts you need, may take a little searching, depending on the model and year of your vehicle. I got mine from "cvjoint_shockabsorber" on Ebay I found them very courteous and helpful, the shocks they carry are Australian made with a 3 year warranty. The Impact Wrench is a "Unimac" and again sold by Australian outlets on EBay starting at $89 (specs 240V/50hz no load 2300 Power output 900 watts Torque 300Nm square drive 1/2" wgt 3.5kg) It is not a toy and performs as well if not better than a pnuematic torque wrench. (Checking on EBay today its now selling at $79 link below) Spring compressers vary from either 1 or 2 hook types, I purchased the twin hook version and paid $21, you can pay more than $50 but they are all virtually the same. The 2 hook does add a wider gripping surface in the spring coils. (WARNING Extreme caution and safety practises must always be used when handling compressed springs - Up to 1000lbs pressure can be present) Using a ratchet wrench can be laborious and the Torque Wrench makes it easy, but I stress very strongly use with extreme caution, using only short touches of the trigger. As to the ride, I will report on that after the rears have been installed in about 3 weeks time in a new and separate post after I have had a test drive on local/freeway/dirt roads. But at the moment the fronts appear to be medium to firm Links: http://www.ebay.com.au/itm/300847119813?_trksid=p2057872.m2749.l2649&ssPageName=STRK%3AMEBIDX%3AIT http://www.ebay.com.au/itm/190864277866?_trksid=p2057872.m2749.l2649&ssPageName=STRK%3AMEBIDX%3AIT http://www.ebay.com.au/itm/130617193722?_trksid=p2057872.m2749.l2649&ssPageName=STRK%3AMEBIDX%3AIT Disclaimer: The information given here is given in good faith and believed correct at time of posting. It is the full responsibility of anyone purchasing any of these items to follow safe practises and accept any loss, injury or death arising from using these items. Changing out shock absorbers (Struts) can present a danger to inexperienced persons. Cheers Dave (Self maintained a 1972 TA22 Celica over 25 years/500,000 miles)
-
Time has moved along since this saga began and I am now 100%++ sure that the problems was fixed by the injector change, I have spoken to a couple of of mechanics since, plus the original one, when the problem first reared its ugly head. All agreed that it is an extremely rare event for an injector to break down and then behave like nothing happened. To this day they all read within the accepted parameters when checked with a DVM set on 200ohms. (I will have them checked later to satisfy my own curiosity) The car has now clocked up over 600 km since the injector change and as stated the car has not run sweeter since I bought it a year ago. I am also getting up 10% better fuel economy, This included hauling the trailer and some open road driving. I have now decided to spend a few DB and tidy up a few issues like struts and tyres I got a quote for 4 replacement struts of $1400 (gulp!) so decided I would do them myself and yesterday I changed out the fronts, $180 (Aussie made with 3 year warranty. I also invested in an electric torque wrench ($99) and a pair of spring compressers (Twin hooks - made in Poland) ($21) all of which were post free. Following a tutorial on EBay, took me a total of 5 hours to the test drive and basically was a fairly easy job. - In three weeks time I will purchase the rears from the same place ($150) They should be even easier to fit having no transmission drive to contend with. Incidently the struts on the car appear to original and were totally useless, I recall the mech who serviced the the car in January making a note that the shocks were leaking and needed replacement. Understatement of the year, no they were not leaking, - the was nothing left to leak on both front and rears! So my DIY job will only come to $450. plus I now have a torque wrench which proved itself to be most valuable and I very much doubt I would have moved the 22mm nuts and bolts manually with a socket set. If anyone wants to know where I sourced my parts and tools PM me or post a request and I can add them here. But they were all available on Australian EBay here in Perth and in the Eastern states. One final comment always check with seller with VIN and full details of model. As previously mentioned earlier, there are a large number of variations in the vehicles assembled in AU 1995 - 1997. Some sellers are lumping struts in that period which are incompatible. Cheers, Dave.
-
In my manual Laurie its page 4-2. (P3.2). My check connector is totally different than the one in the manual. But has FP and +B terminals. Also my connector is mounted on the rear of the left shock housing. Just went out and checked it. Yeh, those little Quokkas have a really bad time with some of those moronic tourists. They are an endangered species. But setting fire to them - That's really sick.
-
The latest information: Received the PCV valve today and installed that with the new grommet. A couple of days ago, hitched the trailer on the car and went and picked up an arcade game console** on behalf of my son. Fairly heavy and a two man lift job. 32K round trip, followed by 42k round trip to return my son to his unit south of Perth. 270Km now on the tripmeter since the injectors installed. The engine idle revs have stabilised at around 800 rpm normal and goes up to 1000rpm when the AC is on. No sign of any temperature rise of the case of the ECU where the heat sinking is done for the Inj Transistors, remaining cool at all times. I think I can now safely re-instal the glove box and panelling. My next post will be after I have had the old injectors fully checked out. When that will be I am not sure. I need to fix a couple of other issues on the car, which takes priority of finances. Cheers Dave. ** He wants me to help him "fix it", apparently based on a computer system, got huge touch screen.
-
One is never too old to learn something new.. When I left school at the age of 16, my headmaster said to my father "Mr S, that is the end of your son's education" My father replied, "Mr B. you are very wrong, it is the start of his education, all you have done is given him a basic platform on which to learn for the rest of his life" I have always remembered that and applied it to everything I did, hobbies, work and leaisure activities. Later I went on to gain Higher Certificates, Diplomas and other Qualifications. Regarding the prime valve, my Camry does not have one, as mentioned above, it would appear that the 96, & 97 models went through a large developement phase, whilst the 5S-FE 4I 2.2L engine was the common 4 cylinder engine, it was modfied and changed in many ways (as I found out with the numerous types of injectors used) Also the ECUs varied in a number of formats of wiring and harness configuration. It is essential when obtaining parts that you obtain the "identical" part number for your vehicle. Alternatively check with your seller as to compatibility. The new injectors I am running are yellow capped not green as the originals, but the second part of the ID # is an identical number, (74100) which the seller advised was OK. As the vehicle battery had been disconnected for a number of days prior to removing the injectors there was no necessity to release the fuel pressure when removing the fuel lines. In the handbook Toyota recommends to remove the negative battery lead before doing any major work on the engine/electronics. This is a recommended procedure on virtually most makes of cars. However if you have thief protected radios or air bags, make sure you have the reset code and have the airbags reset with a special tool. (my Camry has neither) As I mentioned the fuel "auto" primed with no issues, 3 short cranks and it burst into life. I will give updates as time progresses, the first 200K or so is going to be the test. Failures were as follows, with a loaded camper in hilly country 50km and 20km. The recent 3rd failure, unloaded flat driving a total of 150km made up of 4 journies, the final only 3.6km from start to bang. Out of interest I have read about 96 Camrys having refuelling problems, when filling the tank with petrol, the pump keeps shutting down, it does not happen on all pumps. One forum went on at great lengths (Including replacing the fuel inlet pipe!) without really coming up with the very simple answer. Which is; do not put the nozzle deep into the filler pipe, place it half way and hold it down towards the the cap rim. This allows the internal air to escape and not trigger the auto cut-off of the fuel supply! I was having that problem with 2 of the pumps at my local outlet and the Manager told me that a number of earlier Camry experienced this problem! Dave.
-
On the road again... Yesterday the postie called laden with goodies. Injectors, transistors and top engine mount. In between showers got everything back together and both ECUs repaired with new power transistors. This morning hooked up the fuel lines and PCV tubing and replaced the cam box cover and fitted the ECU. Reconnected the battery and the car started on 3rd crank as the fuel supply was restored. Engine running very smoothly, idle revs up a tad over 1000RPM. Also quite a noticable improvement in engine reaction to the accelerator. Did a 5k test run round the block and also noticed the "dead spot" when accelerating in first gear has disappeared. (Not that I intend to do wheelies - I have far greater respect for my tyres and transmission) But if I need that little bit extra its comforting to know its there. I can only hope that this is the conclusion of a somewhat expensive exercise in getting other people to fix the problem without success. My DIY cost for parts $175.00. Only further running will confirm that there was a faulty injector breaking down under working temps. However I will be sending the old injectors to my supplier to have them fully tested, but funds are depleted for the time being, so this may be quite a while . Normally injectors work or they don't and behave badly. It seems no one has experienced an injector that breaks down intermittently and blows one of the driver transistors, at least not on this forum anyway. I know one thing for sure, it was quick and steep learning curve dealing with EFI engines. But it was worth the effort! Only time will tell -- Meanwhile I will continue to keep a spare ECU in the glove box 'just in case' :) Cheers Dave. (Perth WA)
-
So far I feel I am on track... The next few days will see the arrival of a set of spare transistors for the ECU, a set of new injectors and a new PCV valve and grommet. I also have a new "dogbone" upper engine mount coming as the original has a split rubber insert. The cam box cover has been degunked and the PCV channels are clear or carbon buildup and free flowing as are the interfacing hoses. The injector fuel supply manifold has also been fully cleaned and checked for any damage.. I am 99% confident that either injector 1 or 3 is the culprit and is intermittenly shorting out. I have done extensive checking of the harnesss and the wiring, it is in good condition and continuity. It may be some time before I get the old injectors checked and tested. But will report back when I get a "round tuit" :) Hopefully I can report that the car is back up and running by the end of this week.
-
The original post stated correctly that there were two wires coming from the ECU: White feeding 1 and 3 and Yellow feeding 2 and 4. Due to a typo in one of the posts the designations were inadvertantly changed to 1 and 4 and 2 and 3 which is incorrect. Physically and in the diagrams 1 & 3 (white) and 2 & 4 (yellow) is correct.** Yeh the joys of antiquity :) Sometimes the fingers do not type what the brain is thinking. I will be glad when this saga is over. One thing I will say, I have learned a heck of a lot about the Camry engine. As Laurie mentioned the manual is very good and goes into great detail. It is quite incredible the variants of injectors and ECUs, harness plugs and sockets that have been used by Toyota. They seem to have absolutely no consistancy. It is absolutely essential to obtain the "exact" replacement type number of each and every part. They even changed the pin out configuration of the harness plugs also the number of pins on the plugs. ** On my particular vehicle!
-
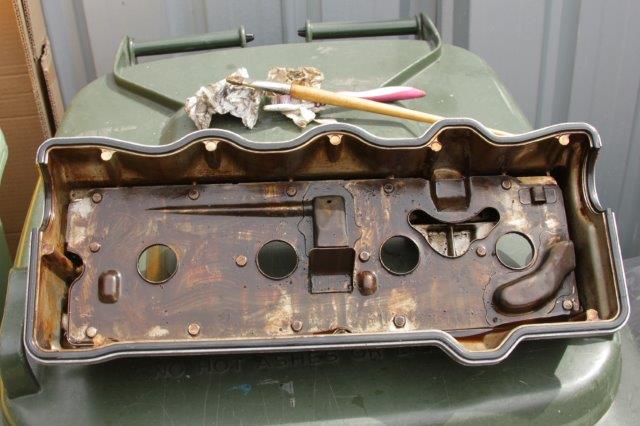
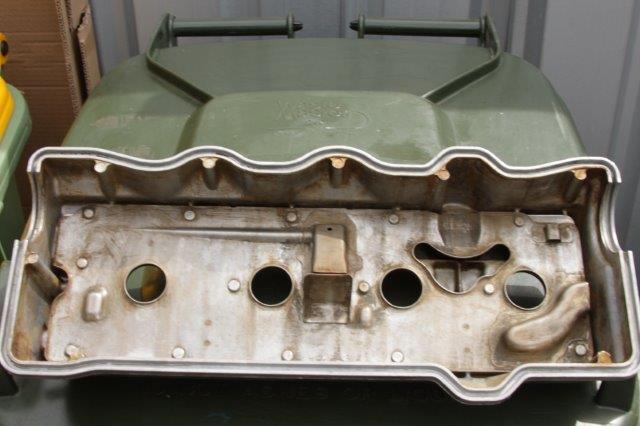
Erratum: Somewhere after my first post the Injector wiring got changed. Please note Injectors 1 and 3 are fed by the white wire and 2 and 4 are fed by the yellow wire from the ECU as initially stated. Decided to check out other peripheral items including the cam box cover and found that internally around the edges of the PCV plate, esp the back area and also the front area. a considerable build up of oily carbon deposits were found. These have been removed. Also the PCV valve input was total blocked with carbon. This was left to soak overnight in degreaser solvent and washed out and now has free movement of the valve. However this will be replaced at the first opportunity The extenal PCV pipework is clean and free from contaminants. Before and After. Not perfect, could do with a good steam clean or sonic bath. But the heavy stuff has been removed.

-
Not at the moment. Will do that when I get the new injectors. Cam box cover has been temporarily replaced and input ports protected by placing injectors back into the ports. Should get the new ones Tues/weds next which come complete with new cushions/o-rings. I will also repair both ECUs I have with a pair of new switching transistors for 1&4 and 2&3
-
Old injector removal. Note 30mm box spanner for cam box cover removal.
-
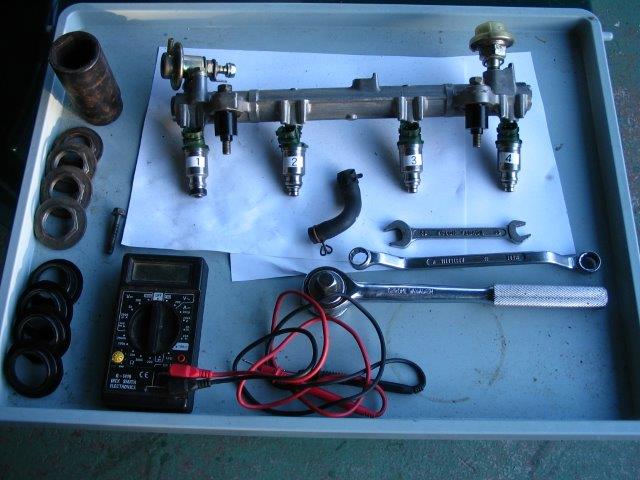
Confirmed with seller that he can supply injectors. --- Purchased and Posted today, very helpful seller. Have arranged for old injectors to be sent to him and they will do a full test and rebuild. Old injectors came out of the car with no problems. Took about an hour all up. 1 2 3 all reading 14.0 ohms and 4 13.8ohms on a digital multimeter. Have also removed the ECU and taken out both pulse driver transistors ready for new ones, when they arrive. Seller said it was quite possible for an injector to fail under operating conditions with engine temperature rise. The replacement ones are rebuilds and fully tested to Denso specifications. Next week should see the car back on the road. :)
-
The price is fairly good for remanufacturered injectors. ATM we are exchanging information and just taken photo of injector and located the Pt No. mine is 23250-74100. Dk Green. Waiting on reply as to whether the ones he has are compat or it he can rebuild mine if not. If he can supply. Yes I will definitely go ahead and buy. At this stage I can see no alternative. It has to be the injectors.. :)
-
I was prepared for this to happen, but not on such a short trip of 3km. Though that in itself was good thing as I was able to "nurse" the car home. I agree will you Jim and all who have offered advice and suggestions that it can only be temperature related problem with 1 or 4 injector. Well, three strikes and they are "out" -- Last night I located on EBay from a Perth source a set of genuine Denso re-manufactured injectors (4) for $100 inc post. I have written to confirm compatability... STOP Press! Just received this from the seller. Quote The 1996 Toyota Camry Csi 5SFE 4I engine had a few injector variants. You will need to check the part number on the injector. These are compatible with the following part numbers. 23209-74040 - Yellow 23209-74100 - Olive green 23209-74100 - Dark greenUnquote Mine are dark green More later....; Dave
-
BANG! Weds April 1 After running the car around for a week and including a venturous trip via Spearwood and on to Armadale and back to Perth some 60km round trip we had 150km on the trip counter since I did a temp repair job on the ECU. Today we went to Cannington Shopping Centre approx 3.1KM and as we drove into the car park the wife said, somethings burning. Anyway did our shopping and started the car to return home. car only running on two cylinders again. (rude word) did a trial run around the park and managed to get out onto the highway and headed for home, luckily was able to fit into the traffic with ease and general speed was limited to 60K max. After leaving the main highway took some back roads to home and sailed into the car port with very little interuption to any traffic behind us. - Still waiting for the new transistors to arrive and should be here tomorrow or after Easter on Tuesday. So this time we got around 155km B4 the transistor on 1 and 4 blew again. Having checked out all other possibilities it has to be either INJ 1 or 4 breaking down. After I got home I checked the case of the ECU near the Transistor heat sink and it was very hot. I will check the ECU tomorrow and confirm its the same transistor. - Luckily I have not re-installed the glove box etc :) Enjoy your Easter :) Dave Next step is to remove all the injectors (and number them!) and get them to a servicing centre in Perth where they can be fully cleaned, tested and O rings replaced and if 1 or 4 is suspect have it replaced. - Not sure where in Perth yet. I have found USA Toyota site that gives an excellent nut by nut description on how to access the injector delivery bar and remove it complete with the injectors. (Plus how to release the fuel pressure prior to disconnecting the fuel line) http://www.toyotanation.com/forum/103-3rd-4th-generation-1992-1996-1997-2001/339863-diy-fuel-rail-injectors-removal-4cyl-i4-5s-fe-gen4-camry-pics.html
-
Yes. Checked it out no faults code shown. Note: It would appear that Toyota has a multitude of types of ECU, connectors, and test boxes for the 5S-FE 4i engine. So far I have not found any data relating to my particular ECU and car. I think the Haynes circuits and harness/plug plans relate more to the USA/Canada cars*. The diagrams are only described as "Typical" and should not be relied on for what is in your car. Even the test box layout is different. However there was layout label in the lid showing E1 & ET1 test points. Probably the differences also relate to whether the vehicle has power windows, central locking and a many other features.like airbags, manual or automatic etc.Even the pin outs are different between variously number ECUs although marked 5S-FE It is essential to ensure you get an identical Part number and socket pin count. *Ref: to California Emission Laws.
-
I have the workshop manual now. Its also mentioned further back in this feed. Tks.
-
This morning, the car started normally, just slight touch of the key and burst into life:) As Jim says, the search continues for why two different units went with identical faults. The first transistor shgowedd no physical signs of blowing, however the replacement on, had a large piece of the moulding blown out, that was probably what my son smelled, commenting on an electrical type burn. (I have no olfactory nerves - cannot smell anything). This morning we did a round trip of about 10K to a hardware store and picked up load of shelving for our kitchen. The car drove beautifully like nothing every happened. I have left the glove box and moulding out ATM until I get the back-up transistors and repair the other unit. Then will have the Auto Elec check it out and make sure its programming has not been compromised. (Though everything appears to be functioning OK) This will probably be at least a week, so unless anything drastic occurs will make my next post in a weeks time.
-
All reading very close to around 12 ohms with the harness disconnected at the injectors..
-
Sunday 22nd. Raided the replacement ECU whiich failed for the good transistor left and fitted into the original ECU. Installed in the car and she started first turn of the key running on all 4. Decided to check the connectors on the injectors, the injectors and connectors where covered in a fairly thick coating of grease and dirt, not the best for electrical connectors. I had problems getting three of them off they were jammed in tight. The are not easy to get at in the first place. Cleaned the shells and injectors and surrounding area with decreasing fluid and washed it off and left the car open for them to dry after removing any moisture with home made super long cotton buds on a satay stick. Just taken it for a drive around the block and seems to be running OK It appears to be OK to get it to the Auto Electricians during the week. I may wait until I receive the spare parts so I can repair the other failed unit. The second hand one I bought, although it is marked 5S-FE (it also has additional 'ECT' under the 5S-FE in smaller print). I will have to return or exchange that unit as it has different plugs and pinouts. My original is 89661-33261 Sockets 26P 16P 12P Whereas the one I picked up is 89661-33660 and the Socket pins are 26p 16p 22p. Why did it happen? I still do not know, I have checked the harness for shorts and injectors for shorts or abnormal resistance. . Also on connector one, the Yellow and White wires are on different pinouts. (Probably a later model, also the CPU is different)
-
Phase II diagnotics and repair. Yesterday Saturday 21 Mar. We recovered the car after a 9 hour round trip. Everything went very smoothly and it helped that although only running on 2 cylinders we were able to drive the car onto and off the transporter and into the car port. I also recovered the original ECU and last night removed the faulty transistor a 2SD2162 CMOS darlington power transistor. The transistor was open circuit between Base and Emitter. When I receive the replacement transistor ($1.50 ea) next week will replace it and carry out further tests. The power transistor also has a protection diode built in between the collector and emitter which also appears to be open circuit. Current control resistors between the collector and ECU 12v power source will also be checked for continuity and voltage. The two output transistors are independently supplied from the main ECU 12V voltage source via series resistors and decoupling capacitors.
-
I agree with you Jim. Aircraft of course have scheduled "life spans" of components and are changed at designated intervals. All aircraft flying are not the same aircraft that were originally "in air" righ down to fuselarge panels etc. That is why properly maintained aircraft can fly the number of hours they do. It would be nice to do this with cars, but it is just not economical for the average car buyer.. Those that have buy a new car each year and the peasant buyers their cast-offs. (A new car at today's prices would use up two years aged pension) However I think probably my driving days are coming to their "Use by date" and I will have to rely on Public Transport in next few years. Today is collection day, and we do a 600Km rounmd trip together with my son and his 4WD and car trailer and bring the Camry back to Perth. Yesterday I had interesting talk with the Manager of an Auto Electrician, whom I have used before. They have well fitted workshops, with all the good oil as far as diagnostic equipment etc and are respected in the industry. He posed a question after hearing my information,: "Have you actually tested the ECU yourself and is the output transistor to the white line actually blown?" I was as we all known I have have not had physical access to the car since this problen occurred, he was suggesting that it is possible the mechs are looking too much at the obvious and the transistors are not blown, but the fault lies at other inputs to the ECU which can effect its operation, ie: sensors and other associated feed back in the ignition and fuel system. He said he has not experienced this actual condition, nor has he had problems with "intermittent" injectors, they either work or they don't. The major problem with injectors is lack of maintenance, cleaning etc. - however these faults are often progressive, with rough running and difficult starting. So some food for thought. As previously mentioned I will thoroughly check the system and if the ECU does have a blown transistor I will replace it and take the car to the Auito Electrician and they will do a complete diagnostic test. The Parts should arrive from "UTSource" in HK some time next week. Watch this space. :) !!
-
No Jim, nothing missing :) I now believe that it has to be an injector breaking down. However I noted your comments and will check every possible avenue. I posted that info ablout the connectors purely out of interest. As I have commented a wiring fault is possible so it remains on the check list. ATM there is nothing I can do until I get the car back. Dave
-
Hope this works. Copy of the 5SFE 4i circuit diagram and ECU connections 2 pages http://dsmithdale.net/camrydocs/ecu1.oxps http://dsmithdale.net/camrydocs/ecu2.oxps The injector pulse output pins on the ECU are marked #10 and #20 white and Yellow If using Firefox you should be able to click and view or download. Files about 2mb each N-Joy :) PS. Removing pins/wire from harness plug on ECU. On the edges of the plugs on the wire side are small hinged tabs. Carefully raise them upwards from the wire side and hold the wire close to the pin with a pair of small smooth flat pliers and gently lift upwards. The pins have small "pip" that lightly locks it into the shell, then locked in with the hinged tab. Do not use excessive force as you could pull the wire out of the crimped pin. If it does that, it was a bad crimp in the first place! If you need to remove the wire, carefully cut it inside the sleeve crimp tabs, do not try to open the actual crimp, you will wreck the pin. Put the new wire thru the sleeve tabs with about 4mm of bared wire and solder to the top of the crimped area, there is room if you are neat and do not use excess solder. The pins should have gold plated tips, clean with a contact cleaner do not use abrasives which will remove the plating. Proprietory Contact Cleaning solvent is ideal for plugs and sockets. It washes and removes harmful contamination and dries clean. Always allow 20 minutes after using it before applying power, but use it sparingly in the first place, there is no need the flood the connectors.
-
Addendum I have been going through the Haynes manual of the Camry (which covers various models including the V6) and having not read it completely, I came across the chapter on ECU self diagnostics. By shorting out the pins E1 and TE1 on the ECU diagnostic block and observing the internal display panel with the ignition switched on an indicator will give various flashing codes indicating faults found by the ECU under differing engine conditions. it also shows how to read the codes and list some 21 codes and what they mean and possible fault location. The diagnostic data should be erased after the faults have been read and rectified by removing the shorting link and the 15A EFI fuse, then replacing the fuse. This and other detailed information on testing is also contained in other chapters. Because of the large number of pages and copyright laws. © 1997. I do not propose to repeat it here. However I recommend that anyone interested should obtain a copy of the Haynes Repair Manual for the 1993 to 1996 Camry/Vienta and Holden Appollo cars. ISBN is 1 56392 257 6 which can be purchased on line or from most Auto stores in Australia..