legend_of_lazz
-
Posts
114 -
Joined
-
Last visited
Content Type
Profiles
Forums
Events
Gallery
Tutorials
News & Articles
Videos
Everything posted by legend_of_lazz
-
Doing my best guys. We were all a go for last weekend but the small problem of non stop rain for a week made things impossible especially with a few places in Townsville flooding. Everyone at work seems to be just as anxious to see the results. All I can say is at this point is that I've been practicing my launches on a private road in a relative's property for the last week or two and am doing quite well in my opinion. I really can't wait to give it a go against him, just to see how it works out one way or another. I will update the second it happens. Adam.
-
Some further development. I have fitted the Ultra Racing Strut and 19mm Sway bar to my Sportivo and what a difference! I do want to make the step to a suspension upgrade sometime very soon. I spoke to local Pedders guys here in Townsville who gave me 2 options. He first of all told me that they are no longer making a shock for the Aurion so the best they can do is put me on some lower springs. Total price for this including parts, fitting and a 4 wheel alignment is $750. It doesn't sound bad at all, but I'm nervous about leaving the stock shocks in place with the lowered springs and I love the fact that you can adjust everything in a coilover setup. Next he told me about the Pedders Extreme Coilovers. Total price again including parts, fitting and 4 wheel alignment is $2000 even. I know 1stKill has gone down this road. How do you find them? Lastly, I'm looking at BC Adjustable Coilovers. They are $1299 and fitting plus a 4 wheel alignment will run me another $400 for a total of $1699. I'm thinking it's probably better to go for the coilovers so I can return the car to stock if need be and I can adjust the height and dampening etc. Just wondering if you think the Pedders Extreme Coilovers are worth the extra $300. I should point out that they have warranty on the Pedders but can't do anything about it if my BC fail. What do you think?
-
Haha this thread is great. I don't know how soon this will take place but his fiance is away at the moment so that could be a good sign. I will post results as soon as it happens. I'm thinking I might add a bit of lead weight to his car just for that extra advantage. I have to win, regardless if it's honest or not. And yeah, black dress, red nails it is if I lose. Will post pics one way or the other. Let's hope I win for all our sakes.
-
Thanks for the advice guys. I'm still trying to get it organized so I'm not too sure of a time yet. With regards to weight and power maybe I'll remove my head unit too just for that little extra bit. I hope I have some time. I may be able to get my car a little faster between now and then. I hate losing so I'd risk putting a small dry shot of nitrous just for the race and get rid of it. I have a friend who can set me up. I know that's really ricer, but I can't lose to a him especially since 90% of the office are on his side. Has anyone ever done anything as drastic as nitrous in a 2GR-FE or similar engine? Do you think one small use of it could do any harm? Again I know that's really stupid, but I have to win.
-
Hey guys, I know I might get flamed for this but bear in mind we intend to do this legally at the Townsville Drag Strip so don't bother doing it here. A guy at work has just bought an 09 XR6. I drive a Sportivo. We have been arguing for a few weeks whose car is faster up a quarter and have made a bet about it. Who ever loses up the quarter wears a dress to work for a day. Both cars are stock and auto. Based on experience should I be okay or start shopping for a dress? Also I should point out he weighs about 50 kilos more than I do. Most of the office is on his side as the XR6 seems to have a better reputation. Opinions would be great. Thanks. Adam.
-
 I have no idea. Daryl is the man for that question. I was content in knowing I can use it if I need it. So I really have no idea.
 -
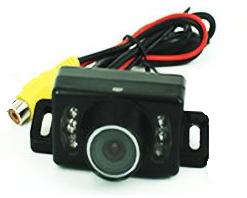
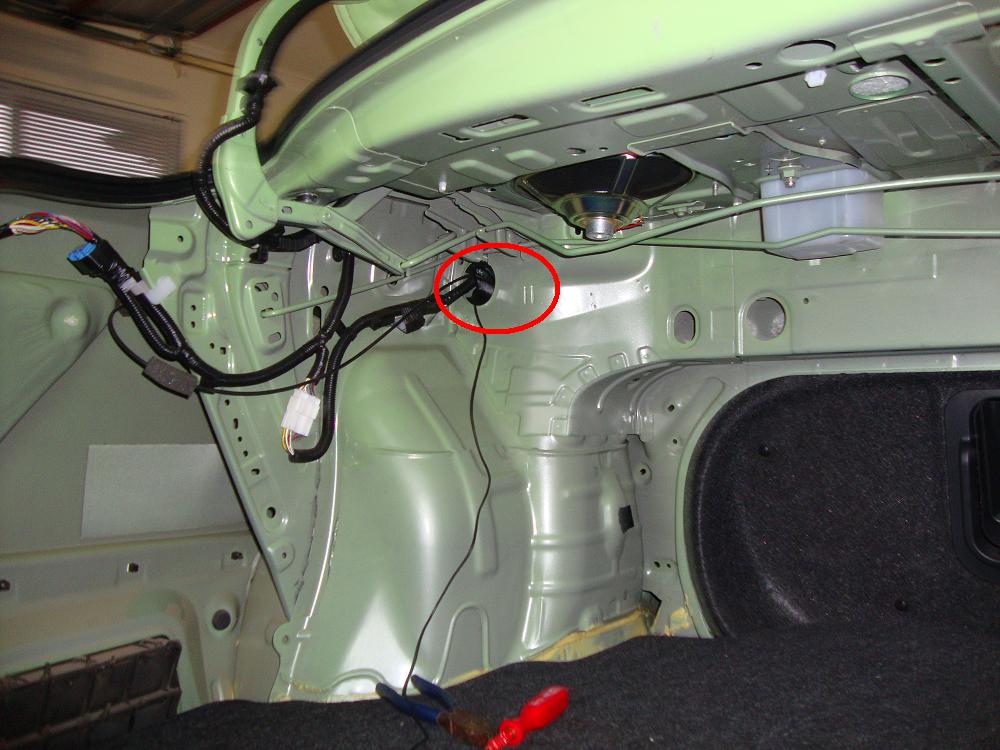
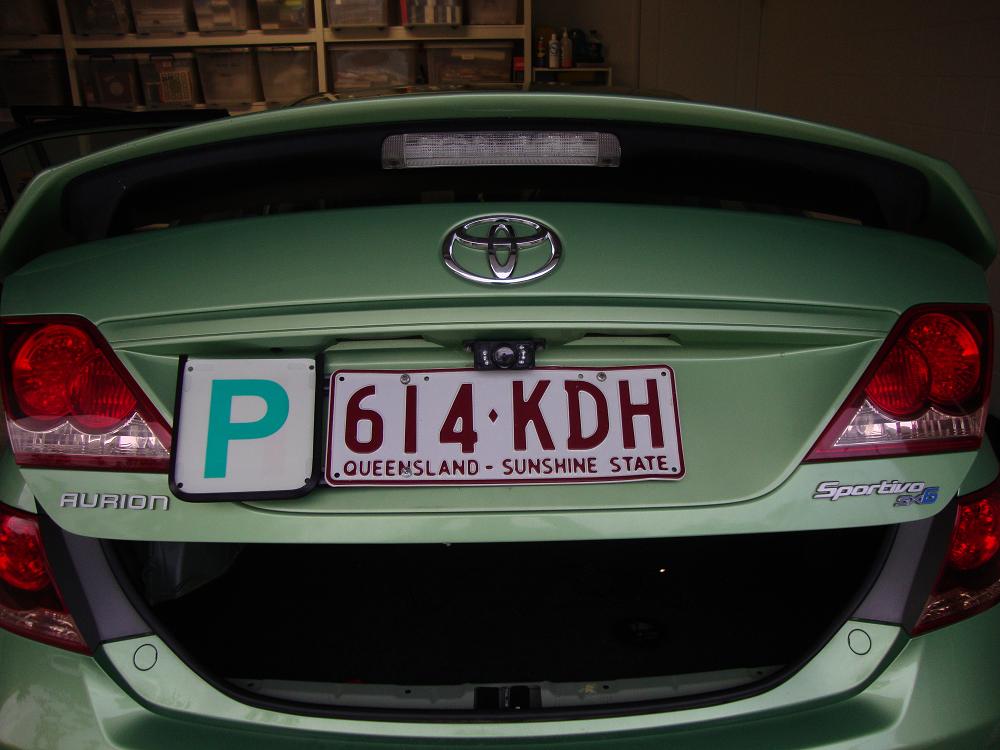
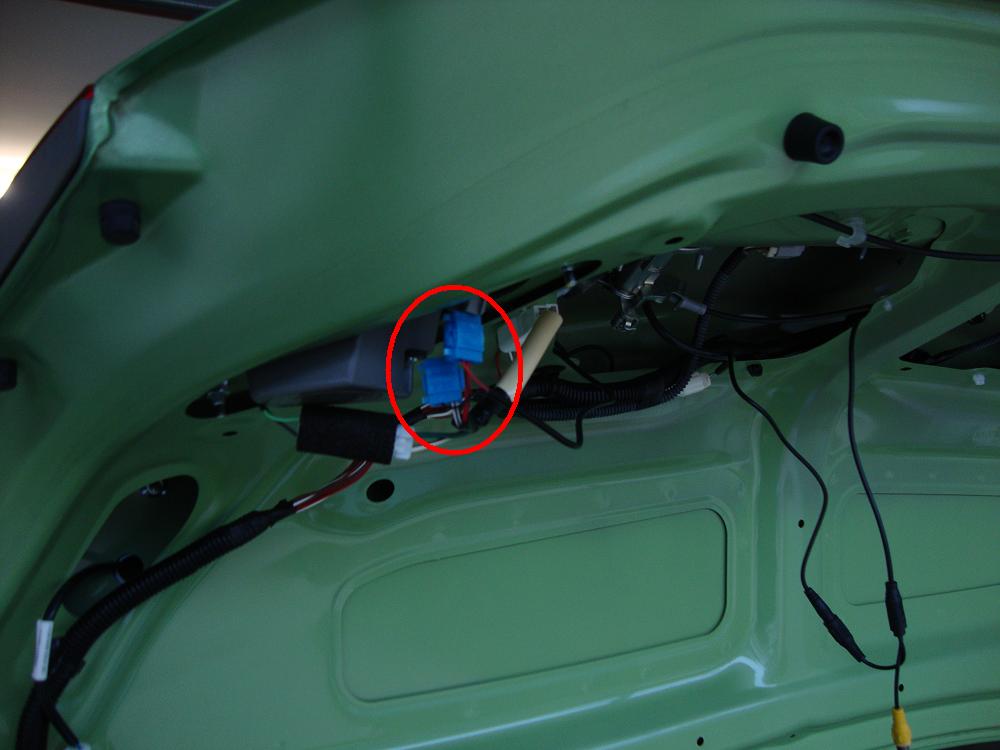
I’ve been putting off installing my reverse camera that came with my new head unit for a few days due to the lack of a complete guide all in the one place. But yesterday I decided to bite the bullet and go for it. I’m going to assume the reader is a complete beginner and explain everything in detail and hope it makes it a bit easier for someone in the future. My Head Unit is listed on eBay as HD LCD CAR DVD GPS 2007/08/09 TOYOTA AURION CAMRY DVB-T from seller autome305. I have written a review of the unit itself here. The installation may differ depending on the camera that you have, but the camera I have looks like this. The camera is designed to be screwed on above the number plate and attached with the included screws. The entire installation process working as a complete beginner took around 2 hours working slowing and carefully. In retrospect, it was quite an easy although time consuming job and I’m definitely pleased with the result. The camera itself comes with 2 cables: a standard yellow RCA cable and a 12 volt cable, both of which plug into the camera. The power is accessed through the reverse light and the RCA cable runs from the boot to the head unit. The set up I am going to write up now does not automatically bring up the camera on screen when reverse is selected, but I’m happy with this as I don’t believe the camera is always necessary. All you need to do to access the camera is press menu and press the CAM button on the screen. Now let’s get into the set up. What You’ll Need: - Camera. - Cables. - Drill. - Silicone. - Coat Hanger. - Screwdriver. - Wire Taps. STEP ONE: REMOVAL OF TRIM: An important note when it comes to trim removal: Make sure that all clips are removed before you try to put them back in. It took me awhile to figure this out and was very frustrating. As the title suggests, the first thing you’re going to do is remove all the necessary trim to drill and run the cables through. The trims come off by simply pulling quickly away from the panel. Any that don’t come out can be removed by using 2 flat head screw drivers to lever them out. Care should be taken in this step as the white clips that hold the trims in place are a pain to get out at times and are definitely the most frustrating part of this installation. I broke quite a few trying to get them out. If anyone knows of an easy way to get them out, please let me know. Starting at the boot the trims you are going to want to take out are the boot lid trim. This is quite easy as the black clips are easy to get out. Just put the clips somewhere for later. The next thing to do is to take out the floor of the boot and remove the entire piece of carpet as well as the wood underneath it. This allows you to remove the trim on the left side of the boot and have access to the cable hole. All the side trims simply pull off as well. All the removed trims can be seen in this photo. Note the cabling hole circled in red. This is where you run the cable through. The Next thing you are going to want to remove are the door trims along the side of the car starting with the door pillar and forward kick panel before moving on to the door trims. STEP TWO: FITTING OF CAMERA. To fit the camera was easy. I simply found the middle, marked out where the screws were going and the cables had to be run through and drilled the holes. Make sure you only drill the holes just big enough to fit the screws through or you will have to find something bigger. The cables were inserted through a 12 mm hole I drilled. My advice with drilling is to start with a small bit and work your way up. It’s easier to correct any mistakes and is neater. The camera was simply screwed in and the holes were covered in silicone to waterproof them. The final job looks like this. STEP THREE: ATTACHING THE CABLES: To get power for the camera, I just looked at the back of the car and saw which wires connected to the reverse lights and tapped into them with some wire taps. You can use a soldering Iron instead, but this is not as permanent and much easier in my opinion. The completed work can be seen in this photo, the wire taps are blue. That is the power taken care of. Whenever reverse is selected, the camera has power. Running the RCA lead was simple. All I did was tape it along the existing wires and run it through the cable hole. If are working in a bright environment this process is easy. What I did was straightened a coat hanger and make a small loop at the end to lock the cable in. I then simply grabbed the top corner of the back seat and looked for day light. I pushed the coat hanger through, attached the RCA cable from the boot and pulled it through. Once this was done I ran it along side the other wiring all the way to the front foot well. Once this has been done, reinstall the trim starting with the pillar the forward most kick panel. After that, push the 2 door trim back on. The only thing left to do now is to attach the RCA cable to the head unit. Head unit removal is easy thanks to DJKOR’s guide here. If you open the glove box and look to the left side you will see a small hole with some cabling inside. Run the coat hanger through this hole and down to the foot well. Pull the cable through, behind the console and through the hole on the right hand side and attach to the head unit. The coat hanger is a big help here as well as the use of a torch to see which holes line up where. It is a simple matter to run the cable through and attach the head unit so I won’t go into detail there. All you need to do is install the RCA cable to the plug that says “Camera” and reinstall the head unit. Before you put everything back together, turn the car on and put it in reverse and check that you have a picture as well as your reverse lights working. This shouldn’t be a problem if you have followed the instructions and been careful. All that is left to do now is put everything back in starting with the Head Unit and moving to the boot trims. If you got them off easily, just reverse the process and you’ll be fine. That’s about everything you’ll need to know. It’s a fairly long write up for a simple process but it has the beginner in mind. Thanks for reading and best of luck. Enjoy. Adam.

-
Yeah I understand what you mean, but I'm not a big fan of noise (although Darius sounded amazing with the Varex) and I'm not too keen on modding things that can't easily be changed to stock to sell the car when the time comes. Could the SRI cause any loss in power at all?
-
Hey everyone, just wondering if anyone's had an aftermarket sunroof fitted to their Aurion. I'd like a sunroof put in but Toyota quoted me $3500 for parts plus labour and a new roof panel and basically told me it can't be done. I'd even just like a glass panel that doesn't move at all but just lets sun into the car. Has anyone had any experience with this or have any ideas? Thanks.
-
Hey guys, just wondering how many people on these boards are in Townsville. I know they have a meet in Brisbane and would like to get one organised in Townsville if there are enough people to support it and make the meets worthwhile. I'd like anyone interested in or with a Toyota to come along. What do you think? Thanks Adam
-
That's exactly what I was thinking. Okay well I guess I won't bother with the SRI then.
-
Judging from all the things I've done to my car and posted on the forum here, would you think I got someone else to install my rear sway bar? :P It's easy to do yourself without even lifting the car (or putting it on jack stands if it is lowered). Haha I suppose so. I can safely say I will never replace my VVT-i Oil Line. But I'll give the sway bar a go and see how it works out.
-
Okay thanks for that. I'll order the Sportivo plate next chance I get. Did you use anything special to attach it? And back to the original topic, I am very happy with the head unit Freaky has mentioned. No complaints at all.
-
I wouldn't bother with the 4-point brace as this is not going to provide much benefit in my opinion. As well, it happens to sit rather low so if you do get it, you may have it scrape etc. Okay thanks for that. I won't bother with the brace then. Did you fit your Rear Sway bar Daryl or get it done by someone? I'm sure I can mount the strut but not too sure about the sway bar. Will have to wait and see.
-
Buy the door or fender (2010 model) badge lettering from Toyota,set your spacing and stick em on your console... :) or you can buy that sh!tty plastic chrome lettering from most Autobarns,Supercheap ect ect ect. Excellent. Thanks for that. I'll order it as soon as I get back to Australia. I'll stick to the genuine Toyota parts though, for the sake of a few extra dollars, It'll look a lot better.
-
Has anyone actually done a dyno test on the SRI to see if the 11hp is accurate or if there are any gains at all? I'd consider buying one, but for that price I'd like to see an increase in horsepower and not just a better sound.
-
I know this is quite off topic, but it seems like such a small thing to start a topic about, but where did you get the Aurion text below your Airconditioner controls DJKOR? I really like the look of them.
-
Whoops, I guess I was a little tired when I wrote that. I did order the rear sway bar and the strut bar, not the four point brace. Must have been a little tired from a New Years in Monaco... What does the 4 point brace do? Is it a worthwhile addition to the other two or will it only make a minor change?
-
Cool as. Definately let us know how they go. I'm looking at ways to improve my handling. I've order the Ultra Racing Strut Bar and 4 Point Brace and I'll install them as soon as I get them.
-
How many KM's have you done?
legend_of_lazz replied to Silver-Aurion's topic in Aurion / TRD Aurion Club
07 Aurion with just under 48000 on the clock. -
Okay Well that seems like a good place to start, and fairly simple without changing springs etc. I had completely overlooked the Ultra Racing Gear at the time I wrote this, but it does seem like a logical first step. I'm 100% sure I can fit the strut bar but I'm not too sure about the rear bracing. I might have to take that to someone. I'm not so much interested in taking corners faster, just the car feeling more solid so again, this sounds like a better place to start. Okay well I'm not too sure I'd like to start modifying the struts, if I don't need to with coilovers, I'll end up with them just to avoid that step if I decide to change after the Ultra Racing mods. Depending on what happens in the future, I may want to take the car back to stock to sell it. That also sounds like a good place to start. I was thinking Potenza Adrenaline or something like on the TRD, the Dunlop SP Sport Maxx, if they make a direct fit. Whichever you really think would be a better place to start. I'm not going to change the wheels at all at this stage so unless I can get a direct fit, I'll stick with the Potenzas. Thanks for the quick reply as always Daryl and thanks for the advice.
-
Hey guys, I’m thinking of doing a complete suspension change in my Sportivo soon. I know there’s a place in Townsville which can do a Pedders set up for under $1000. I’ve also seen these coilovers on eBay here and here ( not sure if there is any difference) for $1250 but I have really no knowledge on suspension and was wondering what you think would be better. I’d like stiff suspension that can take corners well like a Mazda 3 SP25 or a WRX at the higher end of the scale. They also need to be professionally fitted so I’ll need to check on a place in Townsville that can do them as I’ve had no experience with suspension at all. Or I can give it a go and hope for the best if it’s a relatively easy procedure or I can see a how to guide. Also, what are the benefits of coilovers? Do they have any benefits other than adjustable height? Do they corner better than a Pedders set up or anything? I’d just really love my car to be able to corner better. Thanks for any info. Adam.
-
Nah mine's an SX6 so no electric passenger seats. I'm gonna take a really good look now at the seat and have a go at removing it.
-
Thanks for your reply. Nah I haven't had a look yet, but I will with that in mind. No more drunken idiots in my car. That's the new rule.
-
Hi guys, do you know if the front passenger seat can be removed? Reason I ask is because I decided to let a drunk idiot into my car the other night and surprise surprise he stepped on a UDL can and burst it under the seat. I'd love to get in there with some carpet cleaner and give it a good clean before I leave the country for 3 weeks Friday. Any help is greatly appreciated. Thanks. Adam.