


RollaRollin
-
Posts
173 -
Joined
-
Last visited
-
Days Won
2
Content Type
Profiles
Forums
Events
Gallery
Tutorials
News & Articles
Videos
Everything posted by RollaRollin
-
Corolla Sportivo 05 parts sale
RollaRollin replied to Gino's topic in Buy & Sell - Parts and Accessories
PM Sent -
eBay was where I scored mine from $2.50 delivered for two 5000k Halogen Bulbs - H7 Low Beams $2.50 delivered for 10 x T10 Wedge Bulbs (Parkers, Number Plate Lights) Which I then sold the remaining ones to my mates for $5 a set (; So for 5 dollars to my door, this is what I got (: - Well I actually made money back selling the remaining T10 Bulbs haha Needless to say I'm extremely happy about the results, but I will be switching to HID sooner or later, The bulbs simply don't compare, but heck I'm a P Plater and the HID's will probably see me loose my license or some BS :( Oh and I've ordered my 5000k High Beams from the same people, $5.69 delivered And will do a full write up and review once they are in for everyone (:

-
Mate if your trying to replace the cig lighter bulb I'm really not sure you can I remember a thread of someone who tried it an they had to buy a new unit That's what made me not try it But if you want to try, Wrap a bit of paper around it for some grip Like you would a towel to a hard to get lid and twist and pull it out Cheers for the feedback guys also
-
Put your hand where mine is and pull out and up, it should pop the bottom out, don't pull too hard, but still apply some force, the dash is just clipped on so you can't really break anything Once the bottom is pulled out, start pulling the top out, it may get stuck at the ventilation slider Simple just push it through, notice the little tab on top of the unit this sometimes get stuck so just watch it There is the dash pretty much out Disconnect the AC unit, Hazards and De-mister and your done! The dash, now get to work on whatever you need to do (:
-
Now I know this has been done before, But I just thought I could do it a little better and throw in a few more pics to help people out Whether you want to change your headunit or fix a broken light, you need to know how to do this **You'll notice my clock and hazards are missing, thats because I put the dash mostly back together just for this guide, so just pretend they are there** All you will need: - Screwdriver, mediumish size - Patience (: Here is our lovely little dash, it really is that easy to remove compared to some cars I've seen Start by removing the middle fan control button, it will just pull off Unscrew the screw Push the air vents down on either side so you can get a good grip, and then with two hands pull it out It will come out pretty easily, and there are no bolts latches grommets or screws to contend with Here is it popped out Now remove your ashtray to get to the next panel Unscrew your gear knob and simply lift the plastic surrounding it up, it will just pop up Don't take it too far as there is a few wires behind still connected The gearbox, with the Cig Lighter wires and LED light wires, these simply click off, Time to attack the main panel
-
I dare say there has to be another green light mate. Its got me stumped as to why, when the bulb is out, the friggen thing still lights up The only logical solution is that there is another bulb in there somewhere? Which the leaves the question, what the heck was the bulb that I took out? haha
-
Will hopefully have the guide up tomorrow mate (: It will only be the dash tomorrow, and possibly interior lighting as well And if my packages arrive there will be HID license plate lights, parkers and headlights Fingers crossed (:
-
It definately is annoying, and of course, for $200 its not going to be the whizbang unit. I honestly think you'll run into a problem (if you do find one) running a HDD in your car. The vibrations, potholes and shocks can ruin HDD's in a split second. Unless of course you go down the SSD route (flash based) but again, that is a bit pricy Only thing I could think of at the moment is wiring up a HDD media player with an SSD in it and controlling it via remote, but it would be a lot of hassle to get it right.
-
Thats the thing mate, it has a clear lens over it There is no green plastic on my button either, I can see through it clearly and there is no colour in it. When the AC unit is not on, it is clear, not even the slightest tint of green So when I take the bulb out, logically I thought that would solve my problem, But without the bulb in and when I turn AC on, it still lights up and even lights up green! It certainly has me stumped :(
-
Changing LED/Globe cigarette lighter
RollaRollin replied to japspare1's topic in Corolla / Corolla Sportivo Club
Hey mate, I'm replacing the LED's in my 02 so I'm not sure if this applies to you. Assuming thats the part were talking about? Just take it into Autobarn mate, they will just put a new bulb in there for you, I walked out of there and it cost me like 50 cents. Possibly even try D!ck Smith, but I'm not sure if they still do the whole LED thing. -
G'day mate. I have no idea how much money you want to spend, but if your me, you want this on the cheap :P A good friend of mine picked one of these up yesterday, Its $210 delivered, has a plethora of inputs and outputs and supports SD cards and USB drives (up to 16GB I think) as well as iPhone surprisingly The screen is great at night, not so much at day, DVD's display clear as any TV I've seen Has Bluetooth and works perfectly, can even stream and control from your phone (iPhone for me) Has TV inputs and Aux ins, it is really nice and the quality is surprisingly good. Now this is obviously not a top of the line unit mate, compared to a pioneer or something, But for $210, I think its an absolute steal! And serves its purpose well. I haven't checked whether a HDD would work, but I don't think the USB input would support it, or be able to power it. But it will support 16GB SD's and USB's (so it says) so you could theoretically have 32GB Now for me thats plenty, no idea about you though mate. Anyway, good luck and let me know if you need any more help (: Cheers
-
Cheers for the link mate appreciate it, If you have any tips about opening up the AC unit, I'd gladly listen (: Basically though I was going to paint my LED's with a bit of nail polish! That was until I walked into AutoBarn yesterday, and they had the little condom things that go over the LED's for sale, I nearly fell over 3.99 for like 10 of them, so I can change my entire dash for under 5 bucks, and can go back to green if i ever want to, i was so happy (: Theres green, red and blue in the shop I'll post a photo up tomorrow, they are made by Navara and look legit
-
HOW TO: De-Trim Your Ride + De-Badge
RollaRollin replied to RollaRollin's topic in Corolla / Corolla Sportivo Club
Cheers for the feedback guys @demon - I've got chrome handles, they don't look too flash at the moment as most of the car is stock so im going to leave them off for a while and see, they will either be colour coded or chrome thanks for the tip on the mud flaps and boot trim, didn't even think about those! @johnnie - That fishing line is deadly! I litterally gave up after two minutes of using it Seriously though guys, get yourself a wax comb - $5 tops, best tool I use it for pretty much everything, great for panel removals, you never know when they come in handy For those of you who haven't used one, Its a hard bit of plastic with edges, but doesn't do any damage to your trims or car (like a flathead screwdriver would!) -
Thats exactly what I was thinking, like a cover But I'm still confused as to how it is even still lighting up when I don't have the bulb in there? I will think about taking the button off But I really don't want to do any damage and be unable to put it back together Has anyone ever taken on apart and could offer some tips?
-
Hello all, Am in the process of changing out my interior lights. Sick of the stock green, and looking to go for red, which will eventually match my HU. Pretty much am all done, and am in the process of writing up a guide for everyone But I'm stuck on my damn AC light! Its a confusing problem. Here is the AC button, with the LED removed Here is the LED that I took out of it, now to change the colour on the rest of the interior I just removed that little 'condom' over the top of the LED and it was no longer green But after I do this and install the AC button again, with or without the LED in it lights up green?! I'm still getting my green light when I turn the AC on? What the heck? I don't really want to delve further into the button and risk breaking something, its really hard to open it up Had a quick go today and did more harm than good. Can anyone shed some light on this for me? Its my last LED to change and I can't work it out Cheers
-
HOW TO: De-Trim Your Ride + De-Badge
RollaRollin replied to RollaRollin's topic in Corolla / Corolla Sportivo Club
Finished the other door today guys! It dosen't look that great now because I have stock pretty much everything else (rims, no tint, springs etc) But still have so much I want to do to the car, so I think eventually removing the trims will prove to of made the car better than it is now (: Anyway, heres what it looks like fully removed, Before After Before After Finished (: -
HOW TO: De-Trim Your Ride + De-Badge
RollaRollin replied to RollaRollin's topic in Corolla / Corolla Sportivo Club
To do your rear badges its pretty much the same process as removing the trim. Except its a 10 minute job instead of an hour long one Its good because there are no pins that hold the badges in place, so its really easy to de-badge your corolla Heat up the badge with the hairdryer Slide your wax comb or similar under the badge and start working away Heres what were left with, pretty messy Apply your B&T, wait (2-3 mins), and then start scraping the glue off Getting there, one more shot of B&T and should be good to go. Make sure the surface is pretty well clean of sticker residue and then give it a wipe down with a damp rag to remove everything completely. Time for a bit of polish, again you don't need a buffer, just some rags and cut and polish, but the buffer does bring out an awesome shine. The finished rear end (: -
HOW TO: De-Trim Your Ride + De-Badge
RollaRollin replied to RollaRollin's topic in Corolla / Corolla Sportivo Club
One more run through with the wax comb to remove any last bits of glue, then give it a wash with a damp rag to remove all the B&T from your car and clean it up ready for a polish I got my buffer out (SCA for $30, what a bargain) but you can just do it by hand with a few rags, works just as well (: Use a bit of Liquid or Paste Cut and Polish, either way it dosen't really matter, all does the same stuff There we go, all buffed up and looking shiny, looks like there was never any trim there in the first place At this point I only finished one trim as a storm was brewing, and also sticky taped my chrome door handles on. Bit hard to see now, but with a tint, some wheels and the other trim gone, I think it'll be looking sweet (: The finished product (: Things to remember: * This will take about an hour, the front doors are larger than the rears, so the rears are a pretty quick job. * Don't get frustrated, just apply more B&T and wait, then scrap, it will come off. * Do it in a cool shady spot and a good idea it so have a nice low comfy seat * You don't need a buffer, rags will do just fine, but if you want one, SuperCheap has them for $30! * Have fun and enjoy, nothing like free ways to improve the look of your car if you find anything or did something a different way to me, post it up (: -
Well I woke up this morning and thought, you know what, its a great day to remove some of that ugly trim from my stock 02. So thats exactly what I did, along with a debadge of the rear. So I thought I'd share with you all how to go about this and what I learnt from the whole process Enjoy and let me know what you think of my first how to (: Here is my ride as of this morning Heres basically what you need, most of it you probably already have lying around. Bug & Tar Remover, Gloves, Cut and Polish, Rags, Seat To make the whole process easier I used a plastic Wax Comb for a surfboard, now you can use anything similar, but for Me it worked perfectly! And you can pick em up at your local servo for like $2.50 if you don't have one lying around, Makes the process a heck of a lot easier. It is also advisable to have a hairdryer. Also an Electric Buffer if you want (optional but they do make it shine) Heat up the trim with a hairdryer, doesn't have to be too hot, just too loosen up the glue behind the trim Slide your wax comb or similar in under the trim, it will be a bit hot so just watch yourself. Keep applying a bit of heat down the trim, and keep sliding the wax comb along Eventually, you can just pull the whole darn thing off without any heat Heres what where left with, 10 year old glue residue that looks horrible Apply some Bug and Tar Remover, we will call it B&T for now on (: Give it say 2 - 3 minutes to do its magic. I've found that waiting for it to soak in works so much better than going straight at it. Its tempting to try and rush this, but trust me, let it soak in. The easiest way to describe it, is the glue left over has layers. Apply your B&T, wait, then scrape off. You wont get it all first go! Thats because of the layers of the glue, and the power of the B&T. This glue is 10 years old guys, so its stubborn. Work your way down the panel, take the top layer off the glue off, then apply more B&T and then go for the next layer. For each spot of glue there is about 3 layers. Take your time, and it will be a piece of cake, don't get frustrated if it isn't coming off and try and scrub harder, you will just get worn out, ****** off and quit. Simply apply more B&T and wait, IT WILL COME OFF, I promise, once you get to the 2nd or 3rd application of B&T you will see it all working out. Another tip is to move around, while your waiting for a section to soak in, start on another section, it will make it a lot quicker and you'll have it done in no time at all. You can see it starting to clear up and work, this took me about 45 minutes, and thats with all the stuffing around and experimenting I did.
-
Ordinary Fuel Economy from my 02
RollaRollin replied to RollaRollin's topic in Corolla / Corolla Sportivo Club
Took out the MAF today and gave it a clean with MAF cleaner. (see pic beforehand) Also took out the Air Filter, looks dirty as! (see pics) Will have to replace that as soon as I can! Any tips on how to clean the one I have? Pretty dodgy but I won't be able to get to Supercheap or Autobarn till Friday at the best so I'd like to just give it a clean if possible Also did the 30min ECU reset (: Will see how I go Any other things I should be looking at? *ps sorry about the size of the pics, dont have my jpeg compressor on the mac
-
I've been driving my 2002 Ascent (ZZE122R) around for about a week or two now and noticed I wasn't getting the greatest fuel economy. Decided to do a little bit of testing. I let the fuel light come on, and then put in $15, which was 10.43L at the time. I got exactly 130km out of the 10.43L before the fuel light came on again. During that time I drove on pretty much on highway roads. With the occasional bit of city driving. I'd say 110km was on highway and 20km was done in city driving. Just looking up the specs of my car, it says it should be getting, 5.8L/100km from it on the highway, now I know thats at best conditions but if you work it out I'm currently getting like 8.5L/100km, and I don't drive hard, thats just cruising in 5th gear (90km/h P Plater). Thats pretty much an extra 3L burn every 100k I drive, compared to what its rated for. Heck in city driving its rated for 8L/100km. And I'm doing worse than that out on the open road. Is this normal for my car to be giving such ordinary fuel economy? And if not where do I start to fix this problem as its already starting too add up ): Appreciate it, Cheers
-
Hey all New to the forums but thought I'd put the word out. Anyone on the North Coast of NSW (or SE QLD) that needs photo's of their ride hit me up. No pro, but I do have a bit of experience in taking photos, and am currently using a Canon 40D and a few different lenses. Happy to do it free of charge if you wanna meet somewhere or something ($ for petrol if its a bit of drive), just message me or respond to this thread. Free most weekends and would be good to get to know some more members! And to shoot some good cars while I'm at it (: Callum
-
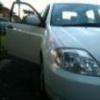
Headlight Discolouration
RollaRollin replied to RollaRollin's topic in Corolla / Corolla Sportivo Club
Bit of chrome polish - Mothers And a bit of Cut and Polish - Kitten Come up pretty decent, of course not perfect, but it'll do I think. Attached is a before and after shot Opinions? Callum
-
Headlight Discolouration
RollaRollin replied to RollaRollin's topic in Corolla / Corolla Sportivo Club
Thanks for the tip mate. I'll do a spot test in the corner first and see how it goes from there Will post up pics in about in a couple of hours Fingers crossed (: -
Headlight Discolouration
RollaRollin replied to RollaRollin's topic in Corolla / Corolla Sportivo Club
Cheers for the replies guys Cant get to Supercheap or Autobarn today But my mate says he used some chrome polish product and it worked perfectly on his lights So going to have a shot at that and will let you all know tonight. If it dosent work ill try and grab some of the above Keep you posted. Callum


