


apg39
-
Posts
477 -
Joined
-
Last visited
Content Type
Profiles
Forums
Events
Gallery
Tutorials
News & Articles
Videos
Posts posted by apg39
-
-
I did this yesterday because my cupholders weren't working smoothly....theres just a few clips holding that blank piece in. Ashtray should be a couple of small screws at the sides.
Tip: pop the car in N or D so the trim lifts up over it, then reach in & twist the cig lighter globe & pull out the wires, there will be one more the you cant pull off but its a hell of a lot easier to work around now.
-
:o when we did mine we just wrapped it in a towel did u put the light in with nothing around it??
That was my mistake, Ive got a VERY small oven & had to gut the internals...wasnt game enough to put in a towel because the light unit is massive & I wa worried that it would catch fire (gas oven). Now its together though its only a little area thats visible, most of the 'burn' is in the section that goes under the bumper.
Reinstalling this morning when I am motivated to get out of bed....
However, stressing less, best mate is at the local Toyota & is checking Monday if he can just order the casing for me.
-
ORIGINAL POST
OK, the DIY will appear soon...Im half way through & have accidentally burned the casing on one headlight.....poop. It must have leant on the metal in the oven. Not deformed at all, just discoloured.
Bit angry now....but the spray paint fumes are making me happy...
--------------------------------------------------
DIY STARTS HERE
I got this DIY from the Toyota Nation forum, but im going to add in some little notes that are different for the Aurion. When I say Step 1 c) it refers to Step 1 in the DIY & c) refers to the 3rd picture + instruction in Step 1.
I hope the original author doesn't mind me re-posting the DIY here. Original thread can be found HERE
Step 1 c) - When moving the inner wheel arch, there is a clip inside the top & one about half way down...remove these will give the best access to the bold holding the corner of the bumper on.
Tip: After you undo the above bolt - reach your hand inside and push just below the clips to pop them out, if you just pull the panel out you may break the clip. ALSO - there is a tiny push clip where the front grill slips in....taking that out gives more flexibility in the bumper, especially when taking the headlight unit out.
Step 1 e) The bolts holding on the light are alot different. There are 2 visible bolts on the top of the light, there is one on the inside corner, near the grill, I got in there by using an extension socket & bending the bumper out of the way slightly. The 4th bolt is shown above in d). There are 3 globes to remove + 1 plug.
Step 1 f) There is no insertion pin, disregard. Taking out the light is alot different, it takes alot of moving around & bending & this & that but it will work. There is alot of unseen headlight at the bottom as well as stickyouty bits to hold the light in place. Dont ask me how I got it out, got a little rough at one point but its easier if the bumper is bent out of the way.
Step 2 a) Lots of different methods of warming the glue, taking it apart I put the oven on about 100 deg C, the put it in there for 10 minutes, its trial and error though, you just have to do it until the glue is warm enough to come apart. Other people say put it on 220-250 deg C then turn the oven off & the ambient heat will melt the glue. I dont know how long the light will stay in the oven for then. Some say wrap it in a towel or lay it on a towel / cookie sheet. This wouldn't be a bad idea but I reccomend using the method of high heating & turning the oven off THEN putting the light in - so it doesn't catch fire.
Step 2 b ) Things to remove from the back of the light - 10x small screws from around the edge of the light, 1x small black screw with washer holding down wiring, 3x black caps, bracket & plug (tip: bend the bracket, there is a clip on the back to take off the plug to pull it off), rubber grommet around one light, rubber grommet with 2 wires through it, plastic twist cap (then inside that 3x small screws & brown circle) and metal screw thead in the far bottom corner. I didnt touch the alignment screws, just be careful not to burn yourself on them. Didnt affect alignment when re-installed either.
Step 2 f) There are 4x small screws holding the housing on, one also holds the cover for the indicator - take that off as well.
Paint paint paint away & screw the housing back (with indicator piece) onto the cover.
I then pushed the backing back onto the front....glue will hold a little but it wont sit flush like it does OEM. It needs to be reheated & then push it into place, put the 10x little screws back in then leave it to cool. I didnt use any more sealent, lots of people dont, personal choice.
Re-install all the pieces take off before putting it in the oven.
Re-install light on car.
Put all screws & globes back where they belong.
Re-install grill.
Stand back, grab a beer, admire, check all lights then grab another beer.
Finished result.........(Ill take better pictures on the weekend)

-
I also am doing mine today on the Aurion....everything was going swimmingly...until I heated the 2nd light....left it in a little bit longer because I put the first back in about 4 times. When I took it out I didnt notice but where the casing must have leant on the oven has left a white crackle/burn mark on it. About 4cm diametre.
:o :o <_<
:( :( Anyone know if you can just buy the clear casing for a headlight & not the whoel unit??
-
Toyota freaks...I like it.
First question - how old is the Celica you are looking for?
Ideally you would want to buy one thats registered (more rego the better), you have to pay stamp duty (3% of the first $45,000 - NSW) and transfer of rego ($26 - NSW). Being registered - it will already have CTP (Compulsory Third Party) insurance which stays with the car until rego is due next. When its already registered you have number plates already & its just a matter of coughing up money to the authorities to put it all in your name. You can get personalised plates very easily, once they come in you swap them over & hand the old ones back.
If its not registered there's inspections & slips that have to be done & paid for...can be a headache. Depends on the age of the car in the end, a new one wont have a hassle but older one may need repairs or something to bring it up to registration standards
Some one who knows about Imports can answer the next bit...
-
As long as the prices are still reasonable once shipping is included I dont mind organising it. I've emailed 2 places so far to see if they will ship + discount for multiple buys...nothing yet.
I'm also considering that cost v. buying a At-x, presara one & cutting out the internals & meshing it myself. Not sure about how the curvature of the mesh would go though.
-
According to the websites....
* for the chrome grill (R Style) is 3,900 Baht which = $121.70 AUD......CHEAP!!!!
* for the sports grill (Valencia) is 3,500 Baht which = $109.20 AUD......CHEAP TOO!!!!
+ shipping though and if we can get a few then shipping will be cheaper.
I also found these grills from thai forum.Damn looks nice... <_<
The first one one the white cars the same as the chrome, just painted & the black one's the same as the very top picture.
-
It appears they are all available in Thailand only....who would be interested in a Group Buy for any of these? Might try get a member of Camryclub.com to track some down & purchase on our behalf then ship over for us.
-
Also found this one...
-
There's double sided automotive tape at Supercheap auto, when I've put badges back on other cars I've just got that tape & cut roughly shaped pieces to re-fit. Can't do it when the metal's cold though otherwise it wont stick as good...best when its in the sun beforehand & the panel is warm.
-
I would emagine they would...they still look good tho!!
Its tempting to get the insides of the lights painted black but then there could be a chance of gettin condesation after they have taken the glass off.
if anyone gets it done please post us some piccies :D
Missus is going away next weekend so Im all over it...she cant complain if she's not there....
-
Hi Guys,
Got a 3-4 month old kitten (male) that we can't keep. Got given to us a month ago and was originally giving it to mum & dad but they couldnt look after it as much as they wanted it. I cant have 2 males in the house so he's got too go. He's too old to go to Kitten adoption at the Vet's so its free to a good home or the pound....cant bring myself to take it to the pound.
He hasn't been desexed or microchipped, but he is free. Extremely playful, but then can just shut his eyes and fall asleep peacefully. Loves eating because he sticks head right into the food & always comes out with it all over his face. Loves eating corn on the cob (?). Loves sleeping on shoulders when were on the lounge. Gets along fine with our cat so he should be fine with others.
I can meet whoever wants him, preferrably someone around Sydney area or somewhere thats an easy drive from Lithgow.
-
After 3 tanks of fuel, my readouts been 13.7 - 14.5 with my normal around town driving ( Property Manager so Im driving everywhere stop start etc)
Went up to Sydney last weekend - got to 9.1 and dropped to 8.3 at one stage!
-
It happens everytime I get spirited, hits redline & changes gear.
Im glad though cos I dont really want it lurking in redline territory.
Im sure a tune or piggy back ecu can remove it or raise the redline.
-
I'd thought a different grille might be something I think about at some stage, not sure if any of those would suit a darker coloured Kluger like mine though :(
DIY mesh grill FTW! I'd go the stock looking one w/out the badge.
Go the chrome window accents, look good on a dark kluger.
-
-
thats how my mate did his car an he said it was relatively cheap too...where do they get the angel eyes from do u think? i found a few site that have them but they dont send to australia which is a bummer!
I've seen heaps of DIY angel eyes, using a clear curtain rod turny thing, some LEDS & wiring...Ill see if I can dig it up.
Should be able to find them on ebay??
-
AH ok.
I heard back from the Thai Camry's...they took their headlights to a body shop who took them apart & painted the insides black (like what I want to do). My guess is they also had the angel eyes installed at the same time...If thats the case Id leave original parkers & not even bother putting angel eyes in.
-
Not sure I know what you mean? I can still see the parkers there?
If I DIY'd it I would leave a chrome ring around each light anyways, having the angel eyes would mean more wiring.
Have just posted (in English) on the Thai Camry forum where I got those pics so fingers crossed Ill have some answers soon.
-
Ok my searching has found that I can get one from a WALD bodykit, but cant seem to find where they are sold...
-
i been trying to find a website translator for thai to english like babelfish but is epic fail.
can anyone find anything. i keen on surfing that forum
www.thai2english.com is a dictionary I used. Wont translate the whole website though, just text you put into it
-
I dont know if I can wait to buy some....Im keen to do it this weekend...
-
Where can I find this grill? Found the pic on the Thailand Camry website.
Otherwise Ill have to DIY it...
-
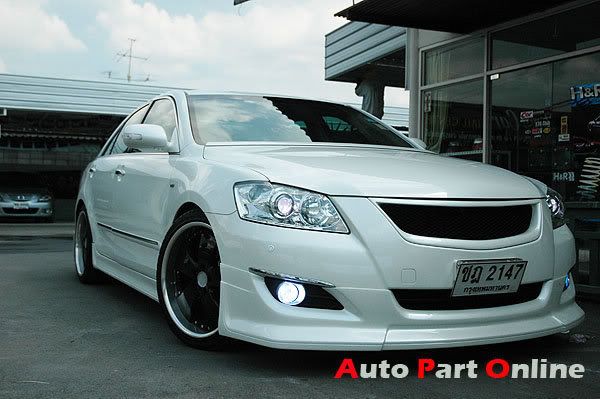
White Camry with blackened headlights
Another white camry with blackened headlights
I also want this Grill too...


 :( :(
:( :( 


Tough Cleaning Materials
in Inside and Out
Posted
I found that out the hard way...removing rubber bumper corners on the Forester + heat & rubbing left me with sore hands.