

Squalled
-
Posts
582 -
Joined
-
Last visited
-
Days Won
39
Content Type
Profiles
Forums
Events
Gallery
Tutorials
News & Articles
Videos
Everything posted by Squalled
-
Current Car Care Specials
Squalled replied to Squalled's topic in General Toyota & Other Car Discussions
One thing I also really love about Wax It. Their rewards system is awesome! I haven't got any rewards just yet but should get my first one soon. -
Current Car Care Specials
Squalled replied to Squalled's topic in General Toyota & Other Car Discussions
Surprised you're not a diamond status yet Tony 🤣 -
Current Car Care Specials
Squalled replied to Squalled's topic in General Toyota & Other Car Discussions
More Wax It Car Care BOGO specials - https://www.waxit.com.au/collections/bogo-buy-one-get-one?_kx=Va35ZHq-KaOtemNhGDd_iCf5zgIMa6O1TUPwdY0IvAs%3D.MeSg3g -
Current Car Care Specials
Squalled replied to Squalled's topic in General Toyota & Other Car Discussions
I've been very tempted to get more but with a lot of things to save for in the coming year, I only get products once they run out and I need a replacement these days 😞 Although I still have a completely full shelf of detailing products so I guess it stops me taking over other shelves. -
Current Car Care Specials
Squalled replied to Squalled's topic in General Toyota & Other Car Discussions
Wax It Car Care having up to 20% off accessories, while stocks last - https://www.waxit.com.au/collections/accessory-sale?view=all Current Supercheap car care specials, until October 9 - https://www.supercheapauto.com.au/catalogue-out-now?prefn1=activePromos&prefv1=Car Care&sz=60 Current specials at Autobard, until October 23 - https://autobarn.com.au/ab/catalogue#view=catalogue2&saleId=46998&page=7 Current specials at Repco, until October 10 - https://www.repco.com.au/en/shop-catalogue?q=on_sale_shop_catalogue%3Arelevance%3Alevel1Category%3A1862917923&text=on_sale_shop_catalogue -
Products: Meguiars Hybrid Ceramic Liquid Wax Application: Working in the shade, apply to a cool clean panel. Apply a small amount of product to a foam applicator or polisher pad. Spread a thin, even coat to a panel and use 2 overlapping passes to ensure complete coverage. Allow the wax 3-5 minutes to cure before wiping the panel with a microfiber towel. Experience: This was my first genuine experience with the proper method of waxing, none of the usual spray on and wipe waxes that are becoming more common these days. Following the steps noted, I applied 2 small drops to a foam applicator and worked a panel at a time and found that a little does indeed go a long way in terms of this product. I performed the overlapping passes and allowed the product to cure for the noted time and moved onto the next panel and began working that the same way before going back to wipe the panel with a microfiber towel. Unlike traditional waxes, this wax doesn’t haze so I could leave it on the panel longer than time recommended with no issues. Once I completed the wipe off, I was left with a super slick panel that had more deep gloss than it had prior. I completed the entire car in relatively quick time given the product allowed me to work another panel before requiring a buff off. Once the car was completed, I found I used hardly any of the product leaving me with even more to apply in future. After watching many videos and reviews of others experience and thoughts, I can attest to them and note how easy and simple this product is to use. Given its application is basically what I found to apply to other liquid waxes, there was nothing out of the ordinary, but the result was even better by the fact that it was easy to apply, the cure time was short and simple to buff off process with no risk of hazing. More product information can be found below: https://www.meguiars.com.au/product/hybrid-ceramic-liquid-wax/
-
Products: Bowden’s Own Paint Cleanse and Restore Application: Before beginning, make sure the car is clean, recently decontaminated, and dry. Apply a 50-cent sized portion of the solution to a microfiber application pad and smooth it out over the entire pad leaving no dry sections. Apply to the car a section at a time working in straight motion if outdoors and circular motion if working indoors. Once you have worked the section, buff the residue off with a plush microfiber towel and repeat this process to complete the car. Experience: For my experience, I had just conducted a decontamination process on my car, washed and dried the car as indicated. The paint prior to my experience was quite slick and smooth as all the contamination had just been removed. I applied the solution slightly different to what Bowden’s notes, applying 4 small dots and spreading the product into a microfiber application and using a straight back and forth, side to side motion rather than circular as I was working outdoors. Once I was confident, I had gone over the section I worked on twice, I got a plush microfiber towel and removed he residue from the paint and was greeted with a very clean and deep shine to the panel. First inspection rubbing my finger along the section, it was even slicker and easier to move along than before. Once I completed my initial check, I then completed the process to the remaining sections of the car. As the product is not abrasive, it doesn’t leave any scratches or swirls after using it. As this product is a cleaner, it is recommended to be used after a decontamination and prior to applying any wax or sealant. Like most Bowden’s Own products, it was simple to use and delivered a great result that I was not expecting to be as good as it was given the age and condition of my paint. I found I used very little product meaning I can get many more body cleanses completed before I ever need to restock and for the price, it makes it an attractive purchase, especially for a novice like me. More product information can be found below: https://www.bowdensown.com.au/products/exterior/paint-cleanse-restore
-
Products: Bowden’s Own Three Way & Claying Rubber Application: Apply to clean, dry paint working a section at a time out of direct sunlight on a section cool to touch. Allow the solution to sit on the section for at least a minute before using a clay bar or in my experience, the Claying Rubber. Prior to using the claying rubber, the instructions note to spray the pad prior to working the section with little to no pressure. Once a section is completed, simply wash the product off (the product can also be left on the panel for an extra period if required) and move on with the remaining sections following the same process before the car requires a re-wash. Experience: This was my first experience with doing a decontamination clean and I have to say using this combo, it was simple and easy, and the results were fantastic. Three is the decontamination spray that’s used to remove iron and other contaminants while also working as clay lube hence it’s quirky name. Given my car is silver, I began on the bonnet as I knew this would be one of the more contaminated sections. I sprayed the panel and let the solution dwell for a minute or so before beginning to work the bonnet with the claying rubber. Even after roughly 10-15 seconds, I was already noticing the purple spots all over the panel indicating the contamination. In my case, there wasn’t a great deal given there were only small purple spots here and there but, on Bowden’s Own website there are plenty of images and a video showing highly contaminated paint. I sprayed the claying rubber to begin the second part of the decontamination process, and began working the panel with very little pressure,working in one direction before changing the motion to make sure the contaminants were removed. Working with these two products, it’s easy to tell there is contamination with the sound made while working the claying rubber along the panel. Once I felt the panel was clean, in this case I moved onto the front guard before deciding to wash the bonnet as the water would require drying anyway but, you’d normally rinse the panel with water and made sure all the solution and contaminants were rinsed off. I repeated this process around the car but after completing the first panel, it was massive noticeable difference in the feel of the panel. Prior to the decontamination, I lightly rubbed the panels with my finger and could feel that the panel wasn’t entirely smooth and did feel rough in sections. Once I completed the decontamination, the panels felt much smoother and slicker, and I couldn’t feel anything really making my finger stick. With the claying rubber being non-marring, I found no more additional scratches added to the paint other than what was there already prior. In my case, I found all the small dots of contaminants were gone along with another section on my bonnet where I’d removed bird poo just a little too late and it did leave a mark, luckily for me not deep enough to damage the paint was also removed. To round up my experience, it was nothing but pleasant, easy, and simple. For a novice like me, undergoing a decontamination process can be daunting but using both these products together got rid of the worry of making a mistake with easy-to-follow steps and application. I know these products may not be the best on the market but for beginners, it’s a perfect start for getting into paint decontamination. For more information on the products: Three Way: https://www.bowdensown.com.au/three-way Claying Rubber: https://www.bowdensown.com.au/claying-rubber
-
New to Toyota - 2005 Corolla Sportivo!
Squalled replied to Squalled's topic in Corolla / Corolla Sportivo Club
That damn accelerator cable. Can't unsee it now 😂 -
New to Toyota - 2005 Corolla Sportivo!
Squalled replied to Squalled's topic in Corolla / Corolla Sportivo Club
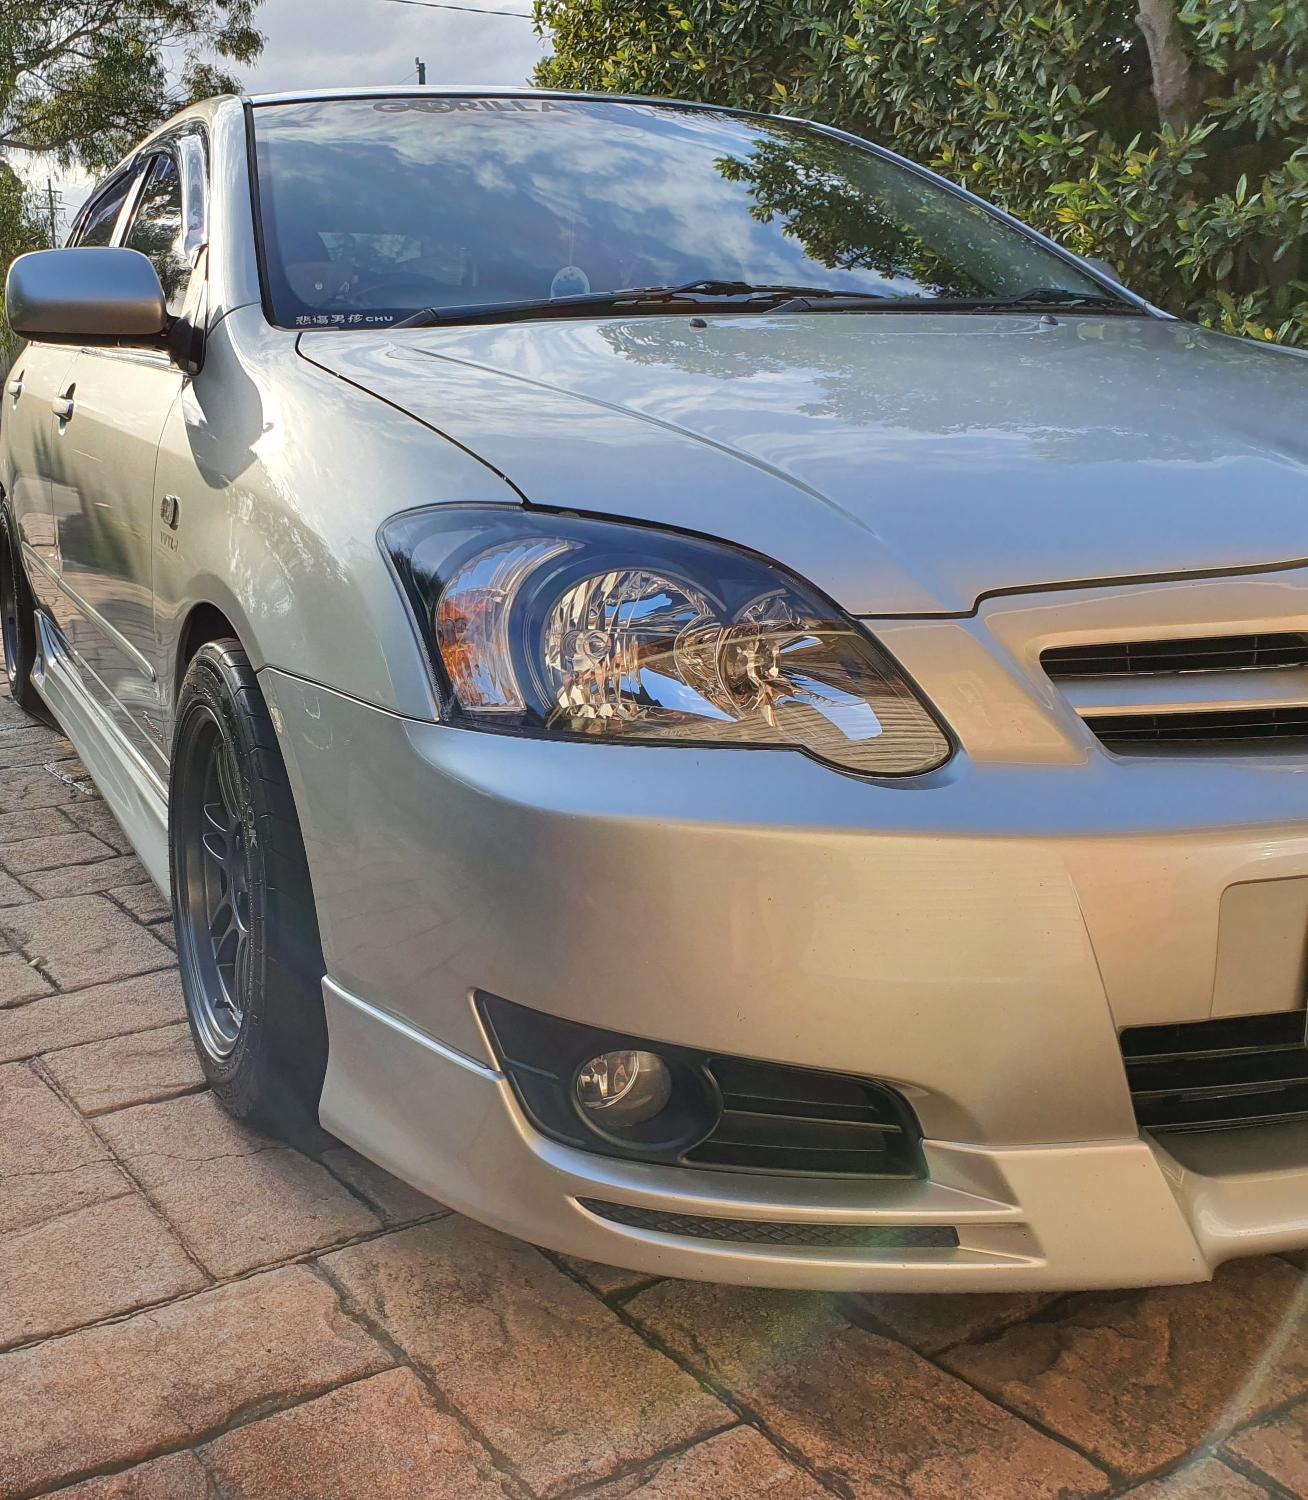
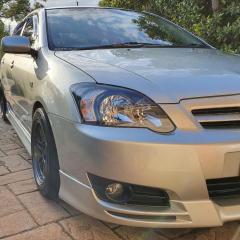
Toyotafest 2022 The Big Day Well, the big day has gone as quickly as it came. Had an awesome day catching up and meeting new people. Surprising even myself, I did see quite a few people have a good look at my car this year compared to previous years which was pretty cool actually. Had a few people show interest and were curious about the car which is awesome, always happy to have the conversation and no question is ever silly 🙂 The day went by very quickly, I know some years it may feel like the day drags on but not this year that's for sure. As it goes every year, started off the day bright and early with an hour of sleep lost. These were my first proper photos in good light after all the detailing work. Was very happy with how the car turned out! I've now got another skill added to my list and something I want to improve upon over time. First stop, the service station for ice for my Esky. Met up with Adam after arranging the previous night before arriving and parking together not too long before the lockout. Decided I'd open my bonnet this year given I've actually cleaned my engine bay somewhat along with the fact I've been finding more and more people are getting interested in not only Sportivo's, but the 2ZZ as well. Didn't take all that many shots on my phone during the day but I know of a few mates that took some shots which I'll see later on. After those 7 hours were over and done with, you may have noticed the other Sportivo had ITBs and I went for a quick spin to see how the felt and sounded like. All I can say is, WOW. I've never heard anything like it before and my ears are still ringing from yesterday. After the quick spin, I made my way home but not before stopping off to the industrial area for some shots which is now built up compared to the last few times I stopped there. Overall Toyotafest #18 was a great success. Did a big detail on the car myself and didn't make the paint any worse, gave the interior and engine bay well deserved cleans and got to meet a whole bunch of new people at the show. With all the little changes I've made, the car should be great for many years to come and the exterior should be easy to clean for many months ahead! Stay tuned.
-
New to Toyota - 2005 Corolla Sportivo!
Squalled replied to Squalled's topic in Corolla / Corolla Sportivo Club
Toyotafest 2022 Part 2 Preparation Day 2 With most of the nitty gritty prep done yesterday, it was one to some very fine details for today. This included an interior clean, minor engine bay clean after a degrease yesterday and some polish for the intake and muffler. I don't usually open my bonnet at the event but I thought the engine bay deserved a bit of love anyways. Probably the first time this year I've actually given the engine bay a clean. Here's how the beast looked this morning after yesterdays rain and post drying. Really over the moon with how the car turned out, the car looks fantastic given the age and paint condition. It was super easy and quick to dry today and made my life a lot easier to get the rest of the finer detail jobs done. It's now garaged tonight to avoid further wet weather and we await for tomorrows day ahead. Stay tuned!
-
New to Toyota - 2005 Corolla Sportivo!
Squalled replied to Squalled's topic in Corolla / Corolla Sportivo Club
Very happy with what I achieved yesterday. The claying rubber and three way spray is basically my entry level into getting into decontamination, I know it may not be the best but I'm sure I'll eventually find something a bit better over time 🙂 I noticed how well it worked given a lot of the spots that were around the car are now gone! Especially on the rear bumper near the boot where water and dirt tend to sit since it's flat. From checking, one was a TYC and the other was a Valeo so I'm not sure if one was OEM or they were both aftermarket as I know TYC is an OE style replacement brand which I coincidentally replaced both sides with new TYC units. Ah yes, that is the JDM Runx badge. If you look closely, there is a small cut out in the design which makes the badge outline look like a "C". The Echo alternative, the Vitz has a similar badge that makes the shape appear as a "V". -
New to Toyota - 2005 Corolla Sportivo!
Squalled replied to Squalled's topic in Corolla / Corolla Sportivo Club
Toyotafest 2022 Part 1 The Preparation We've once again reached that time of the year, the October long weekend meaning it's Toyotafest time. As I mentioned previously in my thread, this year I wanted to undertake detailing and making my car tidy for this years event. The last event in 2019 I had a professional detailer work his magic on it and was nothing short of over the moon with results but this year, given I've been a more keen "detailer" since then, I wanted to give it a crack myself and see how I'd go. Before I got into the detailing side of things, I had some other things on my pretty big to do list to get done first. To start off the list, my fog lights. For some time now, my passenger side fog light has had a lot of condensation inside it which has been bothering me. I ordered a pair of brand new ones which arrived earlier this week and decided to replace both given the drivers side wasn't that great either. The condensation is really not appealing at all. Out with the old, in with the new. What a huge difference a bit of coin and a few minutes makes. Both sides replaced and confirmed everything was still working before moving on to the next job. I will need to see if there's any difference with the lights at night. Next on the list was installing a brand new drivers side guard liner. A few weeks ago, I purchased some brand new OE style replacement liners and some liner clips of various different styles and sizes so I can finally have a nice looking guard area again. I only focused on the drivers side given the passenger side is still fine. After 5 long years, I FINALLY have a drivers side guard liner once again! I test fitted a bunch of different clips and found what worked best and got it fit nice and tight. Now on to the detailing. Going in, I knew it was going to be quite a long day given what I had to complete with the wind and rain making my life just a little harder, it wasn't going to be easy but I wasn't letting the weather deter me. Here's how the beast started out for today, not washed for a fortnight or so and rather filthy with the recent changeable conditions. Knowing that I was going to be going through this effort, I decided to not reapply any form of sealant to make the job today much easier. I begun with a strip foam, using Bowden's Own Orange Agent cleaner, mixed in with their "Yellow Snow" foaming soap which appeared to work a treat. Once I rinsed down the panels they were initially beading which is normal but once I began washing the car they began to be hydrophilic which is what I expected. Once I was done, I dried the car without any aids and began preparing for the next major step. For some time now, I've had this combo and I've been dying to use it given that my paint did have some contamination and I wanted to see if I could try and get it out myself. Insert Bowden's Own "Three Way" and Claying Rubber. There is a bit of Bowden's trend here yes, I do enjoy their products but I am also expanding my horizons and getting into other brands as I find Bowden's products really easy and forgiving to work with especially for a novice like me. Thankfully, this applied to the Three Way and Claying Rubber. "Three Way" is a wax removing and decontamination spray that also works as a clay lube (hence the products name) in conjunction with the claying rubber and also clay towels and bars. I sprayed the bonnet as my first panel and allowed the product to sit for a minute as was welcomed with this. Some very minor contamination given their YouTube example was heavily contaminated. I prepped the claying rubber by spraying it with the product and began working on the panel before moving on to the rest of the car. Here are some of the more notable pictures I got with the product in action. Unsurprisingly, the top section, side skirts and rear section of the car were the most contaminated. The claying rubber worked extremely well and I didn't need to place any pressure what so ever and being non-marring, I didn't have to worry about scratching the car further given I'm not able to do a paint correction. I will be writing a more detailed review in the detailing review thread that goes more in-depth with the products and how they were to use in my experience but I'll just say I was very happy with how the products worked and the result I got. The lighting seemed to work wonders for this shot. Paint all nice decontaminated and ready for the next step. I then moved on to rinsing down the car before re-washing it once again, then drying once more. Once the car was dry, I then applied Bowden's Own Paint, Cleanse & Restore to really clean and prep the paint for the final step. I simply squirted a few small dots onto the pad before applying it to a section at a time before using a low pile microfiber towel to remove the residue. I proceeded to do this all around the car and it left the panels feeling super smooth and slick, not one bit of roughness like it previously had. Now that the decontamination and cleaning was done, it was time for the cherry on top, wax. Instead of choosing the easy spray on method, I went with a liquid wax given I've never had the experience of applying one before. I decided to use Meguiars Hybrid Ceramic liquid wax after a fair chunk of research in my spare time to see what I could use. I applied small spots to a foam applicator and used sweeping overlapping motions and worked panel by panel. The cure time notes 3-5 minutes so I'd move around the car before using a microfiber towel to buff the product off. I don't have any photos of this process as there honestly wasn't much to see as the wax doesn't haze like traditional waxes and mostly because I was trying to not only beat the sunset, but also the incoming rain I could see approaching. All I can say is that it was super easy and simple to use and the panels feel oh so slippery and slick now! I waxed the car before the rain hit and I just beat the sunset too before running out of light. The beading action looks awesome and the water really just rolls off once it hits the panels. I will need to assess tomorrow how easily the car dries when I continue with final few steps before Sunday comes. Here are some of the products I used today. Very happy with the results so far and will keep a tab on how long the products last for as well so I can really test if they're worth continuing to use. I did complete some other jobs but seeing as they're not 100% complete for that particular area, I'll leave that for another update. Stay tuned!
-
Current Car Care Specials
Squalled replied to Squalled's topic in General Toyota & Other Car Discussions
Specials from today @Tony Prodigy that carport cover is now on sale, down to $225 https://www.supercheapauto.com.au/p/coverall-coverall-temporary-carport----3m-x-6m-x-2.7m/164891.html#q=tempory%2Bcarport&lang=en_AU&start=1 Here's Supercheaps car care specials, valid till October 9 - https://www.supercheapauto.com.au/catalogue-out-now?prefn1=activePromos&prefv1=Car Care&sz=60 Repco's current car care & panel specials, ends October 10 - https://www.repco.com.au/en/shop-catalogue?q=on_sale_shop_catalogue%3Arelevance%3Alevel1Category%3A1862917923&text=on_sale_shop_catalogue -
Current Car Care Specials
Squalled replied to Squalled's topic in General Toyota & Other Car Discussions
Club member specials at Supercheap Auto on Bowden's Own, 30% off until September 28 - https://www.supercheapauto.com.au/club-specials?prefn1=srgBrand&prefv1=Bowden's Own&start=0&sz=60 -
Current Car Care Specials
Squalled replied to Squalled's topic in General Toyota & Other Car Discussions
Latest Repco Car Care specials, valid till October 10 - https://www.repco.com.au/en/shop-catalogue?q=on_sale_shop_catalogue%3Arelevance%3Alevel1Category%3A1862917923 -
Will do Rob! Thankfully, prior to Toyotafest I'll be doing a strip wash and decon before giving it a nice re-seal with a coating. I do agree that I've found it does trap unwanted things to my paint so I'll see how I go with the decon process and I may end up doing as a 6 monthly or yearly process. I'll likely update this thread with a few products with my feedback along with updating my regular build thread 🙂
-
Product: CarPro HydrO2 Foam Application: Mix 9 parts water, 1 part formula in foam canon lance. This can be applied in 2 ways, used as a complete wash and seal by spraying the vehicle, using a sponge to clean and rinse off (recommended on lightly soiled vehicles) and the method I use, spraying on the car after a wash and either using a sponge to spread the product more evenly or just using a higher pressure washer to rinse it off. Experience: This is the 2nd finishing style sealing foam I have used, the first being a little further up in this same thread. When my Bowden's H.E. bottle was completed after doing more than 20 cars worth of sealing, I began looking for alternatives that worked in a similar way as this is a method I find very simple with my current experience and I've honestly never really had any issues. After a few weeks of searching the web, watching and reading various reviews and comparisons I decided to go with CarPro HydrO2 Foam and luckly enough for me, it was on sale too! The product is very simple and forgiving to work with, simply mix it as suggested and spray the vehicle. In the beginning, since I didn't have too much where I would wash my car, I would spray a panel, spread the product with a microfibre towel or wash tool and than pressure wash off before my current method which is coating the entire car and going around to spread the product into the panels before rinsing off. It leaves a nice slippery smooth feel on the panels and is safe on all materials, maybe not as smooth as my previous experience with Bowden's but it's honestly not massively different. The beading action is fantastic, it leaves nicely defined beads along with giving the panels nice hydrophobic properties and easily repelling the water away without any real stickyness to the panels. I've also found it does enhance the gloss and add some depth to the paint while adding the protection layer, comparing pre and post coated photo's it's a little hard to tell on my silver car but on other comparisons on different colours, it's a nice noticable difference. CarPro has quoted in some cases the coating can last up to 6 months on garaged vehicles and 3 months on vehicles outside and I can really back up those claims. After my first coating was applied last year, I found I didn't have to top it up for well over 2 months, given my car has never been garaged full time. I had last applied the coating in late July and my panels aren't as slippery and smooth as when the coating first applied but it's very evident when applying snow foam and washing that the coating is still there and working. I personally think it's a very worth while purchase for simple and effective protection. It can purchased locally via - https://www.waxit.com.au/collections/carpro/products/carpro-hydrofoam-500ml-1l
-
New to Toyota - 2005 Corolla Sportivo!
Squalled replied to Squalled's topic in Corolla / Corolla Sportivo Club
That wonderful date of the year has finally arrived and another year of ownership to add. 7 years now I've own the Sportivo, 364 weeks which is roughly 363 weeks more than most current owners seem to own them for these days and over 126,000 kms added. I didn't think I'd end up owning it for this long but at the same time, I really can't bring myself to sell it. It honestly has never missed a beat even when it did have issues so here's to many more kms to rack up. Time for some throwback images, don't think I've ever popped these up on my thread. Late 2015 roughly a month or so after buying the car, I went for one of many drives up North towards Old Pac and had a friend take these shots with his DSLR. This was probably not too long after getting the car back from the smash repairers to fix the rear bumper, side skirts and shave msotly de-badge the boot. Not long after the DSLR shots were taken I went to the drags which I documented very early on. Was one of the slowest cars of the night but thankfully not the slowest. I did however had to deal with a very hit night being over 30 degrees when I began, rubbish economy tyres, a blocking out 2nd gear and being rather inexperienced with keeping the Sportivo in power band made the end result something I'm rather happy with all things considered at the time. I'm still yet to go back with everything I've since changed on the car so hopefully sometime soon I can make a return and run a better time. Now onto the present, or close enough. A Sportivo that I'm very proud of and glad that I was able to acheive my goal and more with it. Stay tuned!
-
Current Car Care Specials
Squalled replied to Squalled's topic in General Toyota & Other Car Discussions
Coating week sale on at Wax It Car Care - https://www.waxit.com.au/collections/coating-week?view=all -
New to Toyota - 2005 Corolla Sportivo!
Squalled replied to Squalled's topic in Corolla / Corolla Sportivo Club
It was oil change time over the weekend. Managed to get it done in really good time as well as degreasing the underside of the engine bay. It appears I have a pretty decent power steering leak and I'd likely say the pump is on it's way out as it has been a little noisy sometimes for a while now. Anywho I had it cleaned up while I was underneath anyway and I keep an eye on it over time. Given I now spend much of my weekends doing house work, other projects and going out I finally had some time, and great weather to wash the beast once again. It was quite dirty given I hadn't got to wash it in a couple of weeks but an hour and a half of my time got it looking nice once again. It will likely be the last wash prior to attending Toyotafest during the October long weekend. I've managed to get the Friday off and I'll be using the extra day to do a very extensive clean inside and out in preparation for the day. I know it will likely not get much love or attention at the show but I'll definitely have a lot of satisfaction knowing I spent the time getting it looking schmick. Stay tuned!
-
Current Car Care Specials
Squalled replied to Squalled's topic in General Toyota & Other Car Discussions
Wax It Car Care have their new buy one, get one specials - https://www.waxit.com.au/collections/bogo-buy-one-get-one?_kx=Va35ZHq-KaOtemNhGDd_iCf5zgIMa6O1TUPwdY0IvAs%3D.MeSg3g -
Current Car Care Specials
Squalled replied to Squalled's topic in General Toyota & Other Car Discussions
Current Supercheap Auto catalogue specials, ends September 18 - https://www.supercheapauto.com.au/read-catalogue#view=catalogue2&saleId=46511&page=5 and https://www.supercheapauto.com.au/read-catalogue#view=catalogue2&saleId=46511&page=7 Current catalogue specials at Autobarn, ends September 29 - https://autobarn.com.au/ab/catalogue#view=catalogue2&saleId=46765&preview=Op4r3dSSEKnv&page=15 -
Current Car Care Specials
Squalled replied to Squalled's topic in General Toyota & Other Car Discussions
25% off Bowden's own this weekend at Repco - https://www.repco.com.au/en/brands/bowden-s-own/c/1887688507?cid=email-2022_09_01_3Day&mkt_tok=NzI3LUJRRi04NjQAAAGGl0pMrYLT7Ocu5cB6Sbh15vFHt4EbEl8BY-h61rzmRnTmblyDNk_rbidtpuw3-jZW2sXjXtnGVp4NoIrx59EafMTmc8JJTZEmMlT9use4ag I'll try and keep an eye on this if it goes on sale. -
25% off Castrol Oils at Repco from today till Sunday - https://www.repco.com.au/en/brands/castrol/c/1379177971?cid=email-2022_09_01_3Day&mkt_tok=NzI3LUJRRi04NjQAAAGGl0pMrT58dLHGnZr0UlpErFOJLGXpatQX84ImeYnONnm7F2ZQ_fVADZciuDiiXpMueAJ8hiCHAYS1KL-EkkzFPynSV0Wtb_LPT0CWdgAGQg


.jpg.730688df11f7fc5cb4d56260e8866a28.jpg)
.jpg.e155303c5f0a74f5a29eb1e7782a5fea.jpg)
.jpg.a79a66c2323ab4fd83f707ced94c2f5f.jpg)


