


DJKOR
-
Posts
8,819 -
Joined
-
Last visited
-
Days Won
28
Content Type
Profiles
Forums
Events
Gallery
Tutorials
News & Articles
Videos
Everything posted by DJKOR
-
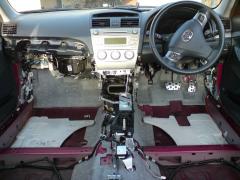
From the album: DJKOR
After cleaning it out. Starting to assemble it before putting the carpet back in. -
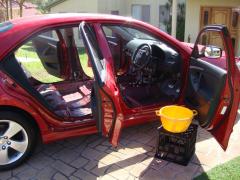
From the album: DJKOR
It was purchased at a flood auction. Had to take it apart to give it a good clean. -
Has anyone installed Bosch HID conversion kit?
DJKOR replied to JIN's topic in Aurion / TRD Aurion Club
Yeah, in the midst of my frustration, I managed to snap one tab as well. The lamp still sits in the holder pretty good. If the bulb ever blows, I'll know what not to do in the future. Mounting the ballasts were the fun part. The install took me 1.5 hours because I spent 1 hour trying to find the neatest spot to mount the ballasts. I couldn't really figure anything out that would be the most ideal (without removing the bumper), so I mounted one below and in front of the battery, and the other... well the picture will show. They are held down with a bolt, and I put a cable tie around it to keep 100% secure.
-
Has anyone installed Bosch HID conversion kit?
DJKOR replied to JIN's topic in Aurion / TRD Aurion Club
I've installed a set of HID's on my Aurion. It was one of those $70 (shipped) kits off eBay though, not a Bosch kit. I had an issue with installing the lamps as well. Because I was installing it with the headlights still in the car, I couldn't get a clear picture of what was happening, and spent many frustrated minutes trying to get the lamp to mount in the holder. It turned out that the plastic tabs that lock the lamp in the holder were sticking out too far to the sides so I used some snips and trimmed them. Can't complain though; for a $70 kit, they are pretty good. It doesn't bother me if the lamps don't last as long as an expensive kit. From experience though, those cheap kits are quite durable. As for my wiring, I installed two relays and powered both ballasts from that. The reason why I did this is that HID's don't really like it when you flash them, and I didn't want to have the possibility of flashing them when I need to flash my high beams. I found out that when you flash the high beams when all lights are off, both the low beams and the high beams come on. Conveniently though, the parkers don't come on in this situation, so I used that to my advantage. Relay one turns on when the parkers are turned on and relay number two (which supplies power to the ballasts) only comes on when both relay number one AND the low beams are turned on. Now I can flash my high beams as much as I want without shortening the life of my HID's. As for connecting the relays to the existing wiring loom, I did a splice and solder connection for the parker light (only on the positive rail) and the low beam one was a crimp connector and plugged straight into the socket then sealed with self sealing tape. The ground from the low beam provides the ground for both relays. That way, only one wire was messed with. I would have liked to get a male H11 connector, but that is a bit of a hard one to find. I prefer to avoid messing with the original wiring, hence why I only did a solder connection on one wire. I've attached my sketch of my wiring setup. It's a bit messy, but it demonstrates the idea.
-
Sorry about that; just disregard what I said. When I unplugged the stereo, I unplugged it without pulling the stereo out (I can work my hands into cramped spaces). I pulled it all out today with a bit more light, and noticed I missed one plug which I had mistaken for the A/C control wiring. I have attached a photo of the plug that when removed, causes the DISP button to no longer work. The DISP button works fine when this is plugged into the head unit even when everything else in the head unit is unplugged. I got out my multimeter and tested the cables to see if I could work something out from it. Unfortunately I couldn't obtain anything useful from my readings. It definitely seems like a digital type circuit and it is not just a simple join the wire job. I wonder why the unit for it is located in the head unit? Anyways, here is what I was able to record: Purple: 0V when ignition is off - 10.97V when ignition is on. Pink: 0V when ignition is on or off - 4.69V when DISP button is pressed - 10.97V when parker lights are on (will remain at 10.97V even if DISP is pressed) Orange: 0V when ignition is on or off - 4.69V when DISP button is pressed - 10.97V when parker lights are on (will remain at 10.97V even if DISP is pressed) Yellow: 0V when ignition is on or off - 4.69V when DISP button is pressed - 10.97V when parker lights are on (will remain at 10.97V even if DISP is pressed) As you can see, the pink, orange, and yellow all behave the same when the DISP button is pressed. One interesting note is that pressing any of the audio buttons on the steering wheel gave no readings on those wires when pressed.
-
Well I disconnected the stereo and the DISP button still worked. Though one strange thing did occur. My temp display on the dash said "E" degrees. Weird. Edit: When I started the car, the problem went away. Was fine when I stopped it and turned the key back to on.
-
omg.. i didn't know this, i thought it is normal for tat right button not to work anymore.. r u sure? if so, i will need to send my car back to 'fix' tat up! Don't take my word for it since I'm not best with automotive wiring diagrams (they are always more confusing to me), but it doesn't appear that the audio control bus from the steering wheel shares the display control. But this then brings up the question; if it no longer works for you, why would it have been disconnected? It could depend on the type of head unit you had before. Did it have the phone function? My curiosity always gets the best of me. As a result, I'm going to try this for myself. I only have the 6-CD changer however with no phone function. I'm going to unplug the wiring harness from it and see what result I get from the DISP button.
-
That was the option I was going to take. I've been using a Pioneer head unit with Bluetooth capabilities, AUX IN, and iPod control and that worked wonders. I was just about to pick up double DIN fascia kit from eBay then install a double DIN head unit with bluetooth and navigation capabilities. After looking scouting around forums and seeing just what it would look like; I wasn't 100% satisfied with the integration and backed off from the idea. I think it might be the fact that the edge of the LCD doesn't directly join to the fascia and that there are a lack of buttons on the sides like the OEM version. Just doesn't seem to look the best in my opinion. Plus I also want to keep my steering wheel controls and don't want to mess around with one of those IR type boxes (SWI-X Universal Steering Wheel Audio Control Interface). about the interface, we can get audio back, but not the right button(the petrol consumption button back) right? Thats why i got a new idea to solve it.. quoted for labour.. found not very worth it.. If you were to put in an aftermarket head unit, you would only loose the steering wheel audio control functionality. The 'DISP' button connects to the gauge cluster and as a result, that button on the steering wheel will still function. The SWI X interface that I listed previously is a box which connects to the audio controls on the steering wheel that were disconnected when you remove the OEM head unit. Think of it as a universal remote in which you place an IR sender led somewhere in the car so that if faces the head unit. You then program the box with the IR remote that comes with the head unit (most now come with one) then the box sends out the signals whenever you press the appropriate button on the steering wheel. Not really a clean integration in my opinion.
-
Aurion sportivo paint, manual, transmission oil and remote key
DJKOR replied to JIN's topic in Aurion / TRD Aurion Club
Well I just finished getting my new key and remote programmed into the car at my nearest Toyota Service Department. They were a little busy and I had to wait 30 minutes. They charged me $45 for their time. So all up it cost me $152 for a genuine replacement Toyota master key. If you also need a remote, I'd suggest buying one off eBay since you can get them for less than $30 and it's programming will be included when they do the key. So overall, it cost me $178 to get a replacement key and remote for my Aurion. -
In terms of actual performance, I don't really notice any difference between Vortex 95 and 98. I've only once used the Vortex 95 however and that is because the Caltex Woolworths around the corner from me has one pump with the 98 on it which is hard to get access to when it is really busy there. I haven't noticed any differences in regard to fuel consumption as well; but I haven't really had my Aurion long enough to test that. So far this is my averages: Tank 1: Vortex 98 - 12.9L/100km : my first time with my car, couldn't help but test its power Tank 2: Vortex 95 - 11.7L/100km : slowly easing off the throttle, but friends still want to see what the car can do Tank 3: Vortex 98 - 11.7L/100km : probably driving it about the same as the previous tank Tank 4: Vortex 98 - 10.4L/100km : currently on this tank, 1/4 of it left. I'm now taking it a bit easier on the throttle Personally I don't think there is any performance or efficiency gain to use 98 octane over 95. I'm the type of guy who thinks that the 98 octane would probably be cleaner for the engine, hence why I would rather fill up with it instead. Just personal preference really.
-
I should have been a little more specific. There is no 3.5mm or RCA AUX in socket on the back of the factory unit. I do believe you can get AUX in, you just need to connect onto the right pins on one of the three wiring harness sockets at the back of the head unit. There are many "blank" pins there, and I'm pretty sure 4 or 5 of them are used for the AUX in. That's probably where the Neo Pro comes in; to plug into those unused pins.
-
That was the option I was going to take. I've been using a Pioneer head unit with Bluetooth capabilities, AUX IN, and iPod control and that worked wonders. I was just about to pick up double DIN fascia kit from eBay then install a double DIN head unit with bluetooth and navigation capabilities. After looking scouting around forums and seeing just what it would look like; I wasn't 100% satisfied with the integration and backed off from the idea. I think it might be the fact that the edge of the LCD doesn't directly join to the fascia and that there are a lack of buttons on the sides like the OEM version. Just doesn't seem to look the best in my opinion. Plus I also want to keep my steering wheel controls and don't want to mess around with one of those IR type boxes (SWI-X Universal Steering Wheel Audio Control Interface).
-
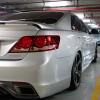
Absolutely love the wheels. I was thinking of getting along those lines for my Aurion. I find wheels with a minimalistic look the most appealing. I'm looking for a 5-spoke or 6-spoke design with the thinest spokes possible. Carbon grey would be ideal.
-
I've pulled my head unit out before and there is no AUX IN socket. You should be able to add one in if you can connect onto the pins on the back of the head unit however. It's either the socket with no plug on it, or if it has a plug on it, there are no pins on the connector itself, if you get what I mean. I was going to add in the AUX port myself but couldn't be bothered since it's easy enough for me to use the CD changer with MP3 CD's.
-
Your TRD sounds great regardless of whether or not it has the muffler on it. After listening to the second clip, I understand how you want to unleash the true note of the engine. It would be good though to reach a good balance in which you can still hear the whirr of the supercharger at the same time, cause that is a nice sound as well.
-
Hi DJKOR, Not sure that its a good idea to run the tank that low if you can help it. The lower the fuel level in the tank the greater the likelihood of condensation, especially in the colder weather. This will be exacerbated if left over night or perhaps several nights, depending on your driving habits. Over time this condensation can build up. This is not a major problem unless you consistently run your fuel very low, You may be lucky and get away with it but if your unlucky it could result in major engine problems. I regularly add an additive to the 269 L fuel tank on my boat, a Chaparral Cruiser that, among other things, breaks down this condensation and it is probably not a bad idea to do the same (occasionally) with the car. Regards Quark It's kind of a habit that I got myself into after driving my old Camry around. Mum was the only driver of it before I got it, and she would never really let it go below a half-tank. As a result, the fuel gauge kinda got messed up. When the gauge was just above empty, there was still a good 25 litres or so in the tank. I was able to get that figure to drop down to about the 5-10 litre mark by running it down to the point where the needle actually went below empty. After many months of doing it like that, it fixed itself up. As a result of all that, it's now a bit of a habit that I'm stuck with. I'm on my fourth tank of fuel for the Aurion now. Twice already I have filled it shortly after the fuel light has come on. I like to have a full tank of fuel, but I also don't want to fill it up too early. As I said, it's all a habit that I have gotten myself into after experiencing a related problem in the past.
-
I have a tendency to always run my tank of fuel down to just about empty before I go and refill. Now I understand that car manufactures will bias the fuel gauge to say that it is empty when realistically, there is still a bit left in the tank. So last night I was quite a distance away from a petrol station and had to get some fuel, so I was driving along and before I got to the station, the needle was pretty much right on empty. At this point the cruising distance on the dash said I had about 2km of travel left, but that was just an estimate. I then filled up the tank and noticed it only took 58 litres to fill it up. After a little bit of driving, the cruising distance updated to 557km's and the fuel economy stated 9.7l/100km. Divide the figures, this adds up to 57.4 litres of fuel that the gauge is calculating on. As far as I'm aware, the Aurion has a fuel tank capacity of 70 litres. I understand the bias towards there being more fuel than the gauge shows, but an extra 10 litres of fuel seems a bit high. I don't have much of a problem with it, I'm just wondering whether my fuel gauge can register the last 10 litres of fuel or not.
-
I don't know too much as well about the design of exhausts as well, but that sure seems like a creative idea. Firstly though, it would be rather interesting attaching the pipework to the outlet of the Varex since it has a 4.5 inch tip. Also, the exhaust note will be affected (good or bad, I don't know) with all that pipe afterwards. In addition to that, due to the Varex design, wouldn't that effectively just make it a straight pipe with the ability to make it quieter on demand? If that was the case, that would be one loud system. Can you set the Varex to half way or is it only fully open or fully closed? Darius should be able to answer that for us.
-
... and reduce visible light thereby increasing privacy. As you described, reducing IR though would act as a heat insulation of sorts ? So increasing the insulation property of the vehicle (most noticeable in summer?) and increasing privacy... isn't that why people usually get window tinting ? At least that's my criteria. I haven't made the leap yet, and although I've had the Presara now for 4 months, I still miss the privacy of the window tinting I had in my last car. My idea/point about the UV-sensitive tints was more in line with having a changing level of tint based on amount of UV. So at night there would be less tinting to avoid the reduction in visibility. However, as you point out, UV gets filtered out so for this to work (assuming that there is such a film) the tint would have to be applied to the exterior rather than the interior (as the glass filters UV before reaching the interior film). Exterior film application would be silly though ? Just an idea... Here's another question about the tinting process. Given that the film is applied on the inside, how well are the windows actually cleaned prior to the film being applied ? What's used to clean the windows ? Might seem like a silly question, but have you ever tried to clean the car windows (especially the rear window) to such an extent that it is absolutely spotless and streak-free? Seems to me like quite a challenge, and to have film applied over a bad clean job would permanently seal that disappointment in? Maybe there's a scientific explanation why this is not important if you add another layer on top with no gap for light to be refracted? They should be able to clean the glass to a streak-free finish prior to applying the tint. There are many solutions out there that can clean your windows well and remove all that oily residue from the plastics in your car. One of my favourite glass cleaners is CRC Glass and Window Cleaner. It may cost about $7.95 a can, but that stuff is wonderful. Just spray it on an wipe it off for a crystal clear finish. It's even safe to use on tinting. Otherwise, if you'd like to get down to basics; metho and water also works rather well.
-
Aurion sportivo paint, manual, transmission oil and remote key
DJKOR replied to JIN's topic in Aurion / TRD Aurion Club
I think a visit to toyota is probably the best way to get touch up paint. My Aurion came with a small bottle of toyota touch up paint and I bought the car second hand. Obviously the previous owneres knew what it was and left it with the car. As for the key - I'd assume that the matching of the car to the new key would be in the service manuals. I haven't downloaded the whole manual but maybe someone that has would be able to search the manual for it (if it's there) Yep, the service manual does state how to code the car to the keys and remote. However, the procedure can only be done with the Toyota Scan Tool/Intelligent Tester. Unless you know someone who can get their hands on one of those free of charge for you, the only way you can do it it through a service centre. -
Aurion sportivo paint, manual, transmission oil and remote key
DJKOR replied to JIN's topic in Aurion / TRD Aurion Club
I'll let you know how much Toyota charges me for the re-programming after I get it done. As for the transmission fluid, changing it is a bit of a fun one. Toyota states that you MUST use the WS (world standard) ATF. Apparently this fluid is meant to last for around 160,000 kms before requiring a change. That figure seems a bit high and you would think it would be better to change it sooner. The fun part about changing it however is that with the Aurion, Toyota requires that you have the Scan Tool, because you need to have the fluid at an exact temperature when you change it so that it is filled to the correct level. It is a pretty annoying process that requires a lot of messing around. You should definitely check out the service manual "U660E_Automatic_Transaxle". The procedure is outlined from page "AX-164". Forgot to mention as well. I also bought some genuine touch up paint from Toyota (since mine was the Mica paint and I didn't want to try a close match from someone else) and they charged $17.35 for a nail polish sized bottle. I covered up quite a lot of scratches on the underside of the front bumper (previous owner must have gone on a steep driveway) and there is still more than half a bottle left. -
Aurion sportivo paint, manual, transmission oil and remote key
DJKOR replied to JIN's topic in Aurion / TRD Aurion Club
oh yeah transmission oil checker. sorry about my typo. :P So Aurion has different automatic transmission system? or I just do not need to check the status of the trasmission oil? :P such technical names guys..Its called a transmission oil level dipstick. And yes i couldnt find the dipstick on my ZR6 either, i will hav a better look tomorrow.when the sun? is shining! You will probably find that there is no dipstick to check the AT fluid level. The trend these days is to move towards a sealed system since transmission fluid under normal conditions is not consumed. It is also done that way to prevent the end user from overfilling the transmission oil and potentially stuffing up their gearbox. I believe if you would like to check the level of the transmission oil, you need to remove the overflow plug underneath the engine and stick your finger in if you can and feel if the oil is close to the top of the overflow plug. When the oil is full, it will be level with the top of this plug as when you fill it, you fill till the oil starts to overflow out this plug. Edit: I also forgot to mention. When I got my car, I only got one key and remote with it. I bought a spare remote from eBay for only $26 shipped, but to be on the safe side, I purchased a key from Toyota. The Key cost $100 from the spare parts department, then I had to go get it cut by a locksmith for around $7. Since the only way to code the keys and remote is with the Toyota Scan Tool, I needed to book it in with the service department for them to do that. They have booked me in for next week. Who knows what they are going to charge and they also said it will take 30-45 minutes. I find that a bit of a lie however since after reading the service manual, it is a process that should only take a few minutes. The keys/remotes aren't actually coded to the car. The car is trained to recognise the keys and remote. Either way though, I'll soon find out how much they charge for a few minutes worth of labour which involes turning a key and pressing a few buttons. Edit 2: I should probably have answered all questions in the first place. Anyways, you wont find the compliance plate under the hood. You should find a it (in the form of a sticker) on the front passenger side door sill. The sticker will contain you VIN, engine number, paint code, etc. -
Thanks for the advice. Since I'm in the electronics industry myself, I had a can of CRC CO Contact Cleaner and Switch Cleaner Lubricant handy and used those to clean out and protect all the connectors that had to be disconnected when taking the inside apart. The exception was the air bag module plug where I just used the CO Contact Cleaner; better to be on the safe side with those electronics. The body of the car underneath all the carpet was already well coated in paint, but after scrubbing everything up, I did put on a light coat of anti-rust. Next time I get a chance to head over to my mate's workshop, I will hoist the car up and give the underbody a clean and coat just to be on the safe side.
-
It may not be an ZR6, but the area is the same anyway. As for me, I installed mine as well without removing the bumper or lights. I simply did not want to go to that extent. You can see how I mounted mine in the photos. The passenger side was mounted just underneath in front of the battery and the driver's side was mounted kind of vertically. They are held down with a bolt and the cable ties are there to secure them tightly to avoid minor vibrations creating noise. You may also notice two relays in the first photo. I would have just simply ran them of the existing harness since the peak startup current is only for a short period and that wiring is sufficient to handle that without any long term damage, but I wasn't 100% happy. I don't want to have my HID's coming on when I flash my high beams from an 'off' state so I used the relay setup to cancel that. The first relay is triggered by the parker lights (which don't come on when you flash the high beams from an 'off' state), and the second relay is triggered by the low beams, but only when the first relay is on. That way I can flash my high beams without doing any damage to my HID's.
-
I live in a cul-de-sac so everytime I leave the house after starting the car, I travel around in a clock-wise direction. As I'm part way into the loop, I always have this quick, light 'knock' sound (kind of like a cold handbrake releasing on a hill) that I usually only hear on the rear left hand side. I was wondering what this may have been. I only really notice it on that move and wasn't quite sure whether it was due to the turn or not. The ABS makes sense I guess.


