Jump to content

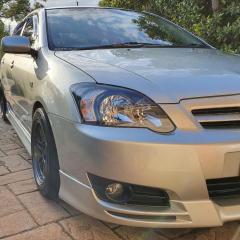
New to Toyota - 2005 Corolla Sportivo!


Squalled

Recommended Posts

Had a productive day last week. Had a day off work and managed to re-seal both the headlights along with replacing my flickering LED parker and cabin filter. I've since come to find that one of the headlights seems to still get condensation in it but even after rain overnight, it surprisingly didn't have any today when I checked which I found very strange. I'll keep and eye on it since I was pretty confident I re-sealed all the spots I found which had gaps or looked suspect.

Finally went back through Nasho after a while, first time from my new place and the drive wasn't that much longer compared to where I used to live despite being almost 15kms longer. Got to catch up with some good mates I haven't seen for a while and cruise through since the recent weather had caused a fair amount of rubbish to go all over the place.

That weekend I got some free time to wash the car along with re-applying some HydrO2 sealant given that the weather would be clear enough for a few days. I definitely need to do a decon wash fairly soon since I've found a few odd spots here and there that I'm not quite happy with so hopefully when I have another day to myself I can get it done. Anyway, here are some standard wash photos.

DDYiJOu.jpg

oeRwaMH.jpg

T1kg5a9.jpg

j5p0R11.jpg

Stay tuned.

Link to comment
Share on other sites

  • 1 month later...

Not much to add this update. Don't get much time these days to work on the car as much as I used to or I'd like but I'm sure I'll eventually have more time. 

Used the long weekend effectively and got myself some new parker LEDs since the el cheapo eBay ones were absolute garbage and would stop working after maybe a month or two. 

20220415_105117.thumb.jpg.571e58be060ef5d76d94faed08ef721d.jpg

Pretty much looks the same as the eBay ones, maybe a tad bit brighter but still not intrusive as if I'd have them as my driving lights.

Also took the opportunity with the great weather to wash the car after it had sat in the rain for the last few weeks.

20220416_115340.thumb.jpg.97489da56d4b877bec930ce7dc44842d.jpg

20220416_115358.thumb.jpg.feee272c4c08cc25e0b9be52be6c8e2c.jpg

20220416_135808.thumb.jpg.e27f63101c6bcbafd0a276e88af31867.jpg

20220416_135822.thumb.jpg.7a47b63ac48cc463eceedb13493c6f2d.jpg

20220418_164143.thumb.jpg.881fcf10b18a81cbb6619af07bdcc99b.jpg

Before the clean, it had a nice noticeable layer of dirt all over it from the rain. The snow foam quickly got rid of most of it before I washed it and eventually applied another quick spray coating over the car for good measure.

Also managed to squeeze in an oil change as it was due for one and I was pretty excited to get into it been the first time doing one at my new place. All went well as expected unlike that time last year. I couldn't use the entire garage yet as my partner and I have quite a few house projects and working towards getting more storage so the first quarter or so was enough to get the car in, jacked up and on stands.

20220418_145214.thumb.jpg.6d081a3ed52827b9aa1b15093d311a54.jpg

20220418_145238.thumb.jpg.a0bef543fefd6e52b0b0b488ed2b282a.jpg

Other than that, still have a few things I need to do when I get time so I'll be sure to keep the thread updated.

Stay tuned.


Link to comment
Share on other sites

It's always a good feeling being able to dedicate some quality time to your beloved machine. I feel you mate, when you say you don't have much time these days.
I too, am in a similar boat, having to deal with many different things on the domestic front...

I wish I even had the time and/or energy to wash any of my cars. The huge wet completely ruled that out and now as we're drying up, the cars are pretty sad looking. 
The only thing I made an effort doing, which was more important than washing, was the oil change. At least I don't have to worry about that one for a while.

Your car looks schmick as usual :thumbsup:

Link to comment
Share on other sites

  • 1 month later...

Been a while since the last update.

Nothing new really, still have a few little bits and pieces I'll get installed hopefully before the end of the year. I'm having some suspicions that my clutch may be on it's way out since I find it's slipping a bit more than I remember but, I don't notice whether it's my left foot being a bit too slow causing the issue.

Gave the car a good wash, been some time since the last after some bad weather and busy weekends but glad I squeezed it in today despite a busy morning.

image.thumb.jpeg.bd9d9b3d62f64c56746b85a22fbac73e.jpeg

20220605_145937.thumb.jpg.3fe6da9699990de8edaaca7c6144e016.jpg

Started off with bug and grim removed since there was a decent build up of rubbish.

T6uXCD0.jpg

20220605_150234.thumb.jpg.1911d30e28630fa9facb2d33c2b48bbd.jpg

20220605_150221.thumb.jpg.b5d7308bfb60a9391edf7c1236e19fa6.jpg

Proceeded with one of my thicker foams and watched as all the rubbish came off.

20220605_164642.thumb.jpg.bda83bece6e28f4fd999308f18ffcf11.jpg

20220605_164718.thumb.jpg.590e14940d36fbffec0bb9e5b5a79401.jpg

And done. Car definitely needs a decon wash some time this year, there's plenty of little spots I've found that definitely can't be removed by a decent wash unfortunately. Hopefully I'll give it a go before the end of the year.

Stay tuned!

Link to comment
Share on other sites


I've been swamped with work and other goings on in my life that all my Aurion and Colorado are have been neglected in the washing/detailing dept. I hope to get back on track real soon and be able to share a similar post to yours too :thumbsup:

I have to say that my biggest bug bear is "bug" removal, especially now that they've been unwashed for months means more elbow grease !

Protective coatings are virtually nil at this point and both will require an intensive decon and singe stage polish prior to applying a fresh layer.


Link to comment
Share on other sites

19 hours ago, Tony Prodigy said:

I've been swamped with work and other goings on in my life that all my Aurion and Colorado are have been neglected in the washing/detailing dept. I hope to get back on track real soon and be able to share a similar post to yours too :thumbsup:

I have to say that my biggest bug bear is "bug" removal, especially now that they've been unwashed for months means more elbow grease !

Protective coatings are virtually nil at this point and both will require an intensive decon and singe stage polish prior to applying a fresh layer.


OOOHHHHH NNNOOOOOOOOOOOO DONT LET HIM WIN TONY STAY AWAY FROM THE NUT ROFL

  • Haha 1
Link to comment
Share on other sites

On 6/5/2022 at 8:35 PM, Squalled said:

Been a while since the last update.

Nothing new really, still have a few little bits and pieces I'll get installed hopefully before the end of the year. I'm having some suspicions that my clutch may be on it's way out since I find it's slipping a bit more than I remember but, I don't notice whether it's my left foot being a bit too slow causing the issue.

Gave the car a good wash, been some time since the last after some bad weather and busy weekends but glad I squeezed it in today despite a busy morning.

image.thumb.jpeg.bd9d9b3d62f64c56746b85a22fbac73e.jpeg

20220605_145937.thumb.jpg.3fe6da9699990de8edaaca7c6144e016.jpg

Started off with bug and grim removed since there was a decent build up of rubbish.

T6uXCD0.jpg

20220605_150234.thumb.jpg.1911d30e28630fa9facb2d33c2b48bbd.jpg

20220605_150221.thumb.jpg.b5d7308bfb60a9391edf7c1236e19fa6.jpg

Proceeded with one of my thicker foams and watched as all the rubbish came off.

20220605_164642.thumb.jpg.bda83bece6e28f4fd999308f18ffcf11.jpg

20220605_164718.thumb.jpg.590e14940d36fbffec0bb9e5b5a79401.jpg

And done. Car definitely needs a decon wash some time this year, there's plenty of little spots I've found that definitely can't be removed by a decent wash unfortunately. Hopefully I'll give it a go before the end of the year.

Stay tuned!

awesome looking rolla squalled...are you going to put on flares ?

Link to comment
Share on other sites

On 6/6/2022 at 11:05 PM, Jamie Edwards said:

awesome looking rolla squalled...are you going to put on flares ?

No plans for flares at this stage mate. Wheels aren't wide enough for them.

Link to comment
Share on other sites

  • 1 month later...

Another update and more washes done 🤣

Still have a few little bits and pieces I need to get done before I'll finally just leave the car as is. I'm really happy with how it's turned out and don't really want to change anything major from now on seeing as I don't generally have the time I used to along with still not having time to learn how to install specific parts etc. Hopefully I'll have some more interesting updates later in the year. Hoping to do a good decontamination wash prior to Toyotafest this year seeing as it could potentially be the last one I enter.

Anywho enjoy some more washing pics to add to the ever growing collection.

20220717_131950.thumb.jpg.826c1e5372fb7927685007cb6fac8b06.jpg

20220717_171608.thumb.jpg.0cb516c921d6b6ed1cb5fb403cb365ca.jpg

20220724_151224.thumb.jpg.09284592761c4d4b04aaf4ded62870e3.jpg

20220724_162441.thumb.jpg.1735bb5e118a2f7d48a9bdf5bd1202f1.jpg

20220724_162534.thumb.jpg.9678506880b49e0d092a023f2fbb3f48.jpg

Link to comment
Share on other sites

Made some little progress today and got some free time to work on the beast.

Yet again one of the headlights was showing some signs of condensation randomly the other evening so I got my trusty sealant gun out and sealed up any suspect spots again. This time I did find quite a number of spots a long the top which appeared to be new so I got them all covered and smoothed off as best as possible before allowing a few hours to set before re-installation.

As you may or may not know, these are the standard ZZE pedals.

20220730_103631.thumb.jpg.61de7e318bf7047889d3ef499d1e026f.jpg

Many many months ago a mate of mine got a hold of some parts which included the 'Sport Pedals' which I've always liked but didn't like the price tag. He had them for a great price and I bit the bullet and decided to go ahead with the purchase.

I got them out today and gave a nice clean before installing them in the car.

20220730_102211.thumb.jpg.aac66d93a11b00ac060f8d4f3800a642.jpg

I can confidently say that this was one of the most time consuming and difficult jobs I've done on my own to the car. It took A LOT of fiddling around, strength, patience of course swearing to get them in. The foot rest is simple, pull out the original and click in the new unit. The clutch and brake pedals however, well they took me a good hour or more to get the originals off and install the new units. I was nervous about doing the accelerator pedal but after discussing the install with mates throughout the day (big thanks again to them), I was confident I could it and, I DID!

20220730_125219.thumb.jpg.0d2f0c57b7a2749e47564617d18675e2.jpg

20220730_124555.thumb.jpg.4934eb94b6655769451c29213079a84f.jpg

Very happy with the new interior look and even better that the car still runs and has a functioning throttle after I've worked on it 😂

Haven't had the chance to take it for a proper spin with the pedals yet but I expect they'll be a little different to the standard rubber/plastic style pedals.

Well, that's all for now. Stay tuned!

Link to comment
Share on other sites

Brake and clutch pedal are a bit easier with some detergent or the like, they are harder than the standard ones though since they don't have as much flex

Link to comment
Share on other sites

20 hours ago, Hiro said:

Brake and clutch pedal are a bit easier with some detergent or the like, they are harder than the standard ones though since they don't have as much flex

A shucks! I feel that would've saved my hands from a few cuts 😅 Oh well managed to do it without the lubrication but they were definitely much harder to manipulate compared to the standard pedals.

Edited by Squalled
Link to comment
Share on other sites

5 hours ago, Squalled said:

A shucks! I feel that would've saved my hands from a few cuts 😅 Oh well managed to do it without the lubrication but they were definitely much harder to manipulate compared to the standard pedals.

I found the brake easier than the clutch too, because you could hook one or two corners over and then push the rest on with your foot against the resistance of the pedal - clutch would just go to the firewall.

Link to comment
Share on other sites

13 hours ago, Hiro said:

I found the brake easier than the clutch too, because you could hook one or two corners over and then push the rest on with your foot against the resistance of the pedal - clutch would just go to the firewall.

God I didn't even think to use my foot for the brake 🤦‍♂️🤦‍♂️🤦‍♂️🤦‍♂️ I found the opposite actually, doing it by hand as I did I found the clutch to be the easier of the two.

Link to comment
Share on other sites

  • 1 month later...

It was oil change time over the weekend. Managed to get it done in really good time as well as degreasing the underside of the engine bay. It appears I have a pretty decent power steering leak and I'd likely say the pump is on it's way out as it has been a little noisy sometimes for a while now. Anywho I had it cleaned up while I was underneath anyway and I keep an eye on it over time.

20220910_092049.thumb.jpg.43aa07d87c5935ed998fe591cb6a6838.jpg

Given I now spend much of my weekends doing house work, other projects and going out I finally had some time, and great weather to wash the beast once again.

20220911_151217.thumb.jpg.ec9da8e23b4d7f5cba0665ea14aabb31.jpg

It was quite dirty given I hadn't got to wash it in a couple of weeks but an hour and a half of my time got it looking nice once again.

20220911_153850.thumb.jpg.2168806ab25b7620e106981511e657f0.jpg

20220911_165358.thumb.jpg.6805d87852df29979435fdcc316fb89f.jpg

20220911_165410.thumb.jpg.60d6cdb54e87df315b20e7c9113d0bb9.jpg

20220911_165430.thumb.jpg.f190712752ecb9bd17e17944d9f8819f.jpg

It will likely be the last wash prior to attending Toyotafest during the October long weekend. I've managed to get the Friday off and I'll be using the extra day to do a very extensive clean inside and out in preparation for the day. I know it will likely not get much love or attention at the show but I'll definitely have a lot of satisfaction knowing I spent the time getting it looking schmick.

Stay tuned!

  • Like 1
Link to comment
Share on other sites

That wonderful date of the year has finally arrived and another year of ownership to add. 7 years now I've own the Sportivo, 364 weeks which is roughly 363 weeks more than most current owners seem to own them for these days and over 126,000 kms added. I didn't think I'd end up owning it for this long but at the same time, I really can't bring myself to sell it. It honestly has never missed a beat even when it did have issues so here's to many more kms to rack up.

Time for some throwback images, don't think I've ever popped these up on my thread.

12314299_10208434880779045_5160326637738185477_o.thumb.jpg.d46d08696e6a102091ccf72b4d5e881c.jpg

12322757_10208434880899048_302810793391586069_o.thumb.jpg.86396937c533af87135152dfca634f79.jpg

12304056_10208434883219106_6368418695529913402_o.thumb.jpg.af9dd7568d0acf233cd3c751302ca15c.jpg

Late 2015 roughly a month or so after buying the car, I went for one of many drives up North towards Old Pac and had a friend take these shots with his DSLR. This was probably not too long after getting the car back from the smash repairers to fix the rear bumper, side skirts and shave msotly de-badge the boot.

DSC_0429.thumb.jpg.78bd44379504385d90bf150beeb6c5bd.jpg

DSC_0432.thumb.jpg.99b1c8535b6dc88e1724d3434049c771.jpg

2141117186_2015-11-2521_20_45.thumb.jpg.47172cfea8cb2f7ec9494cc9900863d0.jpg

Not long after the DSLR shots were taken I went to the drags which I documented very early on. Was one of the slowest cars of the night but thankfully not the slowest. I did however had to deal with a very hit night being over 30 degrees when I began, rubbish economy tyres, a blocking out 2nd gear and being rather inexperienced with keeping the Sportivo in power band made the end result something I'm rather happy with all things considered at the time. I'm still yet to go back with everything I've since changed on the car so hopefully sometime soon I can make a return and run a better time.

Now onto the present, or close enough. A Sportivo that I'm very proud of and glad that I was able to acheive my goal and more with it.

2006622123_20220418_164136(1).thumb.jpg.1c1ccfa9f81dba94611b43557850588b.jpg

1970505859_20211016_160222(1).thumb.jpg.6ec1f3b71719e76e603af70c58c18e49.jpg

1788647929_20211016_160140(1).thumb.jpg.b36c627518ce59340ad955d5c8e9e1aa.jpg

Stay tuned!

Link to comment
Share on other sites

It's a fine achievement mate. You're right about ownership. A lot of people don't hang onto cars long enough to form a bond with it. Most people change their cars every 3-4 years depending on their situation and then some like to move them on just before warranty runs out, if they're the ones who buy new.

I'm not interested in constantly changing cars. I believe if the car you have is serving you well and is reliable, then just keep it. Can't go much wrong with Toyota. We've had our Aurion for around 8 years now and I don't plan to sell it. I'll keep it as long as possible.
My other car, my '99 E36 M3, I've owned for almost 14 years. That's another keeper car. They just don't make them like that anymore. There was something about 90's cars.. The quality was way better then.

I think most manufacturer brands have gone down in the quality stakes, and Toyota would probably be the only brand I'd stick with. The others just don't do it for me.

Anyway, congrats on your milestone.

All the best to you mate :thumbsup:

Link to comment
Share on other sites

  • 2 weeks later...

Toyotafest 2022 Part 1

The Preparation

We've once again reached that time of the year, the October long weekend meaning it's Toyotafest time. As I mentioned previously in my thread, this year I wanted to undertake detailing and making my car tidy for this years event. The last event in 2019 I had a professional detailer work his magic on it and was nothing short of over the moon with results but this year, given I've been a more keen "detailer" since then, I wanted to give it a crack myself and see how I'd go.

Before I got into the detailing side of things, I had some other things on my pretty big to do list to get done first. To start off the list, my fog lights. For some time now, my passenger side fog light has had a lot of condensation inside it which has been bothering me. I ordered a pair of brand new ones which arrived earlier this week and decided to replace both given the drivers side wasn't that great either.

20220930_084639.thumb.jpg.6774bda6970d568e14ec7b8152ca6e7e.jpg

The condensation is really not appealing at all.

20220930_091514.thumb.jpg.bb89dd98aa5665335a6524b4d3e1a7c3.jpg

20220930_090817.thumb.jpg.16643c7f6022892f698f39dcd611e067.jpg

20220930_090309.thumb.jpg.efc2e3beae2d73a900654bacf7acac4d.jpg

Out with the old, in with the new. What a huge difference a bit of coin and a few minutes makes.

20220930_090322.thumb.jpg.e870d25d915b17bd8cfe8598b16f21d9.jpg

20220930_090343.thumb.jpg.025a256550a4f939cc96aa05edd235c5.jpg

Both sides replaced and confirmed everything was still working before moving on to the next job. I will need to see if there's any difference with the lights at night.

Next on the list was installing a brand new drivers side guard liner. A few weeks ago, I purchased some brand new OE style replacement liners and some liner clips of various different styles and sizes so I can finally have a nice looking guard area again. I only focused on the drivers side given the passenger side is still fine.

20220930_103433.thumb.jpg.8986f75026d5c212a3347e68debb3b69.jpg

After 5 long years, I FINALLY have a drivers side guard liner once again! I test fitted a bunch of different clips and found what worked best and got it fit nice and tight.

Now on to the detailing. Going in, I knew it was going to be quite a long day given what I had to complete with the wind and rain making my life just a little harder, it wasn't going to be easy but I wasn't letting the weather deter me.

20220930_120828.thumb.jpg.e5fbc72a876784e151eecaf61151e47c.jpg

20220930_120920.thumb.jpg.954bb254e453b01102a2322291ac5d3d.jpg

Here's how the beast started out for today, not washed for a fortnight or so and rather filthy with the recent changeable conditions. Knowing that I was going to be going through this effort, I decided to not reapply any form of sealant to make the job today much easier.

I begun with a strip foam, using Bowden's Own Orange Agent cleaner, mixed in with their "Yellow Snow" foaming soap which appeared to work a treat. Once I rinsed down the panels they were initially beading which is normal but once I began washing the car they began to be hydrophilic which is what I expected. 

20220930_140812.thumb.jpg.ef40d48aed3a79b674352bc6c8a969a8.jpg

Once I was done, I dried the car without any aids and began preparing for the next major step.

For some time now, I've had this combo and I've been dying to use it given that my paint did have some contamination and I wanted to see if I could try and get it out myself. Insert Bowden's Own "Three Way" and Claying Rubber. There is a bit of Bowden's trend here yes, I do enjoy their products but I am also expanding my horizons and getting into other brands as I find Bowden's products really easy and forgiving to work with especially for a novice like me. Thankfully, this applied to the Three Way and Claying Rubber.

"Three Way" is a wax removing and decontamination spray that also works as a clay lube (hence the products name) in conjunction with the claying rubber and also clay towels and bars. I sprayed the bonnet as my first panel and allowed the product to sit for a minute as was welcomed with this.

20220930_141248.thumb.jpg.01a3d5e40cd8640ff0a9b2e55ff45bcd.jpg

Some very minor contamination given their YouTube example was heavily contaminated. I prepped the claying rubber by spraying it with the product and began working on the panel before moving on to the rest of the car. Here are some of the more notable pictures I got with the product in action.

20220930_153517.thumb.jpg.a1ae47056be810f1f5ffc07136e98e0d.jpg

20220930_143255.thumb.jpg.e8aae90fcaf2b0e03ad0552f5ce09f7e.jpg

20220930_143325.thumb.jpg.3462c3e9046de1e8953931e0b400cc0c.jpg

20220930_145439.thumb.jpg.50894d82f91b8f498e2d71439419538d.jpg

20220930_151323.thumb.jpg.06fc5a7316be8430aefcee7dc2e47b6d.jpg

Unsurprisingly, the top section, side skirts and rear section of the car were the most contaminated. The claying rubber worked extremely well and I didn't need to place any pressure what so ever and being non-marring, I didn't have to worry about scratching the car further given I'm not able to do a paint correction. I will be writing a more detailed review in the detailing review thread that goes more in-depth with the products and how they were to use in my experience but I'll just say I was very happy with how the products worked and the result I got.

20220930_164404.thumb.jpg.eb3da1aaec06d24134a9a18f61d433d2.jpg

The lighting seemed to work wonders for this shot. Paint all nice decontaminated and ready for the next step.

I then moved on to rinsing down the car before re-washing it once again, then drying once more. Once the car was dry, I then applied Bowden's Own Paint, Cleanse & Restore to really clean and prep the paint for the final step. I simply squirted a few small dots onto the pad before applying it to a section at a time before using a low pile microfiber towel to remove the residue. I proceeded to do this all around the car and it left the panels feeling super smooth and slick, not one bit of roughness like it previously had.

20220930_171749.thumb.jpg.1ae324d0e6bc835d8c7f711f595242b9.jpg 

Now that the decontamination and cleaning was done, it was time for the cherry on top, wax. Instead of choosing the easy spray on method, I went with a liquid wax given I've never had the experience of applying one before. I decided to use Meguiars Hybrid Ceramic liquid wax after a fair chunk of research in my spare time to see what I could use. I applied small spots to a foam applicator and used sweeping overlapping motions and worked panel by panel. The cure time notes 3-5 minutes so I'd move around the car before using a microfiber towel to buff the product off. I don't have any photos of this process as there honestly wasn't much to see as the wax doesn't haze like traditional waxes and mostly because I was trying to not only beat the sunset, but also the incoming rain I could see approaching. All I can say is that it was super easy and simple to use and the panels feel oh so slippery and slick now!

20220930_205009.thumb.jpg.91ff9615a5617f5d87a87ef09a674e65.jpg

I waxed the car before the rain hit and I just beat the sunset too before running out of light. The beading action looks awesome and the water really just rolls off once it hits the panels. I will need to assess tomorrow how easily the car dries when I continue with final few steps before Sunday comes.

20220930_204940.thumb.jpg.1ac0bc948e3e13c05c9d10d2bb3b5da5.jpg

Here are some of the products I used today. Very happy with the results so far and will keep a tab on how long the products last for as well so I can really test if they're worth continuing to use. I did complete some other jobs but seeing as they're not 100% complete for that particular area, I'll leave that for another update.

Stay tuned!

  • Like 1
Link to comment
Share on other sites

Nice work mate. It's a lot of work but the results are always spectacular.

A proper, thorough chemical decon is always required before clay bar. Using the right products is imperative too. Colour indicating fallout remover is great and gives a sense of satisfaction seeing where the nasty areas really are. The tops and bottom sides always fair the worst and you have no idea how badly contaminated your car is until you spritz it all over. I'd also give the glass a hit too.

My Aurion is overdue for a similar treatment. Though this time, I'm going to do a two stage correction then apply a dedicated ceramic coating so it'll free me up to do other things. The ceramic will keep it protected longer and help reduce time washing in between too.

Good call on the those spot lights too. They were nakkered. Were the new ones OEM replacements or aftermarket ? Also, I never noticed the grille badge till now. What is that ??


Link to comment
Share on other sites

2 hours ago, Tony Prodigy said:

Nice work mate. It's a lot of work but the results are always spectacular.

A proper, thorough chemical decon is always required before clay bar. Using the right products is imperative too. Colour indicating fallout remover is great and gives a sense of satisfaction seeing where the nasty areas really are. The tops and bottom sides always fair the worst and you have no idea how badly contaminated your car is until you spritz it all over. I'd also give the glass a hit too.

My Aurion is overdue for a similar treatment. Though this time, I'm going to do a two stage correction then apply a dedicated ceramic coating so it'll free me up to do other things. The ceramic will keep it protected longer and help reduce time washing in between too.

Good call on the those spot lights too. They were nakkered. Were the new ones OEM replacements or aftermarket ? Also, I never noticed the grille badge till now. What is that ??


Very happy with what I achieved yesterday. The claying rubber and three way spray is basically my entry level into getting into decontamination, I know it may not be the best but I'm sure I'll eventually find something a bit better over time 🙂 I noticed how well it worked given a lot of the spots that were around the car are now gone! Especially on the rear bumper near the boot where water and dirt tend to sit since it's flat.

From checking, one was a TYC and the other was a Valeo so I'm not sure if one was OEM or they were both aftermarket as I know TYC is an OE style replacement brand which I coincidentally replaced both sides with new TYC units. Ah yes, that is the JDM Runx badge. If you look closely, there is a small cut out in the design which makes the badge outline look like a "C". The Echo alternative, the Vitz has a similar badge that makes the shape appear as a "V".

  • Thanks 1
Link to comment
Share on other sites

Toyotafest 2022 Part 2

Preparation Day 2

With most of the nitty gritty prep done yesterday, it was one to some very fine details for today. This included an interior clean, minor engine bay clean after a degrease yesterday and some polish for the intake and muffler.

20220930_091702.thumb.jpg.4977fe515b4ec8c4507b032ae87bc290.jpg

20221001_161002.thumb.jpg.e9fdf799b3ed2c5da3bde943c02cd7b8.jpg

I don't usually open my bonnet at the event but I thought the engine bay deserved a bit of love anyways. Probably the first time this year I've actually given the engine bay a clean.

20221001_094116.thumb.jpg.eed4cce00aab49ee9a7f7aa338eed566.jpg

20221001_094152.thumb.jpg.1891dbe36edf10762f9dd5d56035582b.jpg

Here's how the beast looked this morning after yesterdays rain and post drying. Really over the moon with how the car turned out, the car looks fantastic given the age and paint condition. It was super easy and quick to dry today and made my life a lot easier to get the rest of the finer detail jobs done. It's now garaged tonight to avoid further wet weather and we await for tomorrows day ahead.

Stay tuned!

Link to comment
Share on other sites

Toyotafest 2022

The Big Day

Well, the big day has gone as quickly as it came. Had an awesome day catching up and meeting new people. Surprising even myself, I did see quite a few people have a good look at my car this year compared to previous years which was pretty cool actually. Had a few people show interest and were curious about the car which is awesome, always happy to have the conversation and no question is ever silly 🙂 The day went by very quickly, I know some years it may feel like the day drags on but not this year that's for sure.

As it goes every year, started off the day bright and early with an hour of sleep lost.

20221002_074521.thumb.jpg.b3e4d35124e346ada55d7186e5f9478d.jpg

20221002_074715.thumb.jpg.92884874ef65b31191c68b9f24accb91.jpg

20221002_074531.thumb.jpg.398ff19164799baae88d65e9d40f1260.jpg

These were my first proper photos in good light after all the detailing work. Was very happy with how the car turned out! I've now got another skill added to my list and something I want to improve upon over time. First stop, the service station for ice for my Esky. 

Met up with Adam after arranging the previous night before arriving and parking together not too long before the lockout.

20221002_101440.thumb.jpg.93f82c25992fae1627ee839a04241622.jpg

Decided I'd open my bonnet this year given I've actually cleaned my engine bay somewhat along with the fact I've been finding more and more people are getting interested in not only Sportivo's, but the 2ZZ as well.

20221002_124359.thumb.jpg.1957feee65d2886cd25ddd4280e35589.jpg


20221002_140105.thumb.jpg.6b93a838055b6ab6e1defc8cf8847769.jpg

Didn't take all that many shots on my phone during the day but I know of a few mates that took some shots which I'll see later on. After those 7 hours were over and done with, you may have noticed the other Sportivo had ITBs and I went for a quick spin to see how the felt and sounded like. All I can say is, WOW. I've never heard anything like it before and my ears are still ringing from yesterday. After the quick spin, I made my way home but not before stopping off to the industrial area for some shots which is now built up compared to the last few times I stopped there.

20221002_154619.thumb.jpg.11a484eff7f12d57136b9617443cef0d.jpg

20221002_154658.thumb.jpg.f992b458ca74a445b773918329f3490d.jpg

20221002_154629.thumb.jpg.ad39ab1ac1c23bca1c426ef695e3110f.jpg

Overall Toyotafest #18 was a great success. Did a big detail on the car myself and didn't make the paint any worse, gave the interior and engine bay well deserved cleans and got to meet a whole bunch of new people at the show. With all the little changes I've made, the car should be great for many years to come and the exterior should be easy to clean for many months ahead!

Stay tuned.

Link to comment
Share on other sites

  • 2 weeks later...

Not a whole lot to update post Toyotafest. Haven't made any significant changes or anything since but I have been able to go out for some drives since and enjoy the car through some twisty roads but yesterday with a perfect weekend of weather I decided to give the car it's first wash after all the detailing undertaken.

20221016_120602.thumb.jpg.a8290c73b32659980ee53966c814bca1.jpg

20221016_120605.thumb.jpg.c542fb52bd59d1664fa784943cd234cc.jpg

First up I cleaned the wheels as normal but found I got quite a nice reaction this time compared to other times I have the wheel cleaner so thought it was worth getting some shots of given I'd only cleaned the car around 2 weeks or so ago.

20221016_122507.thumb.jpg.dc581c31c74d52c918c00522d4faf846.jpg

Standard snow foam shot. One thing I did find with the wax was most of the road grim and dirt quite literally feel off the car with the snow foam or came off when I pressure washed the remaining foam prior to my wash. There was some section particularly the lower sections where there was some minor dirt and grime that didn't come off with the foam but it was effortless to remove. I did find during the wash the panels weren't beading as well as they were when I initially applied the wax but I did find the panels were still smooth and water wasn't sticking around on the panels so I know the product is still working.

20221016_140716.thumb.jpg.4d3179f44e910701a2c1d9e9a618b12a.jpg

The end result. I decided that I would apply another layer of protection using the CarPro HydrO2 finishing foam which is what I wanted to do ahead of Toyotafest but didn't have the time or weather working with me. I applied it and the panels are now glossier and slicker than ever and now they don't have contamination trapped in as it did before when I regularly applied it. Hopefully this time around it should last a little longer but given my car isn't garaged at the moment, I'm not holding my breathe on it.

While the weather was nice, I decided to immediately go for a drive to get some shots.

20221016_135336.thumb.jpg.23b88988d0118d95a243c30eb28352a8.jpg

20221016_135343.thumb.jpg.60f3192b42b99f6ce09039b68da88160.jpg

20221016_135438.thumb.jpg.020131d277779d2549da559914214abc.jpg

Back to the old spot I went to around the same time last year after a good clean with the car looking more or less the same since then.

Stay tuned.

Link to comment
Share on other sites

Join the conversation

You can post now and register later. If you have an account, sign in now to post with your account.

Guest
Reply to this topic...

×   Pasted as rich text.   Paste as plain text instead

  Only 75 emoji are allowed.

×   Your link has been automatically embedded.   Display as a link instead

×   Your previous content has been restored.   Clear editor

×   You cannot paste images directly. Upload or insert images from URL.


  • Join The Club

    Join the Toyota Owners Club and be part of the Community. It's FREE!

  • Latest Postings

    1. 1

      Fuel filter change - start stops running

    2. 17

      Wobble at the front

    3. 7

      Brake issues

    4. 10

      Best Oil for 2014 Lancruiser GXL 200 series TT V8 Diesel

    5. 25

      RADIO CODES "HELP"

    6. 17

      Wobble at the front

    7. 11

      rear wheel arch hole covers (3rd row seats removed)

    8. 1

      2013 Kluger grande Bluetooth music issues

    9. 0

      2010 MANUAL Prado with high speed acceleration hickup

    10. 1

      Fuel filter change - start stops running

×
×
  • Create New...

Forums


News


Membership