AurionX2
-
Posts
135 -
Joined
-
Last visited
-
Days Won
10
Content Type
Profiles
Forums
Events
Gallery
Tutorials
News & Articles
Videos
Everything posted by AurionX2
-
Vijitha, on my Aurions I'm using 5w30 full syn. One, 2008 ~145000k kms is on Valvoline Synpower, the other one, 2013 ~46000k kms on Nulon Long Life, on both changed every 7.5-8k kms. I really can't see any reason NOT to go full synthetic when I can buy them on sale for under 30AUD for a 5 or 6 litre bottle. But bear in mind I haven't had the VVT rattle at start-up yet, so can't tell whether going for different viscosity will help in your case, but you can try. Just curious, ave you ever removed the rocker cover or the oil sump to see whether there's any significant sludge inside? If it looks gummed up you may want to get rid of some of that dirt. Trying several oil flushes may help, but without knowing the car's detailed service history and the current engine condition you're just shooting in the dark here.
-
Kluger brakes fitted to Aurion sx6
AurionX2 replied to Sportivo_05's topic in Aurion / TRD Aurion Club
If that helps, on the stock calipers I'm running for ~2000Km now RDA7686 rotors with Bendix General CT DB2243 pads, decent braking, zero noise and virtually no dust. -
Quick update: after servicing it I could reproduce the flare up when coasting at low speed once and, as a result, last Saturday I've added the extra 200ml of juice to the transmission. So far it looks like Ashley was right: since then the car's gear shifts feel more like my wife's 2013 Aurion, there's noticeably less lag for both downshifting and upshifting and during the last few chilli Melbourne mornings it "felt" smoother when cold. Seems to be more predictable now. Still early days, though. How can 200ml, or ~3% extra fluid, make such difference? L.E. Oh and on the snapped bolt: haven't found any leak at all around the area, however on Satuday I went and got rid of the bit left in the hole and fitted a M6x12mm bolt from Bunnings with 3 washers in there, now that's my fingerprint :)
-
Interesting, so this is a 2015 document that specifically mentions adding extra 200ml after the check fluid level procedure is complete. I've got a handful of documents, all pre-2015, none of them giving the slightest hint about having to top up with 200ml. Why would this be even necessary? I'm not arguing the necessity, but does this mean Toyota have miscalculated the height of the overflow plastic tube from day dot and corrected their calculations later? It just doesn't make sense to top up after the level check procedure is followed to the letter. If the 200ml amount was necessary in the first place it should have been documented earlier, shouldn't it?
-
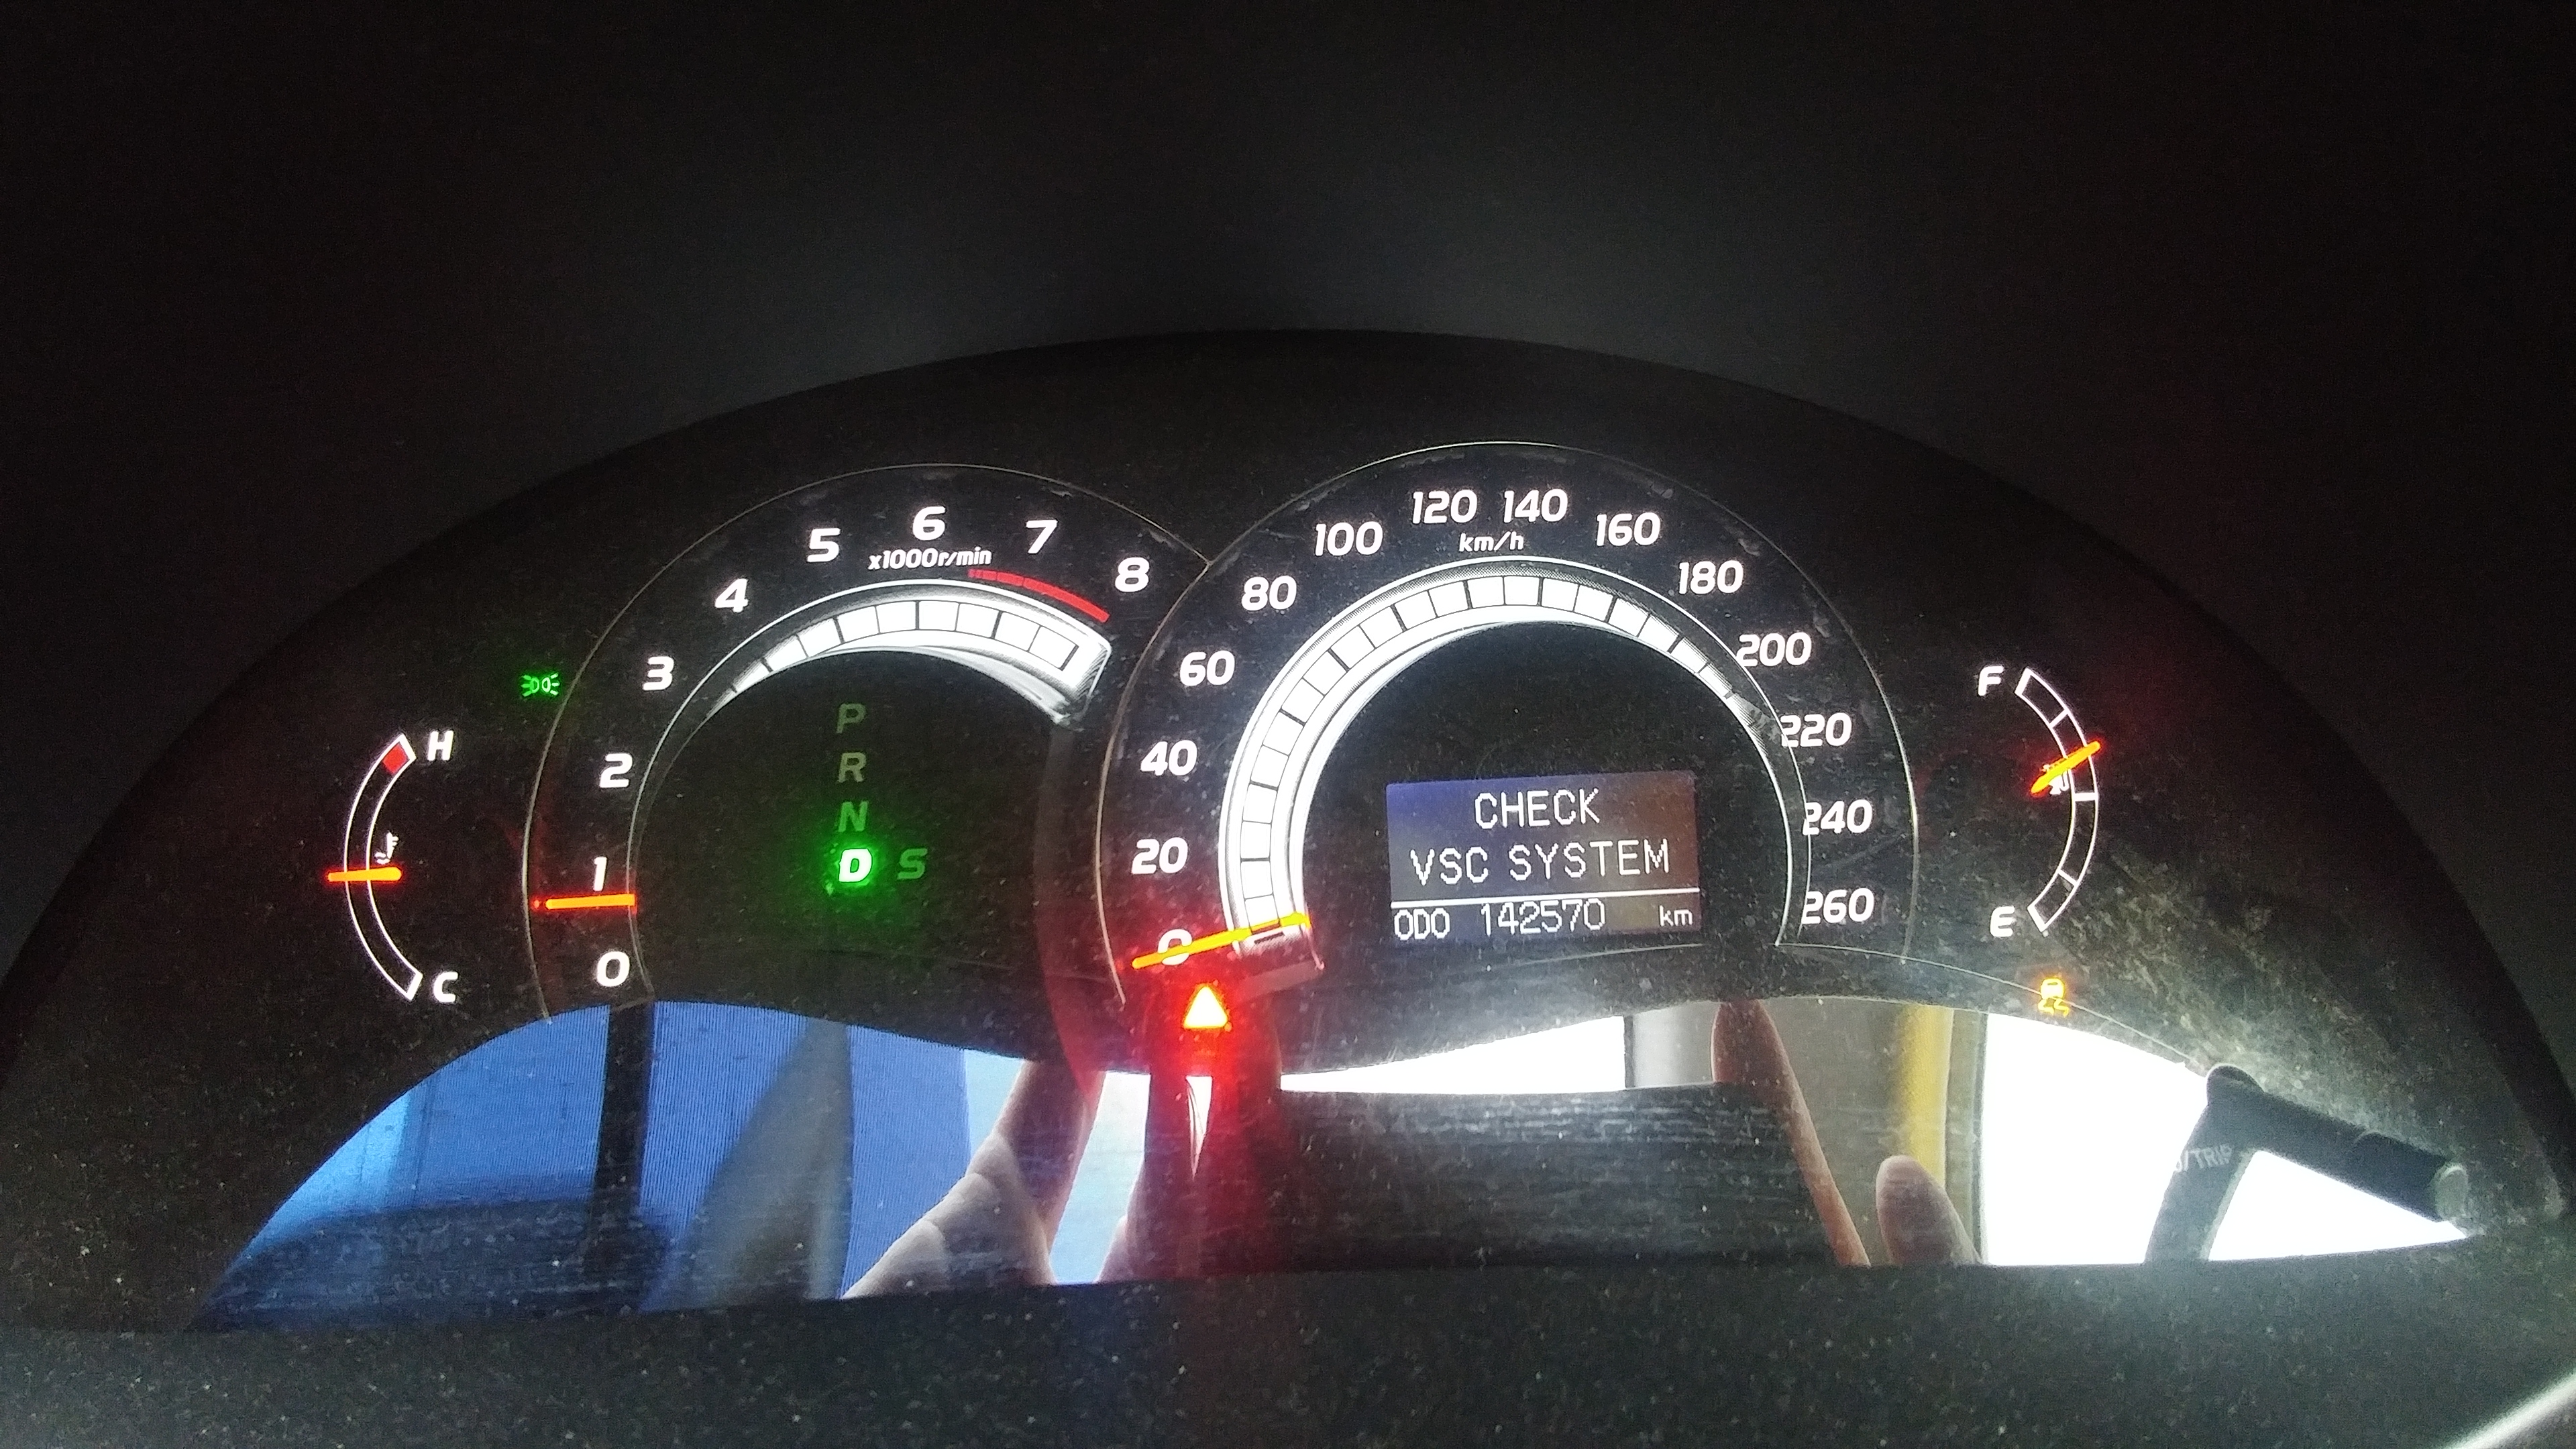
VSC, Traction Control, Check Engine lights all on
AurionX2 replied to xCalibur_'s topic in Aurion / TRD Aurion Club
Hasn't happened again yet. Based on the car's behaviour I have a suspicion it could be loosely related to using a Valvoline engine flush at the previous petrol fill-up. No particular reason other than picking it up on sale for 4.99. Mmmm, is it a case of if it ain't broken, don't fix it? -
Thanks Ashley, good point. Didn't think I'd have to top up with additional 200ml, but I'll definitely consider it. I think I should first wait for the car to jolt forward when coasting on a steep hill at low speed in 2nd gear, what do you think? It used to do it quite often before.
-
Gentlemen, First and foremost, many thanks to everyone who contributed to the U660E related topics here, your contribution was priceless. Secondly, don't hold me liable for anything below, it just "worked for me"(c). Stay safe at all time! So, decided it was about time to bite the bullet and service the transmission on the 2008 Aurion, with dropping the pan, replacing the filter and doing a full flush using the method through the cooler return line from the toyotanation DIY topic with Toyota genuine filter, gasket and o-ring (165aud, ripoff, a Ryco kit is ~50 on eBay or 55 @SCA!) and 3x4l drums of Penrite ATV LV from Repco, about 93aud in total on sale. Basically went like this: 1. Wait for the engine/trans to cool down a bit, chock the rear wheels and jack up the car. Make sure it's level using a 3aud leveller from Bunnings. I've eventually ended up using 3 axle stands, better safe than sorry! 2. Left front wheel off. Remove the 2 shields, lower left and side. Remove the overflow and drain plugs with the 6mm hex socket then drain the trans oil, about 2.8l came out. Then remove the bolts and dropped the pan, adding some more 3-400ml from the pan and filter in the disposal jug. @krigeroz, your home engineered special key to undo *that* bolt saved my day :) 3. Clean and degrease everything carefully, it's not an operation done weekly or monthly so having started around 10am I just took my time. 4. Install new filter with the o-ring and put the pan back up with the new gasket. *That* bolt kept me busy for about 15-20minutes but with a bit of cursing, swearing and a lot of luck I defeated it eventually. Replaced the drained and overflow plugs, but unfortunately at this stage I made the first and thankfully last beginner mistake: I snapped a pan bolt, the very last one tightened :( 5. Refill with 3.2l and start the engine, let it to idle for about 10-15 minutes and check for leaks, then turn the engine on. Take a break, stretch and get everything ready for the flush. 6. Disconnect the cooler return hose that goes into the transmission from the cooler end and connect a transparent vinyl tube that goes into a measuring jug. 7. Pump out / funnel in. Get DW to start the engine and pump 1litre of fluid out, then stop the engine. Note: after stopping the there's some extra 100-150ml coming out, need to account for that when doing it. Remove the filler 24mm plug labelled WS and pour 1 litre in (the first time I went with about 1.25l, better to be a bit over). Replace the refill plug hand tight. Repeat until new fluid comes out. All up, including the pan refill I've used 12 litres of Penrite ATF. Note: before pouring the 1 litre make sure the vinyl tube is firmly inserted into the refill hole. 8. Replace the refill plug hand tight and go through the fluid level check procedure. At this point the fluid should be well below the 40-45 Celsius degrees range. Here I used a jumper wire and shorted OBD2 pins 4 and 13 and verified the temperature with an infrared thermometer. Now, the part I was most afraid I wouldn't get right: With the car in P start the engine, the dash lights will start blinking like a Xmas tree indicating the car is in some diagnostic mode. Then: - Move the gear shift slowly into R, N, D. Then move to S and cycle slowly through all 1 to 6 gears. All necessary to circulate the fluid. Return to P and take few breaths, the next 6 seconds are important. - Move to D and cycle N-D-N-D once every 1.5seconds, should finish in ~6 seconds in D. The D light will remain on for 2 seconds, then go off. Move the gearshift back into P. Now the car in is in temperature detection mode and the trans fluid is below 40 degrees. Remove the jumper wire. Note: you don't have to be extremely accurate with the 1.5/6 seconds counting, you'll eventually get it right. Suggest practising the detection mode before doing the flush to become comfortable with the procedure. - Let the car idle, when the temperature reaches 40 degrees you can start checking the level. As soon as D light came on I went underneath to check the oil pan temperature with the infrared gun in several points and got 38-39 degrees readings, so off by few degrees which was acceptable for me. With the engine running removed the overflow plug and the fluid started to trickle, meaning I was bang on with the refill. Replaced the overflow plug and tightened it, followed by tightening the refill plug. Done! Note: if the D light starts blinking it means the oil is above 45 degrees, you must stop the engine, let it cool down and start again. - Stop the engine, re-check all the pan bolts, check for leaks, then reinstall the shields. Replace the front wheel. - Remove the funnel & vinyl tube, then the tools / pan / rags / dropsheets / other objects from underneath the car, make sure no curious kids are stuffing around, then lower the car. Tighten the wheel nuts at 76lbs and remove the wheel. Look around the car, hopefully no parts / bolts / clips left around. Job done, time to praise yourself you've only ended up with one snapped bolt. - Go on a drive to test your work, if possible including suburban, coasting and freeway. When returning back home check for leaks again. Essential points and lessons learned: - Take your time, don't rush. - Read and reread the toyotanation.com topic and this one until everything is clear and follows a logical workflow. - Practise the temperature detection mode beforehand. - Don't over-tighten the pan bolts. The manual says 8nm torque which is extremely light. - Use dropsheets & rags in abundance, it does get messy. - Have extra shield clips handy, I broke 2 out of 3 from the lower left shield. See here the U250 and U660 repair manual, pages 55-57 for the U660 filling procedure. Thank you all again, you're a great bunch of selfless people :)
-
VSC, Traction Control, Check Engine lights all on
AurionX2 replied to xCalibur_'s topic in Aurion / TRD Aurion Club
Out of the blue, this morning while driving to work. About 2 minutes into the trip, accelerating quickly for a merge, then at the first traffic light got the dreaded "CHECK VSC SYSTEM", engine and TC lights on, which stayed like this for the remaining 45 mins or so. Car drove well, nothing out of ordinary. No rough idle, fluid leak, no loose connectors, cables or hoses afaict. At lunchtime went to check it again. Started the car and, of course, no VSC error anymore, engine and TC lights off, everything's back to normal!! Drove it around the block and checked it with the OBD2 scanner, no fault retrieved :(:( Ideas? Guess I'll have to wait for it to reproduce and have the ELM327 adapter around...
-
Replaced ~3 weeks ago the front rotors and pads on my 2008 Aurion, the front disk was warped and was driving me crazy. The parts I used were: - Rotors: RDA 7686 off eBay - Pads: Bendix DB2243 from Repco, perfect fit. Lucky I went in there otherwise I would have bought DB1474 which are off by few millimeters. Bendix have a comparison between the two: https://www.bendix.com.au/news/comparing-db1474-db2243-toyota-camry-aurion-v40 Strongly suggest using a torque wrench, including for the wheel nuts. Make sure you don't make the rookie mistake I made: I've installed the 2 pads with the wear indicator on the same wheel :)
-
In US Toyota recommends 120000 miles for spark plugs change, puts the 90000 km interval here in perspective :) Pretty sure they last for much longer than 90k, both FK20HR-11 and DILFR6D11.
-
2 Aurions in the family: 2008 touring, 139k kms. 2013 at-x, 43k kms. The latter is way stiffer, though it appears to help on the winding roads. None, though, is as pleasurable and fun when cornering as the old good VZ, who was otherwise a pretty crappy package compared to the Toyotas 😀
-
Tyres related, I'd say. Combination of tyre, wear, alignment, tyre pressure and surface. Worth checking the pressure, had the problem on a Sonata 2007 with some Thai made Michelins that were overinflated at the time, plus the car would pull to the right pretty badly. The problem was aleviated by dropping from 36psi back to 32, which is what Hyundai recommends in the manual. Went away after replacing all 4 tyres, which included the wheel alignment. Hth