dutchie101
-
Posts
2,043 -
Joined
-
Last visited
-
Days Won
2
Content Type
Profiles
Forums
Events
Gallery
Tutorials
News & Articles
Videos
Everything posted by dutchie101
-
Ive just changed to using Megs Hot Shine Tire Foam in the pressure pack.. works very well, easily controlled and minimal overspray. Its not as shiny as the purple gel (which i think has now been change to a clear gel version) but im not so interested in shine, just a nice rich semi gloss/satin black. Much easier to get even coverage in the shallow and embossed designs of the wheels walls without excess fly off. I normally leave it on for 2-5 min then wipe off the excess. Be sure to wash off any waxes/soaps used to fit the tires before dressing with any product. I haven't had any browning either using the Tire Foam can.. Dis one:
-
Congrats on the bubs! Congrats on the coils too! Hope all went well and the mrs and bubs are in the best of health.
-
Great work, awesome conversion. Looking forward to more pics and details as they come to hand.
-
Coilover help unsure what to do...?
dutchie101 replied to LFT-OOF's topic in Corolla / Corolla Sportivo Club
I recommend professional install, as you will also need a wheel alignment after install Some light reading for you on coilovers: (ignore the fact this is a 4X4 website) http://www.pirate4x4.com/tech/billavista/coilovers/Part_1/ -
Coilover help unsure what to do...?
dutchie101 replied to LFT-OOF's topic in Corolla / Corolla Sportivo Club
Coil overs come with springs. Some coil overs have soft/medium or hard spring sets. -
Oh how nice of you to notice! You know guys these days never compliment on the simple things in life...
-
Saw this and couldnt resist... Is that my car in the back of that shot?
-
Yeah, These were from Rakuten or YahooJap, Jesse got them for me. KSP Engineering make the REAL spacers. Best fitting i have seen or used in quite some time. Made from Duralumin, hardened and black Alumite coated. But you pay for them... like anything.. bout AU180 pair landed for the 5mm KSP Engineering Spacers YahooJap link Ill get the part numbers tomorrow, same for ZRE as the UCF30R And yes, i have seen the 15 or 20mm bolt on, with 3,5 and 8mm slip-ons in one kit. Not sure of price but i think it was AU300 odd/pair Edit, Spacer kit, 15mm bolt on, 3,5 and 7mm for Auris 5mm Hubcentric for Auris
-
Yeah, although the 3M is great stuff, i just cant go past the real deal.. even if only for cosmetics. Stay tuned..
-
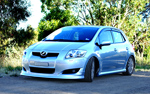
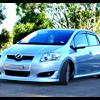
Finally got some time to swap those sh!tty noisy and utterly useless Nangkang NS-II's for the Michelin's ive had sitting here for ages. Michelin's are far superior by immeasurable amounts. The 'Kangs were only purchased for fitting guard clearance issues, i would never run or recommend these..... Michelin's stretch matches the rears nicely now, just how i wanted it. Also added a 5mm hubcentric "REAL" spacers i got from Japan, and now the fitment is almost spot on. (sorry for the phone pic, camera was dead and needed charging) Whole swag of goodies to go on the beast in the next few weeks: Tein Crusing Master Premium Coil-overs Tein EDFC SARD front and rear Sways (and bushes) Camber/caster/30mm down adapters as mentioned above Should make for a decent yet still soft ride. Oh, and the Admiration Aero kit....
-
Ah you make me laugh John Seriously considering doing it, ill have to carve out a chunk of my work time, once the shed is done, so maybe within the next 3 months. All things going well. Im just talking about the exhaust garnish, not the whole skirt. If the garnish goes well, the skirt could be next... You could always CF wrap it, but its just not the same is it? :P
-
Nice work John, all legal eagle n stuff now B) Sticker placement is spot on now 5mm FTW!!!
-
Hands up if I should eventually attempt to make Modellista Carbon Fiber Exhaust garnishes?
-
Excellent!
-
I would say its tar like you mention. Megs Gold Class Bug & Tar Remover works a treat, just had to remove some off the ZRE a few weeks back. Dissolves and easy removes it with minimal effort. Ethanol should work too but not sure how well, also be sure to re-wax after you have removed the offending nasties, ethanol or metho will strip all wax off the area.
-
Answering my own question here, AutoGlym Super Resin Polish doesnt require old waxes to be removed (ie isopropanol), it contains its own cleaners. Saying that, it wouldnt hurt using isopropanol anyways.
-
Hmmmm... maybe some one should read the ZRE FAQ page :P Front Camber Kit: 81290 81290 (Pedders)
-
Re Isoprop, Davo, you using the 70% or diluting it to 50%? Spray on, wipe off, then hose down?
-
Heya Tash, Just thought I would let you know that a few months back i purchased an Autoglym wheel polish in a can on special at Repco for like 12 bucks. I havent tried it yet, probably will this week. Designed to reduce dust and keep shine on wheels. Might be another alternative to waxes/polishes mentioned above. http://www.carcareproducts.com.au/product/autoglym/alloy_wheel_seal As i said, i havent tried it yet, but just letting everyone know about another product out there... Oh, and i was reasonably happy with Mothers FX Wheel Cleaner.. hadnt cleaned the wheels on the beemer for almost a year (its been sittin in the driveway)and it worked wonders, even the barrel of the wheels came up excellent with no scrubbing.. Just remember to wash again with wash/ was n wax after to neutralize the cleaner.
-
feels like his LS is driving on a continual babys bum now he has banished those nasty nangkangs from the front wheels... man the Michelins never felt soo good. Now i have steering, braking, and turn in, oh, and no continual roar front the front end.. Mich FTMFW!!
-
ZRE: Removing the Licence Plate Light Assembly
dutchie101 replied to u54mot's topic in Corolla / Corolla Sportivo Club
Ahhh Thomas you found some? :D I would suspect the normal way, remove the interior trim from the inside of the hatch, i think you have to start from the top of the window and work your way down the sides. From Minkara: (japlish) 手順としては、ウインドウの上→ウインドウの両サイド→ドアパネルの順番で外します。 As a procedure, remove the door panel in the order of → → windows on either side of the window. ウインドウの上はガラス側から手を突っ込み、手前引くと取れます。 Thrust his hand on the side window glass, pulled 取Remasu front. ただ、この時かなり力が必要ですのでケガには気をつけてください。 However, the injury must have considerable power, so please be careful at this time. 両サイドは、トノカバーの紐がかかっているフックのところを引っ張ってピンを抜くと取れます。 Both sides, pull out the pin 取Remasu just pulling the rope is at stake Tonokaba hook. ドアパネルは、最初にハッチのフック左側にあるクリップを外し、中央のピンを押し込んで、ドライバー等で外側のピンを引き抜き、ハッチの取っ手をはずしたら、両サイドの外した所から外します。 Door panel, remove the clip on the left side of the hatch to the first hook, push the center pin, pull the pin on the outside with a screwdriver, the handle of the hatch Hazu****ara away from the office off of both sides. 内張り外しは、基本的に力が要る作業ですが、あまり力ずくでやると、内張りのツメを折ったりするので注意してください Remove the lining, but I need the work force is basically to do so by force, please note that you can bend the tab on the ceiling If Johns sees this he will be bale to post up the other Minkara page i know of that has the full pics of the wiper delete job. Its prety much the same. Once the trim is off i suspect there will be a few 10mm nuts to remove then it should just pull out from the rear... -
Thanks :D Hopefully AutoGlym products arrive tomorrow...
-
Best CAI for a 2010 Corolla Ascent
dutchie101 replied to Jaclyn's topic in Corolla / Corolla Sportivo Club
Got mine from EBay seller. http://cgi.ebay.com.au/INJEN-COLD-AIR-INTAKE-09-COROLLA-1-8-4CYL-BLACK-/190465917830?pt=Motors_Car_Truck_Parts_Accessories&hash=item2c58a74386 Look around for prices tho, shipping is a killer. Pretty sure 2010 is the same as what i have... -
Quick google search yielded this in about 10 seconds: whilst for an 09-10, it shouldnt be much different for an 08.