

dutchie101
-
Posts
2,043 -
Joined
-
Last visited
-
Days Won
2
Content Type
Profiles
Forums
Events
Gallery
Tutorials
News & Articles
Videos
Everything posted by dutchie101
-
ZRE Facelift rear bar
dutchie101 replied to Ascendant Rice's topic in Corolla / Corolla Sportivo Club
Funny was going to post this if i got lumbered with the face lift when i ordered my ZR, i wanted to change the bar back to the pre-facelift!! :) -
Oh what have i started! He heee GTLO5T, can you get the "No Glare" HID kits, the ones with the shielded globes?
-
No problemo. Re the headlights, I think they are custom black headlights, you can DIY. See these threads here - i just checked the thread, seems many of the links are down.. I swear there is another thread re black headlight mod here somewhere... do a search for them. Similar idea diff model tho here And here
-
Not sure if your keen on these but i thought i would share them with you : Smoked LED tail light Other Tail lights
-
Fight! fight! Correct, a LOWER, wider span, not higher or further... With the conditions of road here in SA, im happy to pay a fine rather than rip off my front lip or need a wheel alignment every 3 months...
-
Danja. Maybe you should take your gripes here. Im sure you'll have fun there. I cant see how ZRE foggies can be considered non-directional. They are in a confined, forward facing polished housing, not open faced big dishes like other foggies (ie large WRX style). From Wiki: Front fog lamps Front fog lamps provide a wide, bar-shaped beam of light with a sharp cutoff at the top, and are generally aimed and mounted low.[10][11][12] They may be either white or selective yellow. They are intended for use at low speed to increase the illumination directed towards the road surface and verges in conditions of poor visibility due to rain, fog, dust or snow. As such, they are often most effectively used in place of dipped-beam headlamps, reducing the glareback from fog or falling snow, although the legality varies by jurisdiction of using front fog lamps without low beam headlamps. Use of the front fog lamps when visibility is not seriously reduced is often prohibited (for example in the United Kingdom), as they can cause increased glare to other drivers, particularly in wet pavement conditions, as well as harming the driver's own vision due to excessive foreground illumination.[13] The respective purposes of front fog lamps and driving lamps are often confused, due in part to the misconception that fog lamps are necessarily selective yellow, while any auxiliary lamp that makes white light is a driving lamp. Automakers and aftermarket parts and accessories suppliers frequently refer interchangeably to "fog lamps" and "driving lamps" (or "fog/driving lamps"). In most countries, weather conditions rarely necessitate the use of fog lamps, and there is no legal requirement for them, so their primary purpose is frequently cosmetic. They are often available as optional extras or only on higher trim levels of many cars. Studies have shown that in North America more people inappropriately use their fog lamps in dry weather than use them properly in poor weather.[14]
-
Use em anytime you like! I seriously dont know what some people are complaining about... ive never had an issue with oncoming driving or fog lights, from any car and i have super sensitive eyes at night... bumpy roads.. fines.... pffff, they aint true yellow foggies, so they are meant to be used as driving lights. Im sure those with HID foggies or anything over 6000k and you would get unwanted attention...
-
ZRE HOT HATCH POTENTIAL + ZRE182..pg117
dutchie101 replied to juvenile's topic in Corolla / Corolla Sportivo Club
Niiiiice - slammed VIP'er -
BTW, true fog lights are yellow. The white "fog" lights in most cars these days are actually referred to as "driving" lights. 55w isnt bright anyways... kobbsno10, if your after upgraded H11 for your "fog" lights, Philips CrystalVision 4300k H11 are a good upgrade to match the ZR HID's. Cleaner colour, better vision, and no, not blinding.
-
Got the polycarb from a plastic/acrylic supplier, check yellow pages for one in your area. Ring and ask for 1mm polycarb ( if you cant find any ill send you some, i have some spare) it was only 8 bucks for 600 or 800mm X 300mm @1mm. Dont get acrylic cause there is a slight bend in the emblem, the polycarb is flexible, acrylic not soo much.. 3M Di-Noc was from Metrodecals.com in the US, good price, fast shipping.. As you only need a little bit, i can send you a bit if you dont wanna wrap everything else in your car with it :)
-
90% of people here in Adelaide use them in conjunction with their headlights... ive never herd anyone complain here about it... If they arnt HID's then they shouldn't glare either...
-
YEah its a bit time consuming, it took me three tries to get the shape even 1-2mm around the emblem (or base). Once you have the polycarb shaped, its not too hard. You do need to know a bit about solodering, and some basic electronics but bugger all. if you have the tools and the time, its not too hard.. Its well worth it in the end... Charlie ill email you the lot when im done, the Nets emblem is a bit different, same principle tho. Ill put it all up here anyways eventually... If i still had access to the cnc router and vinyl cutter at my old sign company i could do these easy as, and as many as needed... Oh well, now its just all hands!
-
Check you manual, it tells you how to replace them with pictures, and what globes you need are in the back section. H11 55w....
-
Dam, I just had half the tutorial done and Mozilla crashed :( Here it is again 6-8 X 3mm super bright LED of choice, Small piece of prototyping circuit board Diodes, resistors (ill give numbers later) 1mm polycarb sheet Sign writing vinyl, contact or Di-Noc Thin gauge wire Soldering iron, drills, screwdrivers or chisels, files. So basically what we are trying to do here is sandwich a piece of polycarb in between the emblem and the emblem base. Putting LED's in the base, and "masking" the polycarb to allow a thin line of light to escape, creating that nice even illumination glow. Ok, you need to make a piece of polycarb thats just larger than the emblem, by only 1-2mm. Best way is to trace the emblem base onto the polycarb, then cut using shears, then sand to the required shape. Keep the protective paper on... dont remove it yet. Like this: Then you have to knock out the area where the emblem pins will come thru the polycarb. Mark them on the polycarb, and drill out the corners with a 2mm drill. Knock them out with a sharp chisel or sharp screwdriver. Its the easiest way. Now we need to make sure the sandwich fits, and to allow the emblem to clip into the base, we have to file 1mm off the shoulder of the back of the base where the emblem clips in, on the side of the tab from the emblem.. Once it all fits well, we can look at masking with cover of your choice.. the emblem must be nice and centered on the polycarb.. We need to mask just inside the emblem, just 1-2mm inside: -------> This mask needs to be dark and not let light through. I opted for 3M Di-Noc carbon look film. Also 3M reflective black vinyl will look good too, or even blue reflective (just go to a big sign company and ask for some scraps) We are then looking at mounting the LED's. These are the places i have selected for the LED's. This should provide an even spread of light. Drill 3.5mm hole at these locations on the base: Ill continue this in a bit.. the next part will take some time..
-
Thats a bit sh#tty, you need an even effect... thats just one led in the corner... Yep doing my Nets badge now... Toyota one is a bit harder... You need some 1mm polycarb, 3mm led etc.. The nets badge will look like this... Ill do a write up later for you all... D
-
New prius rear toyota badge
dutchie101 replied to Ascendant Rice's topic in Corolla / Corolla Sportivo Club
Dont expect them to be cheap! Even "stickers" arnt cheap in japan.... Add postage, International TT charge, Japanese bank charges (normally AU$30-70 alone) and broker or finders fee (10-20%) nd it all adds up, trust me.. : -
New prius rear toyota badge
dutchie101 replied to Ascendant Rice's topic in Corolla / Corolla Sportivo Club
From what i can gather, the Auris/Corolla badge is W150, the same as the Alphard GGH20 W150 Rear W150 8,400円 . Dont hold me to that but im pretty sure... i dont think the Prius is that big. -
New prius rear toyota badge
dutchie101 replied to Ascendant Rice's topic in Corolla / Corolla Sportivo Club
Waaaahhooooo!! I found it... So much for my memory, its Grazio&Co. Soo many crazy VIP company names going thru my head at the mo.. Linky Steering wheel emblem inlays, badge inlays too: Ohh black chrome and Heat blue background: I have no idea what sizes are stocked or needed...but im sure there is something here for you... Oh, and "splash" emblems :D I would expect over AU$120 for the badges... -
New prius rear toyota badge
dutchie101 replied to Ascendant Rice's topic in Corolla / Corolla Sportivo Club
Yeah but no. :) Its not them, i searched their website before... It was a burgundy coloured background on the website... It may hace even been Carsion or something...They did a lot of woodwork and other badge work, Arghhhhhh.... -
New prius rear toyota badge
dutchie101 replied to Ascendant Rice's topic in Corolla / Corolla Sportivo Club
For some bloody reason i cleared my history from yesterday!! Arghhhh!! I cant find it, bugger. Ive just spent a few hours trying to find em... I remember the name of the company was garisson or garson or something similar!! Argggghhhhh its soo frustrating!! I knew i should have bookmarked it. :( If i find it again ill be sure to show you.. -
New prius rear toyota badge
dutchie101 replied to Ascendant Rice's topic in Corolla / Corolla Sportivo Club
You'll need to measure it and check the pin position... If your after the cool blue fade ones, I had a company in japan that makes them too, they also make the inlays that are the same, available in various colours... :) Ill try to find it again... -
Howdy. Im just wondering what ZRE people are doing to re-level their HIDs once they have lowered their rollas? Ive found two methods, just wondering if anyone had tried them yet.... First, is resetting the initialization level. This can be accomplished by shorting out the pins on the OBC plug, pins 8 & 4. See linky TEIN HID RESET Also i have confirmed that the ZRE OBC plug also used pins 8 & 4 for this. From a Japanese blog site: "In the headlights OFF. イグニッションをONにして画像にある「故障診断コネクタ」の4番と8番を短絡させます※上の画像説明参照 Images in the ignition ON and the "diagnostic connector" No. 4 and No. 8 are shunted to the image description information ※ 怖いですが(笑) Is scary (laughs) Now we took the short (20以内Rashii seconds) 3回1秒間隔でパッシングさせると Three times in one second intervals and passing to 画像のようなウォーニングランプがタコメーター左に3回点滅します★ Tachometer to the left of the image such as a warning lamp will blink three times ★ そしたら成功です! Then a success! " The other method is Kenstyle Adjustable link Any thoughts....
-
ZRE Suspension Upgrade complete
dutchie101 replied to dutchie101's topic in Corolla / Corolla Sportivo Club
Cost was as follows. C-One Front strut brace, landed in Oz, from Nengun = AU$309 C-One Front sway AU$357 Cusco Rear sway AU$284 + freight (combined freight for front and rear sway) AU$248 from Nengun Eibach springs - Pro Kit AU$570 to your door ( courtesy of SILVABULLIT) RRP AU$660 Thanks SB! If you had the tools and a hoist or pit, spring compressors etc you could DIY. I couldnt be stuffed and paid Pedders in Ridgehaven AU$400 inc all installation and wheel alignment. Some may think this is a bit exy, but for the hours involved its quite good. So total cost: AU$2,168 Not bad for a new car, its like they way it should be... a whole new and far better drive. I love it. Im running standard shocks till they cr*p themselves, then i might go coil overs so i can get the ride height just how i like it. Good coil overs tho, no cheapies. -
Alex, I got the C-One front(excellent quality) and the Cusco rear for the same price landed here in Oz from Nengun Japan for the same price as the TRD front only. Try Nengun and see what the cost is from them.
-
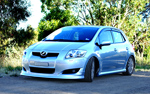
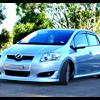
Heya. I just picked up the ZRE yesterday. Had the following parts fitted: C-One Front sway bar 25mm - Nengun Front strut brace - Nengun Cusco Rear sway bar 16mm - Nengun Eibach Pro kit springs - SILVABULLIT (Member here, Great price and prompt delivery) First impressions are the car is a totally new vehicle. Im very happy with the end result. Turn-in is far sharper, more responsive and agressive. Body roll is almost eliminated compared to stock. Spring rates are nice, not crazy firm, yet i am very impressed with the ability to absorb road noise and still be so firm. Ride height is good (30mm front drop and 35mm rear drop) I would like it lower but i knew the ride height before i purchased the springs so no complaints. Im very happy with them. Handling is far superior to the stock set up. Cornering speeds are drastically higher, allowing me to stay in the higher rev/power range than previously driven. No noticeable under-steer at all. The whole package came together really well. I would recommend it to anyone. Now i just need some wheel spacers and a decent seat! Some pics: C-One Front 25mm sway bar: The lower control arm/s have to be removed to fit it. Nothing too drastic. Cusco Rear 16mm sway bar: Cusco Rear sway bar mounting points: Final ride height: Excellent :D

