


theDefiant1
-
Posts
815 -
Joined
-
Last visited
-
Days Won
1
Content Type
Profiles
Forums
Events
Gallery
Tutorials
News & Articles
Videos
Posts posted by theDefiant1
-
-
Speedo corrector kit from Jaycar (www.jaycar.com.au)
Search word = 'speedo'
Speedo Corrector MKII $50.
Kit number KC5435
http://www.jaycar.com.au/productView.asp?I...=&SUBCATID=

-
$1200 sounds like daylight robbery to me (my fathers car was towed from one side of perth to the other for $200). Maybe query the price and make sure its fair if game to do so.
-
I have the same issue with my Echo, which has resulted in many interesting conversations with law-enforcement officers.
"Do you know how fast you were going, sir?"
"No, actually. Ask Toyota for me please."
Truth be told, I have never been officially booked for speeding in the Echo, but I do find that anomaly annoying. I know that Jaycar sell a kit that can fix this problem.
-
Some places (like supercheap the last time i checked) offer free battery testing. If a 2nd battery is causing problems, there may be a reverse current destabilising the battery, causing the acids to 'boil'. It may be prudent to check your electrics/wiring sooner than later - maybe it's not the battery. My knowledge on batteries is about a decade old, but I am trying. A $200-odd battery can ruin a +/- $30000 car.
-
so its a direct swop?
I guess timing would have to be reset. Or are they exactly the same size and the only diffrence is weight?
According to their website, yes they are made to OEM standards, with a reduced weight.
Any ideas on a reasonable price for installation? I trust it is too technical for an amateur DIY...
-
Chemistry 101
Get a bucket of water.
Add in a generous amount of vinegar.
Dip a dish-washing sponge in solution. Wipe over affected parts of car (wearing gloves is advised, double layer if possible).
Vinegar neutralises acids.
Rinse affected areas after washing, otherwise your bay will smell for a while afterwards, and seagulls may fall in love with you.
-
I originate from Perth, am currently in Albury, and spend a lot of time in Sydney.
I can't wait to get back to Perth.
Try Canberra - it's between Sydney and Melb!
-
I think everyone is dead here now lol.
I'll second that. *sob* no-one came to see me...
-
:)
Glad to see you all excited about it - it absolutely looks awesome on my dash - I can't imagine it without lights flashing at me!
Oh well, so much for being unique :P
Those Canberrans who want to see it better catch up with me tomorrow or sunday!
Have a great easter (or equivalent) everyone!
-
I just want torque, just give me torque...
(my new mantra)
-
Hiya canberrans,
This is as close as I can get for now on my pending arrival (I just know you're sooooo excited).
We will arrive in canberra at about 9am. I've organised to meet another couple of people at the info centre off northbourne. I will wait there until they arrive, which should be at about 11am (though lets face it, we will go for coffees).
If you're interested in meeting, please hold your hand up, and we can organise each others contact details.
Otherwise if you see me, run me off the road and we can chat :P
-
I know nothing either. I just wanted to say that it reminds me of Mater, the character from Cars
-
Interesting to see "Vitz" on the back of it...
-
It's lost it's ultra-aggressive look to it. Hell, the hatchback looks hotter!
How soon before a facelift comes out?
-
firstly, thanks for organising this!
second great guide.. might want a mod to cut that out into a separate topic (mish what u think?)
also, if we are sharing shipping how do they take that out of the final cost if everyone is getting charged $160.50?
or did i misread somwhere..
Thanks Daz
For shared postage, the $12 will be divided evenly accordingly. The $160.50 is for those ordering without sharing postage. It would be less for those sharing postage. Ecliptech will process the orders, and invoice you appropriately. Please make sure you are charged correctly!
This guide should work with all shift lights that have 3 connection wires, so workshopping it would be a reasonable idea!
-
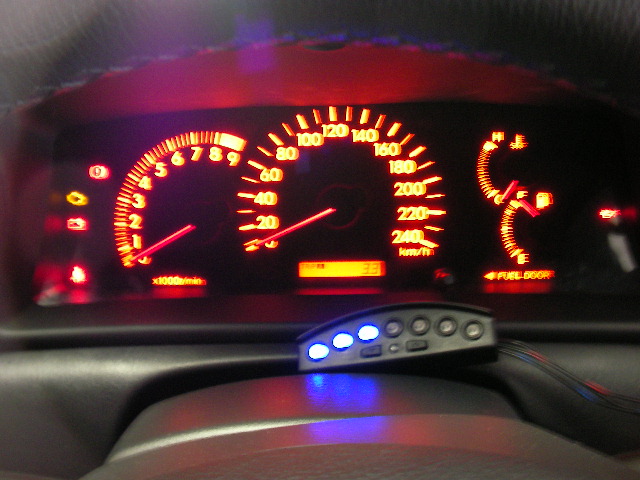
Hi all,
I received my shift-i, and have drawn up an installation manual for the Corolla. There are a few ways to install the unit; the method I have used and explained here is for an instrument cluster hook-up (don’t need such long wires). You can also connect the terminals to the ECU. There is info on how to do this – do a search on “ECU” and “shift light” for instructions on how to get to the ECU and appropriate ECU pinouts respectively.
I recommend reading through this whole guide before you start.
I have never done anything like this before, so I’m pretty chuffed that it worked right the first time. Feel most free to PM with praise. Oh yeah, and feel free to PM with any questions.
Step 1: Remove meter hood sub-assembly (bracket)
There is a screw just under the hood projection (see photo). Use a Phillips to unscrew it. The screw won’t actually screw-out – loosen it, then pull it out (yank). There is a photo of the screw in photo 3.
Then yank the bottom of the bracket towards you. The clip holding the top of the hood in (where the screw was), will pop out. Take care not to scratch the face of the instrument cluster. The whole unit should come out
Step 2: Remove combination meter
With a Phillips, unscrew the top screw holding the meter in place. Support the meter, because it will dance around once the screw is out. At this point I would put some insulating tape around the metal bracket so that it won’t scratch the panel face (I did). There are two clips at the bottom of the meter – push them forward to release them (make absolutely sure you are holding the meter). Then unplug the 2 junction boxes – one on each side of the centre.
Step 3: Identify the correct cables to splice
There are 40 wires to choose from. You want pinouts 2, 4 and 19.
Pinout 2 = ground (white/black); shift cable – black
Pinout 4 = ignition (green/blue??); shift cable – black/red
Pinout 19 = tach signal (black); shift cable – black/blue
Pinout 3 did not have a wire, so make sure you go on the pinout, not the 4th wire along. Also, please keep in mind that I am colour-blind…
I found an easy way to test to make sure that I had the right pinouts. Shave the shift-i’s wires, and place them in the pinouts, start up your engine, and see if the lights come to life. (See also page 5 of the installation manual – verifying operation).
Step 4: Soldering
Follow the instructions on page 4 of the Shift-i installation manual on “connecting wires”, or do what you feel comfortable with. I did not like the idea of soldiering in such a small space, so I knitted the cables and the wrapped them in insulation tape (it’s working so far).
You can pull the junction wires a bit to get to them more easily.
Before you connect the wires, think about where you want the unit placed. If you want it on top of the hood projection, then you may want the wires from the Shift-i going through the instrument cluster; if you want it on the steering wheel stalk then you can through the gap (see photo) OR through the small panel on the right (next to coin holder) (this is where I went – very neat). Run the wires appropriately.
Step 5: Retest, replace
Just making sure that the connections are holding and are correct. Turn the engine on and rev in neutral to see the LEDs advance.
Step 6: Put everything back together, and enjoy. Play with the settings to suit your driving style and preferences.
Neat as.
FTW!
-
Hiya guys,
Sorry it's taken so long to get back - when I haven't been busy at work, I've been sick ;)
Bad news first - no joy on 20% of, unless we get an order of over 25 units. I don't think it's going to happen.
Good news: You can put your orders in now. The 10% group discount will be open for 2 weeks only (that is, orders will cease on Thursday 19 April.
Ordering Instructions:
Go to the website: http://www.ecliptech.com.au/main_win_sep06.html
Click on the ordering tab
Select Australia
Select the unit you would like (ignoring the cost)
Put in your delivery info, payment method and other info.
In the comments section, include (must do this to get discount):
1) Your forum name (eg theDefiant1)
2) "Toyota Owners Club Australia
3) If you are sharing postage, indicate with whom (use the same delivery address for both)
You will receive a payment request that is to be ignored at this point. Ecliptech will send you a revised payment request. The total order cost should be $160.50, including postage.
Any questions or clarifications, please ask.
-
Ralph: I broke my Woogie
-
new club lounge topic setup to replace this topic.
Close thread time?
(and thanks for your support, all)
-
Please list what you can do, in terms of professional and/or miscellaneous abilities.
Please try keep the thread clean, to facilitate ease of reading.
If you acquire new abilities, I suggest that you edit your previous post, and indicate that a new ability has been added within that post.
Should you wish to contact a member to use such said ability, please PM them.
This system/thread should help people in contacting others for assistance.
Have fun!
-
NAME / UNIT
1. Me (Blue / Flat)
2. DHC09 (Blue / Flat) Bris
3. OH84BY (??)
4. Blue_Stivo (??)
5. H1Rolla (Blue / Flat) Bris
6. Daz (Blue / Flat)
7. C-Rolla (Blue / Flat)
8. LiftToy2 (Blue / Flat)
Great response so far.
GTiRboy: dunno. I will speak to my contact and ask him how we can progress. Otherwise, it'll be open for say, another couple of weeks? I think by that stage everyone will want theirs...
-
Do you mean like a skills depository ?
Yup.
For instance, I am a podiatrist (amongst other things), so if you need foot care, why not consider me if it suits you?
-
c0** tease
-
I dedicate this song ...
"I'm a lumberjack and i'm okay..."
because it would take a jackhammer to put that stuff on... and take it off again!


Is this kit good? what do u guys think?
in Corolla / Corolla Sportivo Club
Posted
IMHO it looks okay, but still... it looks very aftermarket. It looks aggressive, but it also looks cheap.
I imagine it will also bring a lot of unwanted attention to your car (you know, the attention attained in the middle of the night in a carpark...)
I remember a forum topic looking at bodykits made in Germany for a reasonable price (try a search).