Jump to content


New to Toyota - 2005 Corolla Sportivo!


Squalled

Recommended Posts

It's that time once again for another update.

So, not long after my last update I was lucky enough to be successful in getting a new job so I've been fairly busy recently. Just before I got my new job, I had ordered some new tyres as the fronts were pretty worn down. I never really rotated them so the fronts were on the wear indicators and the rears were fine.

I went for the Michelin Pilot Sport 4's after reading countless reviews and having first hand experience driving my mates 300KW Skyline with the same tyres. I can definitely say, money well spent and would highly recommend them to anyone.

MHgCQnK.jpg

jq72qqJ.jpg

I have also changed the profile and have moved to 205/50 over 205/45 which has now made my speedometer accurate again, instead of been about 5km/h to fast.

So first impressions were that compared to my old RE002's, the road noise was significantly reduced which makes highway driving a lot more pleasant now. The car doesn't seem to wheel spin or lose grip no where near as easily as the RE002's, even when they were at near full tread. The same weekend I had the tyres fitted, I decided to go for a nice little national park run with my partner to give the tyres a real test. The new found grip was amazing and to be the honest the only limiting factor was myself not wanting to push harder.

That same day on the way home on the motor way, my driver side guard liner decided that it wanted out. I've since pulled it out as it was damaged beyond repair and not worth keeping so I'm on the hunt for another one now.

hasThmz.jpg

I paid Toyota a little visit and caught up with an awesome forum member too.

Earlier this week as I had some time, I was able to get the car in for a service before I start my new job. The oil leak was still continuing so that was looked into. I had my new T2 DBA rotors and QFM HPX pads installed, new spark plugs, fresh oil, oil filter, new drive belt, tensioner inspected and its o-ring replaced (the seal was 'squared off'), MAF sensor cleaned and the chain inspected. Still as always happy with my local mechanics!

abhqieo.jpg

Old spark plugs, have never replaced them until now.

IXHZzlq.jpg

MAF before

O7VlEZy.jpg

MAF after

1rZN2nl.jpg

NFMZcjc.jpg

New discs front and rear.

The car is now in perfect running order and has never felt smoother and safer to drive. Sadly, the oil leak returned after about 2 days so the car will be returning to the mechanics again on Friday to further check the source. It has been sourced around the timing case area which I know is common for 2ZZ's to leak so at least their job is a little easier now.

Here's how the Sportivo currently sits after a wash earlier this week.

MeTNORg.jpg

WEWJdUc.jpg

RkhoKLg.jpg

mLrvVYZ.jpg

Will keep the updates coming! Have a few little things coming later this year or earlier next year so stay tuned. I'll also be updating the photos not showing from photobucket to keep the thread updated :) 

Edited by Squalled
  • Thanks 1
Link to comment
Share on other sites

2 hours ago, MR2Bathurst said:

It really is looking great, well done. Hope they are able to find the leak for you. Add some new seats (if they are on your to-do list) and it will look mint. 

Thanks a lot mate! I'm hoping the same but the source area has been found which is a nice start.

I've recently just put in the seats that are in it :P

Link to comment
Share on other sites

The seats look good, its just some of the wear and tear on the fabric. Don't get me wrong, great seats which look great, its just that the whole car is looking near new and the wear and tear on the seat fabric detracts a little. Can you re-upholster Recaros? To be honest, it probably isn't worth the effort/cost for the minor improvement.

Link to comment
Share on other sites


1 hour ago, MR2Bathurst said:

The seats look good, its just some of the wear and tear on the fabric. Don't get me wrong, great seats which look great, its just that the whole car is looking near new and the wear and tear on the seat fabric detracts a little. Can you re-upholster Recaros? To be honest, it probably isn't worth the effort/cost for the minor improvement.

They're not too bad, most of the time because the fabric is pulled a certain way so it looks worn from the way I've sat in it. 

Re-upholstering is 100% possible, it's matter of finding a local shop that does and also there's plenty of re-trim kits available from Japan, from what I've seen on Yahoo auctions. I may consider it in the future if the seats become a lot more worn.

Link to comment
Share on other sites

  • 2 weeks later...

Update time.

Have being really busy with my new job recently which I'm absolutely loving, despite the fact I'm catching the train to and from work for the last 2 weeks meaning I haven't been driving as much lately. I'll be moving to a new site meaning I can drive as it'll be a lot closer to home.

At last, the mystery oil leak is now fixed. As stated before, my guess was correct as it was the timing case which was causing the problem the whole time. I got the car back last Wednesday after it was taken in on Friday the week before and disassembled to check the seals. The mechanic said it was safe to say the seals were gone. They were the originals and lasted almost 200000 kilometres so I think that's pretty good considering the engine doesn't always have an easy time.

I've been keeping an eye on any leaks over the last week and there are no more!

8P7bi3k.jpg

All the seals that are for the timing case.

pprduZq.jpg

Tensioner o-ring also replaced

ybBbs4C.jpg

Timing case removed

IT6kl1G.jpg

Inside the timing case

In the last week or so, I've began to spoil myself due to the time of year (I'm sure we all do), and have a new addition to be revealed and some new goodies on the way.

Will keep the updates coming before the New Year!

Link to comment
Share on other sites

  • 3 weeks later...

Alrighty, update time.

So, as of recently been pretty busy with work traveling to and from work which has now been made much easier after a relocation and with the unpredictable Sydney weather it's safe to say the Sportivo has sadly been neglected for the last month or so since I had to catch a train every day. Safe to say I've been filling up petrol every 2-3 weeks now since I haven't being driving it as much which isn't so bad with the high prices at the moment.

So here are the new goodies. A few weeks ago, a mate of mine sold me this:

x2taiNK.jpg

It's not getting wired in and tuned until next year so looking forward to some new gains and will get as many photos and provide as much feedback about it as possible.

I also got a new handbrake cover and shift boot with red stitching and have not been able to install the shift boot yet as I'll need the surround for the boot. Having second thoughts about the handbrake cover but it's staying in for now.

ZUrZ15z.jpg

2LMIkLg.jpg

On a last little note, it was time to add a little joke that some owners are well aware of (please excuse my dirty engine bay).

BwZijmp.jpg

Other than that, I hope to give the car a nice clean all round before the end of the year and hopefully give another update. Hope everyone has a safe Christmas!

Will keep this updated.

Link to comment
Share on other sites

Final update for 2017.

So last week I finally got a chance to give the beast a clean. The weather didn't really hold off but I was still able to keep it clean for most of the week.

Nothing has really changed since the last update and the exterior should hopefully see some changes happening next year.

friejag.jpg

1pbFBUj.jpg

The remaining to do list now:

- Install black housing headlights

- Install & Tune the Greddy V-Manage

- Install Whiteline Torsion Bar

- New Battery of correct size

- Clean engine bay and sort out some minor surface rust near the battery area.

Other than that, there may be a few other bits and pieces to come in 2018.

Wishing everyone a safe and happy New Year. Looking forward to see what updates you will all bring in 2018!

Link to comment
Share on other sites

  • 3 weeks later...

Alright first update for 2018.

Not too much has happened for the year so far. Planning on washing the car shortly since I've been pretty busy the last few weekends and not driving it to work as much. Definitely needs a bit of love.

This year I'm focusing mainly on getting all of the little things right before I go more bananas on things I don't want. Things like the surface rust in the engine bay, incorrect battery size and the recently discovered slow coolant leak from the overflow bottle. I've got a few things planned for this year but it's not as much of a priority at the moment.

So, a big milestone to start off the year.

SMQ4hjy.jpg

YqFretG.jpg

Achievement unlocked, 200 000 kilometers reached. Managed to put 55 000 kilometers on it in just over 2 years.

Later the same day I hit 200 000, my mate came down after work and helped me finally install something. My whiteline torsion bar is now installed, only after 2 years of it sitting in the packaging. He also brought over a new battery to which he showed me I didn't have a battery tray so my old battery remains for now.

qk9lNRP.jpg

Stock 18 mm (or is it 17mm?) vs the 22 mm Whiteline

UVig1E4.jpg

Installed, was definitely a tough task for my mate to fit since it was a bit tight. Big shout out to my mate Alec for the quick install. Made it look easy considering I was way to nervous to do it myself.

RpqDJpi.jpg

J1J9exf.jpg

Just some cute shots together.

Other than that, will keep this updated and hopefully update my old broken photos, thanks photo bucket :angry:

Edited by Squalled
Link to comment
Share on other sites

  • 3 weeks later...

Another quick update.

So I've been going through my old posts and re-uploading my photos again for all to see because photobucket sucks. Have quite a few still to do but I think I'm almost half way through.

So about a fortnight a go, I finally gave the car a nice afternoon wash but waited till the early evening to take some shots. It's been a while since I got some evening shots.

xt3D7MI.jpg

kSossTl.jpg

gnFVqC8.jpg

fUeYyre.jpg

So, last week I decided to do something I really didn't think I was going to do for a long time.

3ZQvlXA.jpg

Yeap, I put the the standard intake back in. I pulled it out during the hottest time of the day on one the hottest days during January so it was a little bit of a struggle. The car seemed to feel a lot less willing to rev through with ease in the top end so it's safe to say an intake can produce great gains for the 2ZZ. Now for reference, the Injen 2 piece intake is made for the USDM models but fits the Sportivo also (JUST). So, a fellow Sportivo guru in Melbourne thought he could further improve the design of the Injen.

9QOqhIJ.jpg

This is the original fitment, well close to it obviously the second pipe would fit a lot more snug. The main problem I had was that I had to use a small filter for the system to fit properly since there are some differences between USDM and AUDM 2ZZ Corolla's. So, how do you improve the Injen design?

Zg5CGhL.jpg

I know it may not look that great but it works extremely well. The main modifications that were done were the breather delete, mount delete, flaring at the end of the piping removed and a shorter secondary pipe replacing the old.

OUrYvrb.jpg

e4uHPGh.jpg

As you can see from previous photos in my thread, it sits completely different from a normal Injen. I managed to fit the intake on without removing the bumper but my arms sure did pay the price with some cuts and bruises. The fitment is on the tighter side so there is some refinement to do but, it works fantastically. There is a nice sure in power and torque from 3000 rpm on-wards and is the torque gain is especially noticeable form 4500 rpm on-wards. There is now no where as noticeable dip in power before lift engagement and the sound sounds a lot deeper compared to the original design. It flows extremely well it runs great, feels a lot better for daily duties getting off the line easier with a lot less lag and bogging.

XLN4ZGO.jpg

rJZJS9I.jpg

Yesterday I had a quick opportunity while Sydney's weather was great to wash the car before a drive today.

x0VXlDa.jpg

FAmUB5q.jpg

Luckily enough the weather managed to hold off over night too with only some small parts of residue in the morning.

4JEsqlN.jpg

oo5brgs.jpg

Was up nice and early for a drive with some mates through the Royal National Park and down the Sea Cliff Bridge to some beaches before heading back home mid morning.

Other than that, I'll be keeping the updates coming. There will be another update coming in the next week or so for this month so stay tuned.

Edited by Squalled
Link to comment
Share on other sites

Alright time for another update.

So yesterday, I had the opportunity to meet the man behind my intake modifications and who was able to do this...

S7D0HN7.jpg

He was able to able to install the Greddy V-Manage and also tune it accordingly with my car. The installation itself was extremely quick and he was able to install it within about 40 minutes and made it look easy. A massive shout out to Ed who not only improved the intake but installed and tuned the ECU and came all the way up from Melbourne (absolute legend!)

He then got his laptop and we went through some gears while he would make corrections to the map to make sure the car would run and perform at it's very best. We mostly performed 2nd, 3rd and 4th gear runs. All gears were monitored to make sure that there were no issues with the tune. Initially we performed the changes retaining the 6200 RPM lift engagement point and what a difference that made.

The car became a lot more responsive and revved out so quickly I wasn't even ready to shift it yet the first time I did a 1st gear pull. When we pulled over I decided I wanted to lower the lift engagement point. Some additional wires were connected and tests performed to make sure the engagement could be changed. With the tests done successfully I took it for a drive and noticed even more of a difference than before. The power band is so much more usable than it has ever been before.

For more information on VManages, view this thread:


Edited by Squalled
Link to comment
Share on other sites

  • 1 month later...

Alrighty time for an update (pictures to come later)

So for most of last month I was on an overseas trip and returned early this month. Not all too much has changed with the car since my last update. The changes that have happened, will be added in another post with some photos.

On to the V-Manage, it is still experiencing the occasional jolt around 7000 RPM which should go away in the next couple of weeks as I keep driving. A new issue that began to occur was an occasional jolt around the 2000-2500 RPM area. Most the time it does happen all too much but upon returning from my trip, it seemed to occur every 30 minutes of driving.

From discussions I've had, it may actually just be the tune itself down in the lower RPMs causing the issue. It was initially thought to be ground issue but due to how often it's happened that has being ruled out. Luckily it doesn't happen all too often.

But other than that, the Sportivo has being running great as of recently. I also discovered that the recently changed valve cover seal appears to be leaking all the way around so I'll be organising the same workshop to look it over and re-do the seal.

Another update to come with photos.

Edited by Squalled
Link to comment
Share on other sites

  • 3 weeks later...

Time for another update.

So in the last few weeks a few more things have been bought and/or installed. Got a correct size battery installed now and a new battery stay so a lot more secure than the previous battery which was a few sizes too big.

The other things that are on the to do list now include Speed Source shifter cable bushings, painting the brake calipers and getting a new trim set hydro dipped. I'll be sure to add photos of the finished results for the calipers and trims. I'll also try to get some photos of the bushing install when I get around to doing it.

Recently since coming back from overseas, I've noticed the valve cover seal seems to be leaking now although it was replaced last year which is a bit of pain. But other than that, the car has being running great. Haven't had too many issues with the tune recently, the jolting at low rpm seems to be a less common issue in the past week so fingers crossed it was just the ECU learning.

Here are some of the latest photos from the last month or so.

08MATEA.jpg

Y4WUlfK.jpg

g0gLOKz.jpg

Size difference between a 2005 and 2017/18 Corolla. Really shows how much bigger smaller cars have gotten.

Finally had a chance to give it a quick wash today.

qVcMAVM.jpg

K9dRWDr.jpg

2xGQjGZ.jpg

1XEj1v9.jpg

Will keep the updates coming.

Link to comment
Share on other sites

  • 2 weeks later...

Alrighty another update.

So after a bit of hiatus from some cosmetic modifications, within the last weekend something new, well kind of for me, was finally installed. Here's a hint...

lgtNHeX.jpg

So after my mate Alec gave an idea of how to get my headlights off the car, I tried it and it worked! Big shout out to him again for giving me the idea. With the passenger light out, the drivers side was actually able to come out with ease thankfully. It took me 3 hours all up because I was essentially pulling the harness out of the headlight and putting it back through the new lights, made harder especially with the seemingly stuck plug.

LVdThxm.jpg

Sat like this most of the morning while I sat patiently pulling it apart.

So now I finally have them in, they do need a really good restoration which I plan getting done professionally as soon as I find someone to do it.

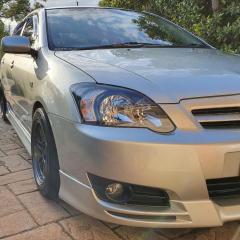
Now here's the new look.

XvVl7MY.jpg

Looks a lot more aggressive. Although it was a pain to do, I'm glad I was finally able to get them installed. I gave them a quick clean up with some car wash and RainX polish which got rid of some of the yellowness of the lights.

iuXIE5A.jpg

Here's the latest shot as of this evening. Haven't had a chance to wash her recently. And as of recently, the valve cover has begun to leak again so another trip to the workshop is in order.

With the V-Manage issues, the jolting at low RPM has dramatically reduced in the last 2-3 weeks. It's since only happened twice in the past few weeks so seems to be the ECU learning still but a re-tune may be happening later this year.

Other than that, I'll be keeping the updates coming.

Link to comment
Share on other sites

  • 4 weeks later...

Update time.

So, now that I managed to install the black housing headlights, they were in much need of attention. They were quite oxidised and had some marks on the passenger light which really did make the car look a little less presentable than I wanted.

I got a detailer to come out and work some magic with getting them cleaned. Sadly there is some oxidation on the inside of the headlight which can't be removed unless I pull them apart again but it really isn't all too bad now.

The detailer arrived and inspected the headlights and told me of what he could and couldn't do. Told me all of the steps that he would perform to get them up to scratch. He would simply use 2 different grits of sand paper to remove the layer of oxidation from the outside, followed by a intense and softer buff with different pads to get them cleared again and lastly adding a protective coating to prolong the oxidation.

The results were great, and Derek who runs his own detailing business was great to chat to and was very professional. Sadly I don't have too many photos of the before but they honestly looked like any other oxidised headlight.

8wICTq5.jpg

qERv8S3.jpg

Derek during the sanding and buffing processes.

ozbXlnW.jpg

After the 2 stage sanding was completed.

w6Vw9uu.jpg

8oPvPEy.jpg

YP260mX.jpg

The final product

Later that evening I decided to take some shots. Car hadn't been washed until last weekend where it later rained anyway.

HvxbSkB.jpg

GQHyIgt.jpg

I'm really loving the new look now, I seem to always look twice at it now forgetting that I was able to get the headlights on. The car exterior wise is right where I'd like it to be and probably won't change all too much in the future.

The Sportivo also went through a service in the last couple of weeks with the brakes and fluids checked over along with rotating the tyres. I'm trying to rotate the tyres more often as the RE002's I had were never rotated and I had to change them a lot earlier than expected.

Other than that, it has been running like a dream! I still have my to do list which now stands as....

- Brake Calipers to be painted

- Install shifter cable bushings

- Clean engine bay

- Hydro dip interior trim pieces

Stay tuned.

Link to comment
Share on other sites

  • 1 month later...

As promised, here's a minor update.

So I haven't done all too much to the car in the last month or so. I've being trying to keep it clean, as long as Sydney's unpredictable weather holds off. With fuel prices sky rocketing over the last month, I for some reason have never had more of an urge to drive everywhere.

Not long after my last update, I had the car serviced by my mechanic just to give everything a good check over. It appears the valve cover may have been slightly loose and was tightened but not long after it was tightened and cleaned up, the oil leak slowly came back so I'll need to address that sometime this year.

Other than that, I haven't had any major issues recently at all. Here some various shots after washes in the last few weeks.

nzO4Wl4.jpg

a5fHJJW.jpg

rdQQVLl.jpg

2CTF8zZ.jpg

EMeUTSq.jpg

Also note the newest addition on the front windscreen, my mate Alec provided the goods and I joined the growing number rocking Gorilla Industries.

Some night shots from a mountain run with some mates a few weeks back.

nG823Pb.jpg

o2LBJhn.jpg

I've also decided to attend a few meets recently, one been a Downshift x Tuned meet and a Toymods Monthly Meet. I haven't been to a non Toyota only meet for well over 3 years now, since I owned my Honda Prelude, and it was the first time taking my car into one. It was a smaller turnout but none the less a great day out watching some racing and admiring other people's creations.

j0pky7Y.jpg

SQt0YaQ.jpg

We were the only 2 Sportivo's that were there and surprisingly my car managed to turn some heads which is something I'm definitely not used too. Sadly I didn't get any photos at the Toymods meet due to the poor weather on the way.

So the list still remains the same as last, I've really got to get started before the end year not only for Toyotafest but another trip I'll be doing.

I'm doing my first long distance drive with the Sportivo along with my partner from Sydney to Melbourne. We're mainly heading down for some much needed relaxation time, do some exploring and also getting the chance to meet some fellow Sportivo mates down there. In the final stages of booking now and really looking forward to the trip. Hopefully my car doesn't fall apart! :ohmy: Fingers crossed

Other than that, I'll keep updating when I can.

Edited by Squalled
Link to comment
Share on other sites

Looking good Squalled!  Love the black headlight housing, turned out pretty good in the end.  What's been done to your mate's black tivo?  Bronze TE37s always look good against a black car.

Link to comment
Share on other sites

3 hours ago, Blacksheep said:

Looking good Squalled!  Love the black headlight housing, turned out pretty good in the end.  What's been done to your mate's black tivo?  Bronze TE37s always look good against a black car.

Thanks a lot Blacksheep! Yeah I'm pretty happy with them, may redo them again, if I can be bothered :lol1: Quite a bit actually, I'll shoot you a message with what I can remember. Also I need to get cruise together asap so we can catch up!

Link to comment
Share on other sites

  • 1 month later...

Finally found some time to update my post. I usually try and do this once/twice a month but life happens I guess.

So about 2 weeks ago, I finally got around to getting my calipers painted. With the help of my mate Alec, who pretty much did most of the job they were done in a few hours. The colour I went with was a custom colour done and other required paints at VG Paints. I got paint matched to the paint code of my old Honda Prelude which has always been my intention.

ndswpVs.jpg

Got the car up on stands and took the wheels off when we both we had a visitor arrive..

KF5Pb8Q.jpg

kAfIWzN.jpg

Our new apprentice ready to get working on the Sportivo.

We started the process with cleaning up the calipers with wire brushes and using brake and parts cleaner. Alec than took the calipers off and the pads out to paint the calipers only, since it definitely looks a whole lot neater that way.

Vnr2unv.jpg

QNHK5vC.jpg

Front and rear calipers after clean and before removal. Still the same paint when it left from the factory more than 13 years ago.

jHmcByP.jpg

p7HFORB.jpg

Primer applied, roughly 2-3 coats to make sure the caliper was completely covered before paint.

NuIhAOg.jpg

Time for some colour. Applied roughly 3-4 coats of colour to make sure all the areas seen had a nice layer.

Ze1blY2.jpg

Now clear was applied. Roughly 2-3 coats again. This colour really has a nice metallic fleck, especially in the sun.

Now the finished product...

Lv9hIMl.jpg

eEcECJp.jpg

CnED3Au.jpg

zRDLkwA.jpg

I was really happy with the way the colour turned out, it's not too bright but a nice little touch of my first pride and joy. It honestly looks the best in the sun when you can see the fleck through it. A massive thanks to Alec for helping me out with the job.

I also had a set of Super Pro end links to fit while we had the wheels off but, I ordered the part for the stock Sportivo suspension. Since I have BC BR coilovers, they were way too long to fit. So back to drawing board for replacements.

With Sydney's unpredictable weather recently, I haven't been able to wash the car until today. Looking a whole lot nicer!

AQtUntX.jpg

soJOd5d.jpg

Before that, my area managed to get as low as -2 degrees which pretty low for where I live. It managed to be this cold at almost 8 in the morning too leaving a nice layer of ice.

xJBFqxk.jpg

Other than that, I've been getting around to things on my to do list which I'll be posting on the forum once they're all done.

I'm slowly getting the car prepared for my Melbourne trip at the end of this month. Getting the car checked over the weekend before I head down, along with getting a nail out one of the tyres (hopefully it can patched as it's not on the sidewall and no air has being lost). 

Stay tuned for more updates!

Link to comment
Share on other sites

  • 2 weeks later...

Awesome car mate!

The photo quality is top notch.

Thanks for taking the time to not only update the forum with your progress, but for putting effort into it.

I was really keen to buy a Sportivo but unfortunately I couldn’t find one in good enough condition while looking for a new car, so instead opted to get a 2015 Corolla Ascent (CVT)

Reading through this post and seeing all the progress you’ve made on the car is inspiring to say the least, especially seeing you go from your green Ps (which I’m on currently) to full license while keeping the Corolla just goes to show how fun and reliable they are.

I haven’t done much to my Corolla apart from installing some Stedi LED headlights and replacing all interior lights with LEDs (since it’s a newer car with ~ 40,000 kms on it and I want to keep it relatively stock to sell in a couple years) but this really makes me want to do more.

Look forward to seeing future updates!

Cheers

Edited by TommyViceCity
Link to comment
Share on other sites

Join the conversation

You can post now and register later. If you have an account, sign in now to post with your account.

Guest
Reply to this topic...

×   Pasted as rich text.   Paste as plain text instead

  Only 75 emoji are allowed.

×   Your link has been automatically embedded.   Display as a link instead

×   Your previous content has been restored.   Clear editor

×   You cannot paste images directly. Upload or insert images from URL.


  • Join The Club

    Join the Toyota Owners Club and be part of the Community. It's FREE!

  • Latest Postings

    1. 1

      Fuel filter change - start stops running

    2. 17

      Wobble at the front

    3. 7

      Brake issues

    4. 10

      Best Oil for 2014 Lancruiser GXL 200 series TT V8 Diesel

    5. 25

      RADIO CODES "HELP"

    6. 17

      Wobble at the front

    7. 11

      rear wheel arch hole covers (3rd row seats removed)

    8. 1

      2013 Kluger grande Bluetooth music issues

    9. 0

      2010 MANUAL Prado with high speed acceleration hickup

    10. 1

      Fuel filter change - start stops running

×
×
  • Create New...

Forums


News


Membership