

dorifto
-
Posts
617 -
Joined
-
Last visited
-
Days Won
1
Content Type
Profiles
Forums
Events
Gallery
Tutorials
News & Articles
Videos
Everything posted by dorifto
-
So I went to Winton... for the 8th time, and for the 8th time I got a new PB but only marginally due to adverse understeer. Here is the video of session 1, I used my friends camera so excuse the quality: AE92 Winton Time Attack Pt.2 Timing breakdown: Session 1 2:12.9020 1:50.4320 1:49.3350 1:55.4300 1:52.0020 1:54.2430 1:48.8930 Previous PB was 1.49.1250 so only managed to dip into the '48's on the last flying lap. Watching the video, I had to dodge/overtake a few cars and not to mention a bird in the early stages. I miss two shifts, on seperate corners/laps so that cost me some time. By this stage, I notice the car is very understeery (I have an aggressive driving style) as the car will break traction mid corner with power-down. I give up and do my cool down lap. Session 2 1:48.4690 1:48.3850 1:58.3350 1:48.4400 2:33.2200 Band-aid solution to understeer means lowering tyre pressure. I was already running on 28psi cold/32-33 hot but now let it down to 26psi. Bam, first timed lap and I notice the car can hold slightly more speed in the corners. Still understeers but I can work with it for now. Manage to have a few clean runs and reel of a string of 1.48's before calling it a day and going for a cool-down. Decided not to go for Session 3 as A) brake rotors were on their last legs and B) a film of oil in my spark plug galley has come to light. Determined it was from the oil filler cap. Would have liked a 1.47 but with low track temps, my tyres were never going to grip as well and so I'd rather drive the car home if anything happened. Unfortunately, my friend wrote off his Nissan 180SX Type-X and another friend blew his engine in his WRX. A costly and sad way to end the day, it's the price we pay for track racing I guess. On the positive side, I'm still leading the Honda/VTEC guys with 4AGE power LOL Thanks for looking.
-
3A Racing FTW! I've got one as well with a K&N air feed and works wonders, just need a heat shield now...
-
ALOT of people, were wrong.
-
Power, isn't everything.
-
Oh man, watching that Video, I rekon you can shave another 2 seconds off. A) Use the entire track width in/out of corners and B.) It seems like your braking 100m too early for alot of the corners. Next time, I'll go out with you if you want and we'll get the car into the low 50s
-
Good work Johnnie with the Corolla :) FYI, for all your timing and sessions, click here: http://www.natsoft.com.au/cgi-bin/results.cgi?02/11/2010.WIN Click on the right hand links to get the break-down of your lap times and PB for each sessions. As for me, I got a new PB but have major understeer issues. Going to sort out my allignment and do a few things to go 1.46 hopefully.
-
Bad use Duy, I pulled out of the EXE day and passed up my spot. My brake rotors have no meat left and the oil problem got a little bit worst on the way back. Always a next time my friend.
-
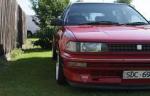
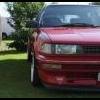
Well I went track racing with Johnnie (Johnnieboi) and Duy (KenshinX). Despite having massive understeer issues (low track temp), I still managed a new pb, going from 1.49:1250 to 1.48:3850, a difference of about 3/4 of second quicker. Did two sessions before running into some minor issues. I'll get pics up soonish when I get them. For now, I've got this.. Thankfully, it's a Toyota Forum!
-
Very good effort for a first timed track day at Winton man. Keen to see some pics and updates thats for sure! As for what I did, I leave that up to you to tell lol
-
October Meet - 31st October 2010
dorifto replied to Kenshin X's topic in Previous/Past Club Meets & Events
Good meet today guys, my only gripe is/was that there wasn't anywhere enough food. Don't get me wrong, the food was freakn awesome but 7 bucks for a one sausage and bread and kebab, sad panda is sad. Had to bail early to get maccas (and work) -
October Meet - 31st October 2010
dorifto replied to Kenshin X's topic in Previous/Past Club Meets & Events
I'll get there around 12:45 for anyone who sees this -
October Meet - 31st October 2010
dorifto replied to Kenshin X's topic in Previous/Past Club Meets & Events
contemplating about removing my race wheels come Saturday's weather. Semis slicks and negative camber all 'round = death. F.uc.k it, I'd rather in style lol -
Thanks guys!
-
Another contributing factor to the expensive cost of Japanese wheels is the rigorous testing each wheel must go through and pass before being sold to the general public. It is this reason why each wheel has a certain plaque on the inside of the wheel that states in what year it was passed and by which inspector. My very first set of VOLK GR-C's had this and so do my current Enkei RPF1's in which I worked and paid out of my **** for. I'm not saying ALL Japanese wheel makers have it but most do, so much so that RAYS ENGINEERING exceeds the JWL wheel safety standards and introduced the JWL+R (Racing) version which are commonly used on many race cars. In my personal experiences with Japanese wheels, I've had no issue for them and for the money you pay you wouldn't hope there would be any. I was told to be careful with the wheels being a monoblock lightweight design, they could buckle from hitting large pot holes. As the car is a daily, it's seen alot of bumps, undulations and pot-holes. 3 months later, the wheel will still balance 100% without the need for wheel weights. This applies to the IMPUL RS wheels I have as well, they use only a few 10-20gram wheel weights but considering they are coming up to 20 years old, it says alot about the design and manufacture of the wheels. In comparison, a knock-off version of my RPF1 is 2 kilo's heavier yet is a 1/2 inch less in width. (4.5kg vs 6.5kg and 7inch wide vs 6.5inch). Food for thought.
-
October Meet - 31st October 2010
dorifto replied to Kenshin X's topic in Previous/Past Club Meets & Events
Hey Kenshin/Duy, can you change my attendance to just 1. Cheers -
Well as the track day looms (November 2nd), I've been busy getting the car getting ready. The last of the to-do things were change brake pads, fit camber bolts and have a full four wheel allignment done. Anyway here are a few pics: Camber bolts fitted and allignment complete. Currently set to -2.5 degrees front and -2 degrees rear. Half stripped interior; no rear seats/parcel shelf/floor mats. Spare wheel will come out come race day Gave the muffler a hit with Auto-Sol metal polish, not bad for 5 mins! lol That's about it really. I wanted to do a gearbox fluid flush too but it's still sorta fresh (has Royal Purple in it). Changed brake pads to QFM's (A1RM fronts and HPX's rear) and changed fluid to fresh Penrite SIN. Now it's just a matter of seeing how the weather holds on up on the day and how the car runs since my mis-hap. Keep you guys posted cheers
-
Thats actually not chipping paint, its the gel they put around the tyre before fitting that has come onto the wheel. If you want it to adhere better, use ETCH primer. That will withstand alot of the soap washing and high pressure rinsing.
-
Well, for shi.ts and giggles I thought it'd be a great idea to test fit the wheels... until it decided to ***** down, stupid idiot mistake haha Mmm yeh, it's pretty flush at the front lol Ground clearance Suprisingly I have no issues with scrubbing (yet) as all fenders had been lipped and have yet to fit camber bolts all 'round. I will take them off when the weather gets better.
-
Ideally etch primer would have worked better with the metal but I just totally forgot about it. Will have to see how this primer turns out. haha yehhh that was me who bought your Pod. Got it and installed it the same day, cheers!
-
Thanks Lee! Your P1's are tits haha. If I go to the Albert Park meet, I'll take the car in track-spec mode. Stripped and all hehe
-
OPTIONAL PARTS I decided from the get-go I would not run the centre caps as they were easily nicked and so the centre would look quite bare. Out came the centre caps with the screw on cap. The bottom two were punched out and had the double sided tape cleaned up. The top two are as per arrival-from-Japan. Only that the top right still retains the C clip. What I did was, took them all out and cleaned up the tape and then used Mothers' Plastic Polish on them. Got into contact with my custom vinyl cutter a few days before completion and placed an order for IMPUL RS's decals and some IMPUL RACING ones'. I didn't like the look of the IMPUL RACING on the dish so decided not to use them. Centre caps now buffed with plastic polish. Had them wrapped in some semi slicks, doing some track work in about 2 weeks. Thanks for looking and please take this as a guide only.
-
11. Down to the business end. Start with primering the hard to get bits; the lug nut holes, the centre and the corner of the spokes. After that, primer the entire wheel and even it out where needed. The wheel in the background has primer coat no.1, the other is onto no.2 12. Both fully primered. Awaiting paint. 13. Coat no.1 of painting. It's quite thin and that's how you want it really, then again I'll leave that for you to judge. 14. To put into perspective after coat no.2. Really starting to take shape now! 15. Ok, so I got lazy to take any photos of the following coats but you get the idea. Even coats at your own pace until fully covered. Then let air dry in the sun :D Close up of matte black finish.
-
7. The primer and paint cans I used. You can opt for a cheaper alternative really, but I wanted to test out how the 3M products would turn out. All up, the 3 cans set me back about $45, $15 a can. Add your sand paper and your looking at about $50. 8. Primering. I decided I wanted to paint the underside as well so if you intend on doing the same, do the underside first so you don't scratch the spoke side afterwards. I did 2 coats of primer before going on to painting. 9. After primering, get out your spray can and shake vigorously. The first coat should act as a "guide"/"base" coat, never over do it. 10. This is the subsequent second and last coat for the underside; I didn't need it done 100% as it's behind the spokes anyway.
-
Disclaimer: The following is provided as a GUIDE ONLY and neither myself nor TOCAU take any responsibility for the outcomes of someones else doing. You hereby acknowledge these risks by undertaking this guide and do so at your own judgement. Aim: To change/renew the look of your wheels with fresh paint. 1. What I initially began with: IMPUL RS's. 14 x 6.5 +15 PCD100. As you can see the dish part of the wheel had water mark stained into the metal but overall they were in good condition with minimal gutter rash and no buckles. 2. I started sanding with 600 grade wet/dry paper. The whole wheel will get painted so the entire thing gets sanded. The purpose is to smooth out the wheel to make the primer adhere better. 3. Valve removal. Pretty self explanatory 4. Once complete with 600 grade, work on 800 grade next. You don't have to but I wanted a smoother finish. 5. Give the wheels a good wash, make sure you get into all the edges and corners. 6. Let the wheels air dry. You can see that the IMPUL RS decals have now been sanded away (that's ok, I'll get to that later ;)). Prep your area for painting, make sure it's somewhere free from wind and direct sun light.
-
What above member said; there's a fair bit of risk with mods like these. Wood isn't a pliable material and once it breaks, it shatters, similarly why carbon fibre bonnets are illegal; you take away the crumble zone and due to the nature of c/f it breaks into splinters. If you want to see footwork, you can buy a cheap camera mount (like $6 posted) for a camera mount like the one I used in my car for footage. Guessing you've seen it? It's the one below:

