

Tony Prodigy
-
Posts
3,367 -
Joined
-
Last visited
-
Days Won
443
Content Type
Profiles
Forums
Events
Gallery
Tutorials
News & Articles
Videos
Everything posted by Tony Prodigy
-
How to remove top of centre console on Aurion Pressara.
Tony Prodigy replied to Rob Davey's topic in Aurion / TRD Aurion Club
It's similar to the 50 series. The 40 series have longer side trim pieces where the 50 has short ones. You need to pull on the trim pieces pictured. Pull towards you. They will pop off. Gear knob removed, and from memory, open ash tray and that small pop up bin forward of the gear shifter and then in the front left and right corners, pull up. You can determine how much force you'll need yourself. I did mine a while back when I had to remove the head unit and centre console disassembly was required. I can't remember exactly how it all came apart, but I managed to figure it out on the fly. So, if I can do it, I'm sure you can. Look for any snags around the ash tray. I should've done a DIY..
-
Fair call. I'm just a stickler for OEM and Original. Definitely where electrics are involved. Factory parts are just so much better.
-
Here's another video from some Ozzie guys
-
I think this is a more involved process than I first envisaged. Found this video and there seems to be quite a bit of disassembly, but one of which doesn't involve removing the a/c compressor completely, so you don't have to degas the system. You can remove the compressor off the bracket and push it aside. No big deal. This video covers the timing belt and water pump, so in your case in having to do the water pump you will have to disturb the timing belt, so the timing belt procedure is necessary too it seems. Just make sure you have TDC marks all lined up Before removing the timing belt. Looks like the water pump is driven by the idler of the timing belt under tension and the fan hub is driven via the serpentine belt. The 5VZ is a strange engine to work on now that I've watched the video. Also, another quick note: Not sure how handy you are, but it looks like you need to make that special tool in order to hold the crankshaft pulley for loosening and torquing back up. Find two bolts that fit the two holes, measure the distance between them and weld them to a thick piece of flat bar. For best results, drill the flat bar and weld the bolts in the holes for added strength.
-
That's good advice. I would tend to do the same. Nothing wrong with good used parts either. Beats aftermarket rubbish any day.
-
Sometimes you can take a Hayne's Workshop manual with a grain of salt. They tend not to be vehicle specific so the method may apply to some vehicles equipped with the 5VZ and not others. If the bolts are visible and easy enough to reach then by all means do it without having to remove all the other items as specified. It looks like a no brainer to me unless we're missing something.
-
I like to stick with original or OEM at best. I'll never put cheap Chinese crap on anything I own. Pay a bit more, get the better item and you'll have peace of mind. I know the cheap prices are tempting, but why would you want to do the same job twice or three times ?? Do it once and be done with it and it will function as intended.
-
I had an unexpected event occur on the 13th April this month , when my wife reported some type of grinding noise coming from the front brakes whilst she was driving to work. I waited till she got home and thought, yep, time for another front pad change. When she got to work someone from her work had a quick look somehow got the impression that the pads were down to metal and the discs required replacement. I reserved my judgement until I took a look myself. The discs do have some wear on them and it was possible to think the pads had worn themselves down to the core scoring the discs. The discs, if you go back in my thread were the DBA rotors. Despite this, I found it a bit hard to believe, so when she got home, I got to jacking the front up, removing the wheels for a decent look. Surprisingly, I found none of the doomsday claim as reported by said work colleague. Sure the pads were getting close, but by no means worn to the metal. I wouldn't allow that to happen anyway right ? So with that, I figured since I have it up and wheels off, I'd swap out the pads with the last remaining Remsa front pads I had in stock. I didn't bother getting any photos this time as I was on a time crunch and was pretty tired from my work day and wanted to get some much needed rest. So lets recap. My first brake pad change occurred on October 14, 2017. Changed front pads and rotors. Original pads were still in at this time and had some life left in them too. Bendix pads went in as did DBA front rotors The second brake pad change occurred on August 2, 2020 installed with Remsa pads. I also replaced the original rear pads this time too with Remsa. (Two front sets purchased and one rear set) The third (Current at the time of writing this) front brake pad change occurred on April 13, 2023. Longevity........ The First brake pad change (Bendix), Oct 14th 2017 to Aug 2nd 2020, lasting 2 years and 10 months.. Original pads lasting 5 years and 6 months (Car is an Oct MY2012, first registered in April following year), and the first 40K not driven by us. Second brake pad set (Remsa), Aug 2nd, 2020 to April 13th 2023, so pads lasting 2 years and 8 months. Third brake pad set (Remsa) April 13th, 2023 Current. We'll see how long these will last. They should similar to the above time frame I'm guessing. So it seems apparent that aftermarket pads don't last anywhere near the Genuine Toyota Pads, which is why I'm going to go back to the Genuine Pads next time around. You get twice the service life in fact and less dust. So my plan is to purchase Genuine front rotors and pads and have on stand by in two years time when the Remsa pads are done. I know Genuine parts aren't cheap but it is for this reason that. I still have the original rotors here so I'll dig them out and take another look at them. If they're still good, I'll clean them up and reuse them, after all they haven't got that many kays on them and my initial thought that they were worn on one side turned out to be incorrect and just a photographic error on my part. Nonetheless, It gave me the opportunity to try the highly hyped up DBA rotors. In my opinion, I wouldn't buy them again. The last time I drove the car there was some noticeable pedal pulsation going on and that was that. My wife doesn't drive the car hard enough to over heat the brakes so warpage should not have been evident. So my estimation of DBA rotors went out the window. This is the problem with aftermarket. You don't know what quality you're really getting and because we don't make anything here anymore, we're most likely getting stuff made from Chinesium, as we all know is a byword for C.R.A.P. The Remsa pads are over rated too. They claim to last 5 years and low dust. More C.R.A.P as evidenced by mine and my recent post "Aurion Wash Day" Look at the state of the wheels.
-
For continuity sake, The following link is to reference my second pad change for the front and for the first time replacement of the rear pads.
-
How was it driven prior to this happening ?
-
Hey Peter and welcome aboard too. I used to have one of those old girls back in '94. It was a 1991 Corolla SX Twin Cam, the one with the famous 100KW motor. It was a fantastic car and sold it to a guy who also loved it. It was mint ! I purchased a 1995 RAV4 Cruiser after that. Kept that for 12 years. Another great car for it's Era. Here are some photos I found of the Twin Cam.
-
It looks like the issue may well be the cluster not outputting the signal after all. If you follow the the Y cable out of the meter combination assy, it feeds to the various LH indicators front, side and rear, then ends with the earth. I'm not familiar with these modern clusters myself, but it could be a dodgy trace on the meter or a component failure. It's not clear what component gives the signal, but there appears to be a CPU of sorts. You mentioned that you checked the grounds but I'd recheck them again just to be sure. How much would a replacement cluster be ? Have you started canvassing the idea of just getting a spare ? Or, if you know someone with the same car, you can swap them and see if this cures the issue on yours and puts the issue on theirs.
-
Need left side door skin for my 1991 ep82 Starlet.
Tony Prodigy replied to jp5's topic in Starlet / Sera / Paseo Club
You after just the outer door skin or the whole door ? I see you location is marked as "Other non -Australian", so if you are abroad, not sure how we can help here. Have tried a local wrecking yard. I know it's an old model and potentially scarce now, but I'd be searching Ebay and any local online classifieds mate. Another option, and this is no joke. Consider having it pulled out with a PDR specialist. You will be amazed how good these people are. It's pure art watching them work. I've watched a few Youtube videos where a PDR specialist fixed what I thought was impossible. I was shock how it turned out after. You couldn't even pick that the section was ever damaged. Good luck and hope you find what you need. -
Thanks for the compliment mate. If I did live up there, I'd gladly help everyone. For the wheel cleaner. I have three different products at the moment. The one I used here was a P&S product called "Brake Buster" but I still have some Nextzett left and a bit of Duragloss all wheel cleaner. All three have been my main staple for wheel cleaners. All three are PH neutral and safe to use. Just make sure to give the wheels a good rinse to get all the residue off. 1 Gallon / 3.79Lt of P&S is around $50. Excellent value as you can also dilute it down to suit, but I like to use it neat.| 1 Gallon / 3.78 Lt of Duragloss is around $75, is a good product and cleans really well. Middle of the range price tag. 5Lt of Nextzett is around $124. The most expensive and aimed at the commercial end of detailing shops. Very effective cleaner but a bit too expensive for the DIYer. I'd still use it again, but I find better value with the P&S product. Another form of Nextzett is one that has a colour changing formula. On that changes colour as it dissolves iron fallout. Same product as the above 5Lt variant where the 5Lt one doesn't colour indicate. Both do exactly the same job in terms of performance. I've used both. The green colour you noticed on my wheels was a combination of using both P&S and Duragloss. I thought I'd do a Frankenstein approach and see if they play well together. They did, but I got that green slimy colour for whatever reason, but no harm done. Wheels came up pretty schmick. I also used a wheel brush to get inside the barrels too. I cannot stand looking at a wheel if it's only had the face done. You have to get inside the barrels too for a proper job. The wheel cleaner makes this very easy. Try and spray the inside barrel whilst coating the face, or even better, to remove the wheel completely and do them off the car for best results. I'm fussy so I like to just try and do my best with them on the car. When I do an epic wash, I remove all four wheels and do the underside, suspension, inner liners and inner wheel barrels. You never need to clean the inside of the glass with chemicals. I learned that trick from a mate of mine many years ago and as simple as it looked and sounded, it made perfect sense. Try it and you see. What happens is the hot water on the cloth acts to dissolve any grime and because it's hot after the glass has been wiped, any water traces left quickly evaporate leaving the glass streak free. Just make sure you use either a new cloth or one that has been washed well so it's not contaminated. Dip it back into the bucket of hot water for each window. For the windscreen, I usually do it in three sections, then one final sweep from left to right to blend it over.
-
An electrical diagram would be helpful in this case, but I don't think that's the issue at the cluster itself. All that would be is the indicator display. Your issue may stem back to the indicator stalk where the electrical contacts reside. If the contacts don't "make" then you'll have a break in electrical activity. You say LHS, so I'm assuming the RHS still works right ? If so, then the relay is ok, which then leads me to believe the stalk is potentially the issue. Are you able to test the indicator stalk ? It's also possible the pins could be loose. Try disconnecting and reconnecting before anything.
-
C1201 and P0990 codes plus shudder after trans milkshake
Tony Prodigy replied to AurionX2's topic in Aurion / TRD Aurion Club
Hey, I never thought of that. Yes, I agree. Those clutch packs are pretty brittle unless they are saturated with tranny fluid. Just like an automatic transmission that's been sat around for years or decades will most likely need a rebuild. If the clutch packs dry out, same thing. Not cheap to rebuild either to be honest. But yes, when you've had a catastrophic situation like water contamination, chances are the tranny will be on the way out. I'd just try and find a replacement low mileage transmission and swap it out rather than waste time with flushing etc.. -
You can bet on it 😉 I won't be able to sleep at night otherwise.. 😜 I have to admit, it is a bit fiddly which is why I don't blame you or anyone not flushing. I'm going to try and drain the block for best results. This way I don't waste too much distilled water. I have a small stash of D.W. at the moment, which should be enough to do the job. I had to re purchase Toyota coolant as the previously purchased bottles have disappeared into the 9th dimension. They are here somewhere but haven't the time to dig for them. I also have to re watch a few videos to get my head around the process and plan my attack. I'll post back for sure.
-
This reminds me to get off my butt and do the coolant flush. I'll start prepping now before I forget..
-
C1201 and P0990 codes plus shudder after trans milkshake
Tony Prodigy replied to AurionX2's topic in Aurion / TRD Aurion Club
Hey Adrian. Did you make the move to Brisbane ? You were in Sydney previously right ? Did you get any info back on TN ? So the root cause of the milkshake was a bad radiator core ? That's always a worry when you have both engine coolant and transmission fluid sharing the same unit albeit separate circuits. I wonder which circuit gives way first.. I tend to think the coolant side may, especially if the cooling system has been neglected or coolant is compromised which can eat away at the core metal. I suspect the transmission may need a bit more TLC than fluid flushing. Maybe the solenoids need to be removed and cleaned also. Milkshake is messy. It get into everything. -
2009 Aurion blowing smoke on acceleration
Tony Prodigy replied to I know nothing's topic in Aurion / TRD Aurion Club
It's a miracle that engine is still functioning. It looks like when you open the lid off a grease can. I cannot fathom a person who would neglect basic maintenance like an oil change to end up with this monstrosity to clean up. The whole idea of preventative maintenance is to negate the ongoing cost of desludging. I don't envy anyone who has to go through this, especially when it's an ongoing procedure. -
2009 Aurion blowing smoke on acceleration
Tony Prodigy replied to I know nothing's topic in Aurion / TRD Aurion Club
I wasn't aware of that. Do you have an image ? What's the point of putting filters in the rocker cover ? -
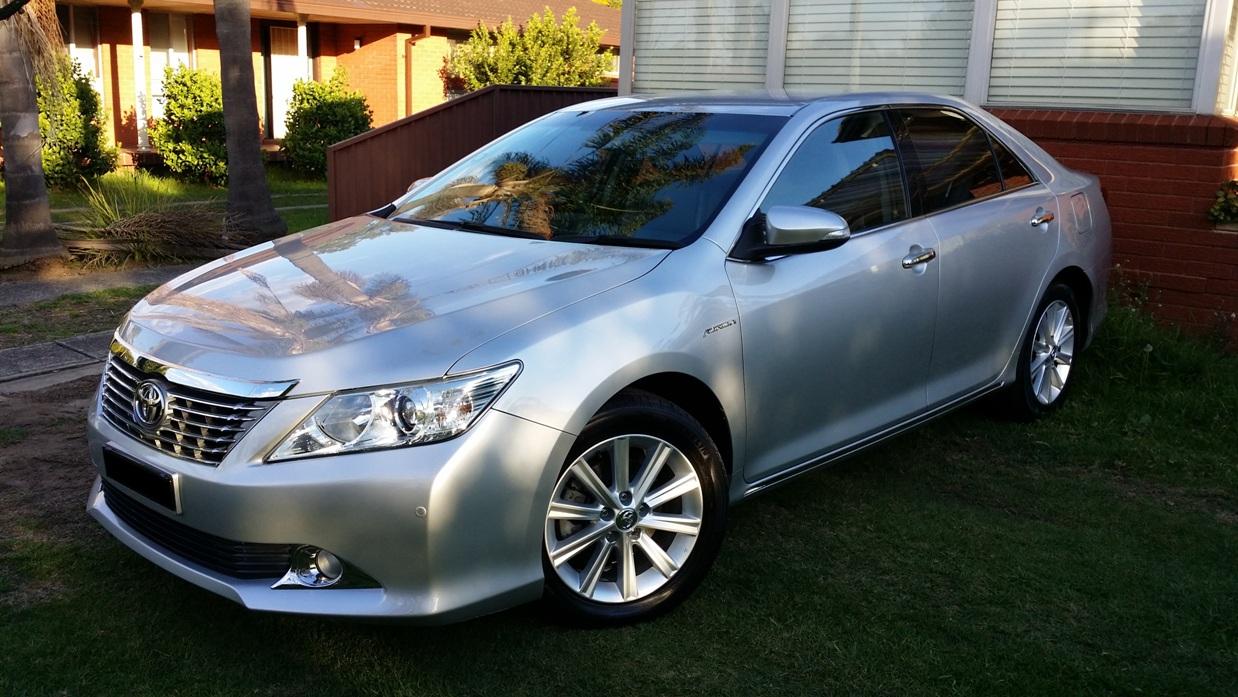
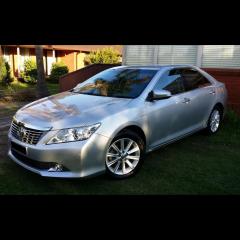
Rinse.mp4 G'day Gents, I woke up yesterday morning and took a stroll outside and saw a very sad looking Aurion. A feeling of guilt overwhelmed me as I hadn't washed it in God knows how long. My life has been quite hectic and I'm either busy or tired. It just had to wait, but that morning, it was go time. I mustered all my energy, pulled out the gear and started at around 7am. I didn't go to town this time, but I gave it a thorough clean inside and out. First order of business was to remove everything from the inside so I could give it a deep vacuum. After a thorough vacuum, I got the compressed air blower gun out and blew any hard to reach debris under the seats and in between the seats and centre console. The parcel shelf also got a serving. There are those nooks and crannies that even your vacuum's crevice attachment can never reach. So off with their heads with the blower. I then followed this up with a final vacuum. Vacuumed the floor mats and the 3D mats which sit under these. Wiped over dash and steering wheel with a microfibre towel dipped in hot water. Also cleaned all the inside surfaces of the glass, windscreen too. Best way I found to clean them is with is a microfiber cloth dipped in hot water. No streaks and no smears. The hot water takes care of all that. Used some Sonax interior cleaner spray for the hard plastics and the seats. It also leaves a nice fragrance too. Once the inside was buttoned up, I got cracking on the outside. Mind you, this wash wasn't intended to be like a previous epic wash I did a few years back where I pulled the wheels and did the underside sections too. Too be honest, I didn't have the time nor the energy to do that this time, but there will come another epic wash and detail in the future. For now It was to just give it a decent clean without going overboard. I usually like to tackle the wheels first. I spray two wheels at a time with my favourite wheel cleaner to allow dwell time. Front wheels were pretty bad, so I had to do those twice. I cleaned the front inner plastic wheels liners as far as I could reach, so they look pretty decent from the outside. Suspension etc have to wait till next time. After the wheels were sorted, I applied some iron remover to the top sections of the car to asses how bad the contamination was and it was bad. Many months had accumulated so much fallout, that this will have to be addressed on the next major detail. I didn't want to waste what little product I had left and figured it's going to be done next time anyway, so I didn't go nuts here either. Then. I got to washing. Usual practice, pressure rinse, then foam canon, the rinse, followed up with a hand wash. Engine bay got a similar treatment too. Removed engine cover to reveal more dirt. I covered the alternator properly with a plastic bag. Be careful with these. Keep them dry and protected so your wash products don't get inside. Foam rinse.mp4 Rinse.mp4 After car was done, I turned my attention to the headlights. The right side headlight was a bit more yellowed than the left as this part of the car tends to get more sun than the left where it's parked at Wifey's workplace. I got my Flex buffer machine out and proceeded to cut and polish both headlights. I then took to doing some spot buffing to remove some incidental marks here and there. Gave the top section of the doors, quarters and front guards a hit too just to clean up the upper boat line. After a nice wipe down, I applied a generous coating of Turtle Wax's Flex Wax. I gave the bonnet and headlights 3 coats as it's the area which cops the most abuse. This should keep it protected for some time. The next time I visit this, I'm going to machine polish the entire car and apply a dedicated ceramic coating for extra longevity. Once this was done, I applied the Rain-X treatment to the glass. Two coats on the windscreen. Also apply some to the wiper blades too. Tire dressing applied. With the car completed, I packed away all the gear, took it outside for some beauty shots. She's good as new ! Thanks for reading guys. Till next time....
-
Another Toyota quirk I guess. Every make of cars will have them. My 2020 Holden Colorado will turn the A/C off completely on some re starts. I have to physically press the button again to get it going. The memory function has a selective memory it seems.
-
That is a bit unusual. I would've expected that part to have some kind of coating, like zinc or something similar. Looks to be bare mild steel. Are you replacing the whole fan assembly because yours has a rusted mount ? Japan has a high humid climate and if parts aren't stored correctly, those that are bare metal will surface rust. You could just clean it up with some vinegar or deoxidine and coat it in epoxy paint.
-
Alert for flat battery in electronic key for 2018 Camry SL.
Tony Prodigy replied to thisguy's topic in Camry Club
It's nothing technical or fancy. You'll see a message pop up in the central part of the display with words like "Key Battery Low". This is the message I've seen in my Aurion some time back but never thought to get a photo of it. Camry will be very similar I presume. I had a quick look online, but nothing popped up. The battery is also very simple to replace. It contains only one. You should keep a small stash of CR2032 in your drawer and when you see the message pop up next time, you can swap it out yourself. You'll even have an opportunity to capture the message and repost it back here.


-Copy.jpg.5083cead9712f43c44f5068d0bb2a781.jpg)
-Copy.jpg.9c794baffe4f042001842aa7ae5913ae.jpg)
-Copy.jpg.8b3a782c0eeca6f901150a5b89e88b95.jpg)
-Copy.jpg.e27ae8850e5b29eb516b168ad01a4ce9.jpg)
-Copy.jpg.e488bec536ed7e3be5a22647f40ea820.jpg)
-Copy.jpg.410a0513b30f0b8b83d2c772062eee7d.jpg)
-Copy.jpg.2a79ba27728eb87dc462a15970f05bdb.jpg)
-Copy.jpg.a64b9e6775ceab6896dbb2bc1e428851.jpg)
-Copy.jpg.93959c42625cb03d88e1401916c0bd9d.jpg)
-Copy.jpg.9c6d1d7a8350ab911e76c9dcf2962c2b.jpg)
-Copy.jpg.8f0d2c32713d732746023b928147a222.jpg)
.jpg.58cca7ed556615d0a5e0d7c1add9ecc8.jpg)
-Copy.jpg.810e11378919508f70bc827081b807d3.jpg)
-Copy.jpg.25c756908df4eedb197a8b984f44457a.jpg)
-Copy.jpg.9264bd4cf06d7d79fc5bbad4d8e6f84c.jpg)
-Copy.jpg.ffc7c5d9e78ad6b982749d3aa12d8a32.jpg)
-Copy.jpg.634835f35e0ac29d54eeb5ead0e0e858.jpg)
-Copy.jpg.d26eb8958499eb4edfe520316897dd53.jpg)
-Copy.jpg.e7660a3962fb3e6bdfe5b89e48ac0e03.jpg)
-Copy.jpg.3bc7624ed4067631f8ea687f626749e3.jpg)
-Copy.jpg.6bb735c5fa3b4ae1f46e91f9df6f4425.jpg)
-Copy.jpg.c89e9fdd323a1c8d841f7c076c06cd3b.jpg)
-Copy.jpg.e5c0c7b952ac14efce70839e94f5c6ec.jpg)
-Copy.jpg.a79ec641fa44da22f5156c16912221b0.jpg)
-Copy.jpg.e758b940f36bc7a334a3d25b26918a41.jpg)
-Copy.jpg.780da1cc42ae6252b3cf9c324a7f1434.jpg)
-Copy.jpg.deeec116d207194d77cd4e273b0d25c9.jpg)
-Copy.jpg.15b0409fa472ba855059d08645dd3ebd.jpg)
-Copy.jpg.6fa9364e7bc0c08b837e7da6d4a95e59.jpg)
-Copy.jpg.0253783e3ea98ec783636025d4b4cb7a.jpg)
-Copy.jpg.fe7ca985b240039030389f59189523f6.jpg)
-Copy.jpg.40ad20dcdbc6e39641626ed1fb45da4c.jpg)
-Copy.jpg.573139c651b589a3268b4201ef0a5508.jpg)

-Copy.jpg.47e5c15115c2e1ceccd3630df597347f.jpg)
-Copy.jpg.6eeeb2dc16ec4ef1ba91b16fb9be561f.jpg)
-Copy.jpg.e9e420d2726436033a94184619012d17.jpg)
-Copy.jpg.ef31fa20e4fd754ae5a5db9d7c2dc64c.jpg)
-Copy.jpg.1d92e2fe01aa88f4831ecf05ab0c361f.jpg)
-Copy.jpg.079eaf92c7a1bc4a1b503a65b39fa963.jpg)
-Copy.jpg.9174ff3679ee1b488032d0184cabe937.jpg)
-Copy.jpg.c77cff7e33bc5f5d8b39978667f5dc87.jpg)
-Copy.jpg.7222bbbdb3ca38894d77015bc0f68180.jpg)
-Copy.jpg.d9e1cea3ca44fb852911039ff3cc1291.jpg)
-Copy.jpg.355fbec96685128b6ec477ee6ce31490.jpg)
.jpg.94ce070cc8a7f6e05f0f4cf60495292d.jpg)
.jpg.7daed5bcee241665e321e14d2e30d371.jpg)
.jpg.ac1f9d301035017d5dea55bb82fa7326.jpg)
.jpg.d0f42bc4dc0882900196d7b296b07447.jpg)
.jpg.9dc23c94feb1214f587b2f78ef578ee2.jpg)
-Copy.jpg.f33a7f36c662c15e80af677afdebdf8d.jpg)
-Copy.jpg.9ae9785a81d2e20dc4330ec129252552.jpg)
-Copy.jpg.f89bfe9cdbb4a778d356f45b96c5d998.jpg)
-Copy.jpg.ede27aa43caebe6be5b160a03bedf30f.jpg)

