campbeam
-
Posts
2,907 -
Joined
-
Last visited
-
Days Won
248
Content Type
Profiles
Forums
Events
Gallery
Tutorials
News & Articles
Videos
Everything posted by campbeam
-
That aligns with my thinking that there must have been enough feedback to Ryco that they have now changed their current fitment guide for the Aurion 50 series to blank. A lot of sellers must still be using an outdated fitment guide. Ryco catalogue shows Z936 for the ASV50R Camry with the 2.5 litre engine. Just guessing but I would not be surprised that the fuel pump in the Aurion is larger/longer which your photos appear to indicate.
-

Navigation no longer working on RAV4 2020 hybrid
campbeam replied to Hanglider001's topic in RAV4 Club
I would think that this is a warranty issue to be fixed by the dealer at no cost to yourself apart from the inconvenience. -
Looks like you did clean the pick up screen as shown in this YouTube video. At least the 2 hours would not have been totally wasted. https://www.youtube.com/watch?v=FLDNQh0nYU0 Hope I do not run into the same issue when I get around to replacing the fuel filter on my 40 series Aurion.
-
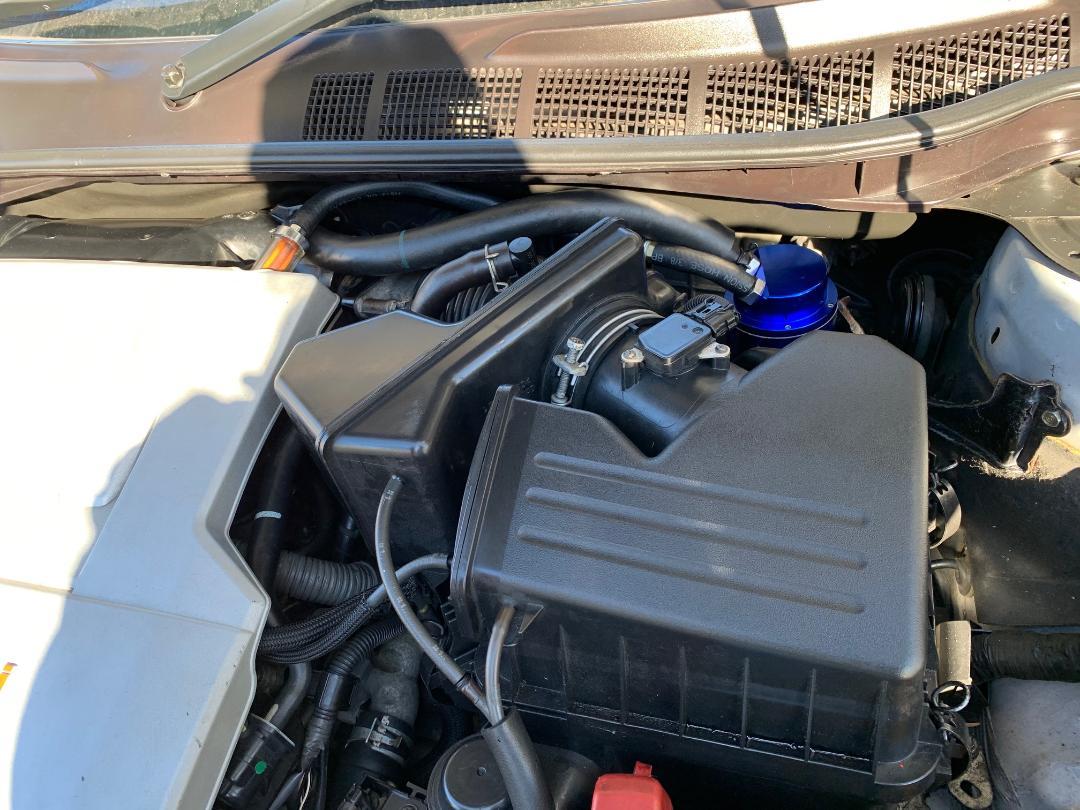
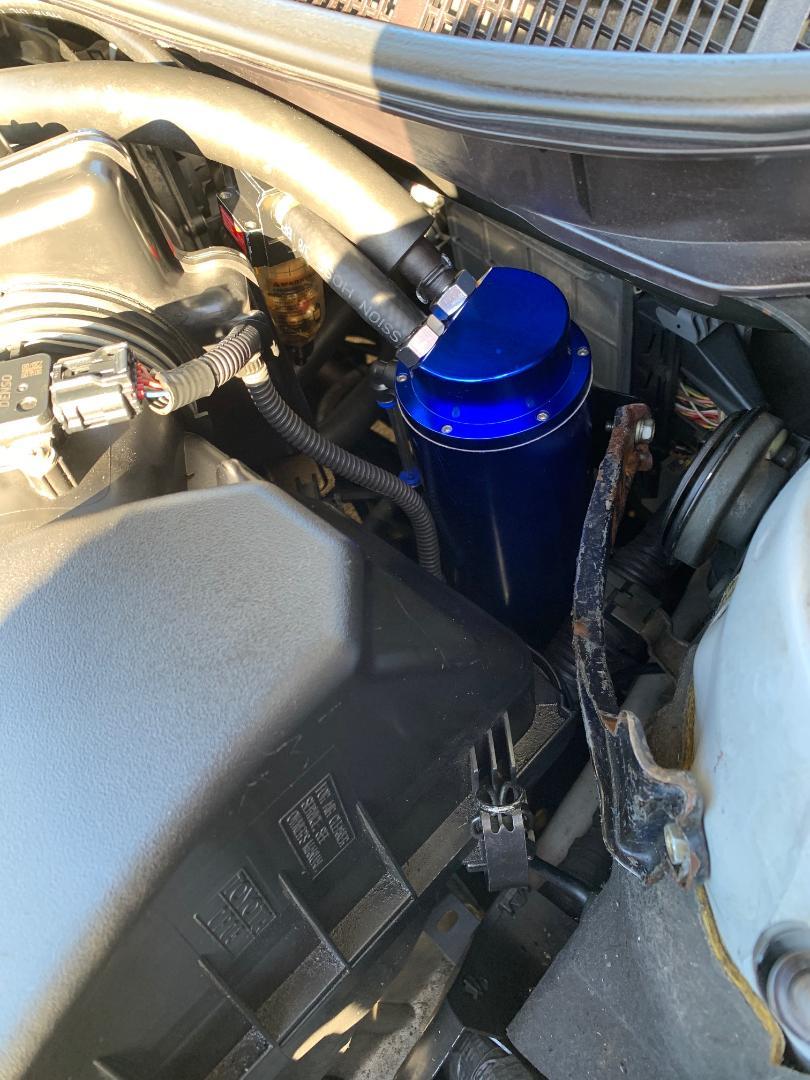
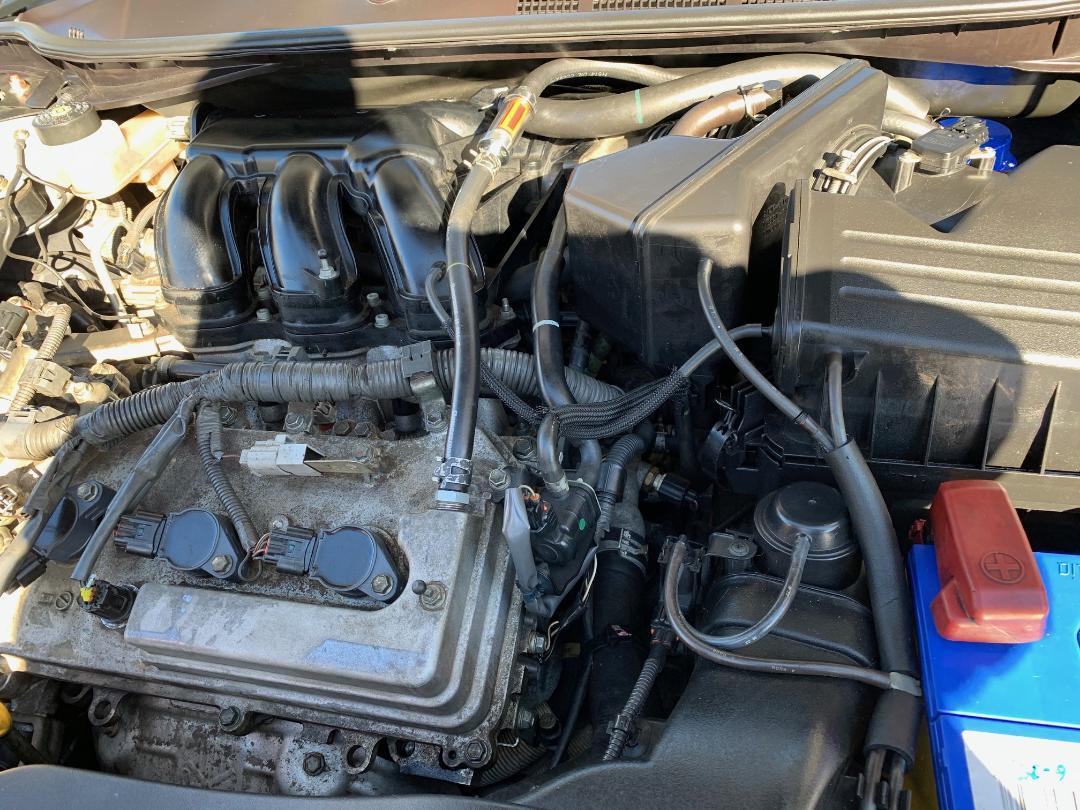
Last oil change, I used full synthetic 5W-40. After 800 kms, it is already dirty being a golden colour. One Sunday, we did a highway trip to visit a relative of the girlfriend; women's secret gossip business and I had an afternoon nap. Upon leaving a few hours later, lots of white smoke out of the exhaust. So annoyed, I tried to remove the valve cover next weekend but missed removing one bolt. Subsequently located this Youtube video which I should have looked at before. https://www.youtube.com/watch?v=VEbfFiJbK2o After a bit of thinking, I decided to buy and fit an oil catch can rather than have to replace the valve cover gaskets. This Youtube video showing the 2GR-FE intake explains why you should have an oil catch can. https://www.youtube.com/watch?v=o2BYkrf-388 It has got to help having less oil vapour being sucked up into the intake. I have used a large zip tie as a probe via the PCV bolthole in the valve cover to remove some of the accumulated oil sludge in the baffle area [lot more than what I was expecting] and also cleaned the PCV valve. I do have a few benchmarks to measure the effectiveness of fitting the oil catch can. It will be a matter of time to get some meaningful experiences/results as feedback.
-
Following pictures show the position of the oil can and the hoses to and from the oil can. Started the engine this morning and there was no vapour coming out of the exhaust. I am thinking that the extra length of the connecting hoses between the PCV valve and the intake is enabling more of the oil vapour to condense back to oil. I reckon that this is going to help the engine to run better and reduce the amount of oil sludge. Sort of kicking myself for not doing a few years earlier.

-
Finished tweaking the installation of an oil catch can on my Aurion. Prior to this, I was using a combination of an in-line filter, an oil separator and 3/8 hose in a direct line to the intake. The oil catch can is now located near the ECU on the firewall, the horn and the front passenger strut tower. I used a battery hold down clamp as the main bracket which is bolted to an existing nut on the strut tower. The supplied bracket on the catch can is then bolted to the other end of the battery hold down clamp. Previous original vacuum hose going from the PCV valve to the intake is now connected from the engine intake to the oil catch can. Previous combination of the inline filter and the oil separator is now going from the PCV valve to the oil catch can. Initial installation was the previous weekend. Immediate difference was the lack of vapour out of the exhaust while the engine was still warming up. After a week, I have now noticed some vapour now coming out of the exhaust but it is quite minor. Also no oil in the catch can yet after only a week and about 100 kms. Planning upon posting some pictures very soon.
-
With a maintenance type battery, you can easily check the fluid level in each battery cell and top up as required. It is a different matter with a maintenance free battery but the fluid level in each battery cell will eventually go down. When this happens, the state of charge indicator will go from green to red. The attached document shows how to restore the fluid level in the battery and potentially restore the state of charge indicator back to the green. This has worked for me in restoring 2 Century Maintenance Free Batteries, one back in 2018 and one in July 2020. How to easily Fill a Century Maintenance Free Battery.docx
- 4 replies
-
- 2
-

-
- battery fluid
- refill
- (and 3 more)
-
Bank 1 is for No.1 cylinder. In the Aurion, it is the rear bank closest to the firewall. https://www.youtube.com/watch?v=Zpd-5z32ZlY Toyota Camry How do you replace a bank 1 sensor 1 A.docx
-
10 litre drums are ideal for 4WDs Engine Refill capacity for a Nissan Patrol is 10.5 litres. Only know this because my son mentioned that he uses 10 litres for an oil change. Engine Refill capacity for a Holden Commodore V6 is 7 litres and 6.8 litres for a similar Ford. 2x10 litres = 3 oil changes for the Aurion [plus occasional top ups, if required].
-
Aurion average fuel consumption approximation
campbeam replied to DJKOR's topic in Aurion / TRD Aurion Club
I will have to keep your results in mind as a benchmark. My 13.5 year old Aurion with 218K on the odometer needs a lot more servicing to get better fuel economy. Getting all ready for an interstate trip later this year assuming QLD-NSW border will be open at that time. Oh what interesting times we are now in. -
Yes that SuperCheapAuto article was interesting. The voltage reading of the brake fluid explains how the brake fluid testers work. Recent learning for me was to lubricate the brake caliper sliding pins using anti-seize copper grease. Something that I had not done in the past when changing brake pads. Now that I know, it is on the maintenance list.
-
Testing Aerospace 303 Protectant and Reduced Tyre Wear
campbeam replied to campbeam's topic in Wheels & Tyres
I was looking at the tyres this morning after driving on wet roads to a car park. I noticed that the Front tyres [newer Dunlop] looked shinier than the rear tyres [older Pirelli] even though they were both tyre shined at the same time. Just thinking that the different tyre compounds can make a difference. -
Aurion average fuel consumption approximation
campbeam replied to DJKOR's topic in Aurion / TRD Aurion Club
There is theoretical and then there is real life. For Urban driving I am aiming for 10 litres/100 kms. Not saying that I always achieve it but that is the aiming point. It all comes down to how much fun I am having driving safely within the speed limits as compared to driving for fuel economy. Recently, I had the car jacked up and thought that the rear passenger brake was dragging a bit. Rear driver wheel appeared to be spinning a bit more freely. Ended up lubricating all of the brake caliper slider pins with anti-seize grease. I think that it has made a difference so it all helps with the fuel economy. -
Aurion average fuel consumption approximation
campbeam replied to DJKOR's topic in Aurion / TRD Aurion Club
Aurion has a fuel tank capacity of 70 litres. Theoretical Fuel economy of 7 litres/100 kms = 1000kms cruising range. In the real world, I have achieved 7.838 litres/100kms on a trip Brisbane to Wagga Wagga via Newell Highway. Different year, I had 11.921 litres/100kms for a return highway journey being 5065kms. Must have been more lead footed that trip or I got some incorrect fuel figures that included a mate's motorbike. Anyway check/clean the air filter, mass airflow sensor and the throttle body for good fuel economy. -
Maybe it is not the oil impacting acceleration. In my case, I finally discovered how to properly check and clean the mass airflow sensor MAFS. Acceleration has improved and the fuel economy has improved significantly. I currently have 5W-40 in the engine mainly because I did not have 5W-30 immediately to hand at the time.
-
Immediate thought is to remove the bulb then use a hair dryer to blow hot/warm air into the headlight housing to dispel any water vapour. Expect that you will have to use some flexible piping. Best to do this on a dry, low humidity day.
-
First thought was to replace the ATF but this was presumably been done recently. Another thought is to also check the ATF level. Next thought is to check connections for an overdrive/lock button. Not sure if this is applicable to your transmission but at least it is a few starting points.
-
2000 Estima - intermittent solid engine light on
campbeam replied to 2000estima's topic in Tarago Club
Guesses can be expensive. Best to do a proper diagnosis before starting to replace parts. However, I would be inclined to start by cleaning the mass airflow sensor MAF It is a regular maintenance item so worthwhile doing. Something else you can do, is to remove the O2 sensors and clean them. Tip/trick that worked for me was to use brake fluid as a penetrating fluid when removing the O2 sensors. Got that one from the internet which was presumably posted by a Toyota mechanic based upon his experience. -
Get yourself some decent quality tyres immediately.
-
Handy information to know/remember about the security code.
-
Recent post is certainly pointing at the EGR cooler needing to be replaced/cleaned. These URLs may be relevant as a starting point. https://www.aftermarket.com.au/egr-cooler-repairs-on-the-increase/ https://www.youtube.com/watch?v=FBAwmXMAEQs https://www.youtube.com/watch?v=N4qcd9YoDoI
-
Alternator on my Oct. 2006 Aurion went after 207500km. Sounds like I bought from the same eBay seller back in March 2019. Supplied alternator ended up being the OEX brand Still going strong and currently getting a workout recharging a recent flat battery from my standby Aurion. https://www.ebay.com.au/itm/Brand-New-Alternator-for-Toyota-Aurion-GSV40R-3-5L-Petrol-2GR-FE-10-06-03-12/111372269393?fits=Model%3AAurion&hash=item19ee4df751:g:GqMAAOSwGhpe8gvH
-
This product worked for me to fix a minor coolant loss on a Mazda 2. https://www.supercheapauto.com.au/p/k-seal-k-seal-coolant-leak-repair---236ml/357729.html
-
Size of hex key (in mm) required to remove ATF drain plug on 2010 camry?
campbeam replied to al26's topic in Camry Club
6mm Allen key. Penrite Lube guide states 3.5litres. https://www.datateck.com.au/Lube/PenriteAus/ Good tip is to accurately measure the amount of ATF drained out of the transmission. This assumes that there have been no leaks. If applicable, add an extra 20-50ml to your measurement. I use a number of clear plastic bottles e.g. 2 litre juice bottles etc as measurement guides. -
Thank you for sharing your experience. Definitely agree that replacing the alternator on the Aurion is time consuming and not so simple. I followed the process in this Youtube video except that I drained the radiator first before disconnecting the radiator hose. https://www.youtube.com/watch?v=IAgFfeWbaMQ Even with the fan assembly removed, it is a juggling act for both the removal and installation of the alternator. I was also able to access the bolt on that bracket without having to disconnect an A/C line. Because it is not a simple bolt off and bolt on procedure, it is worth paying the extra for a quality alternator.